Findings That Apply to Individual Tanks
Below is the meat and potatoes of this body of work: the tank stats. The following measurements were done using AP rounds at a distance of 100-200m. In Update 12, as in previous updates, the distance between the tank that is firing and the target tank has no effect on damage.
Before we get into the individual tank sections, it’s important to note one important thing about Update 12. As I have mentioned before in this guide, tanks have been standardized based on class (barring a few exceptions which are mentioned below). This means that for the most part, heavies kill other heavies in 2 shots anywhere in the body or turret and kill mediums, lights, and recons with 1 shot anywhere in the body as well. Mediums cannot penetrate heavies from the front, typically kill other mediums in 2 shots to the body and can kill lights and recons in 1 shot anywhere in the body. Light tanks and recon vehicles can only penetrate heavies and mediums in the rear, but can penetrate other tanks of the same class in their bodies. This standardization has helped remove a lot of the buggy hitboxes we have seen in previous iterations of the game, which means the statistics below are reproducible and accurate.
Medium and heavy tanks now deal the same damage to trucks and halftracks in Update 12—1 shot anywhere except in the canvas of a supply truck with AP or HE (the canvas on a supply truck is a non-penetrating surface for some reason).
4.1 Recon Vehicles
Section titled “4.1 Recon Vehicles”As a result of the standardization brought about by Update 10, all recon vehicles in Hell Let Loose are functionally identical, both in terms of how other tanks interact with them and how they interact with other tanks. For this reason, I have saved everyone time by putting all 3 recon vehicles in the same section.
All recon vehicles share the same basic features—quick turn speed, automatic transmission, high top speed, a weak main gun, and paper-thin armor. This makes them great for maneuvering and flanking around the battlefield (as well as driving your recon players to the enemy artillery) but not much else. Their firepower leaves a lot to be desired, and they can only do damage to enemy medium and heavy tanks from the rear. Before we get into the general statistics, let’s take a look at the characteristic features that will allow you to spot these easily in game:
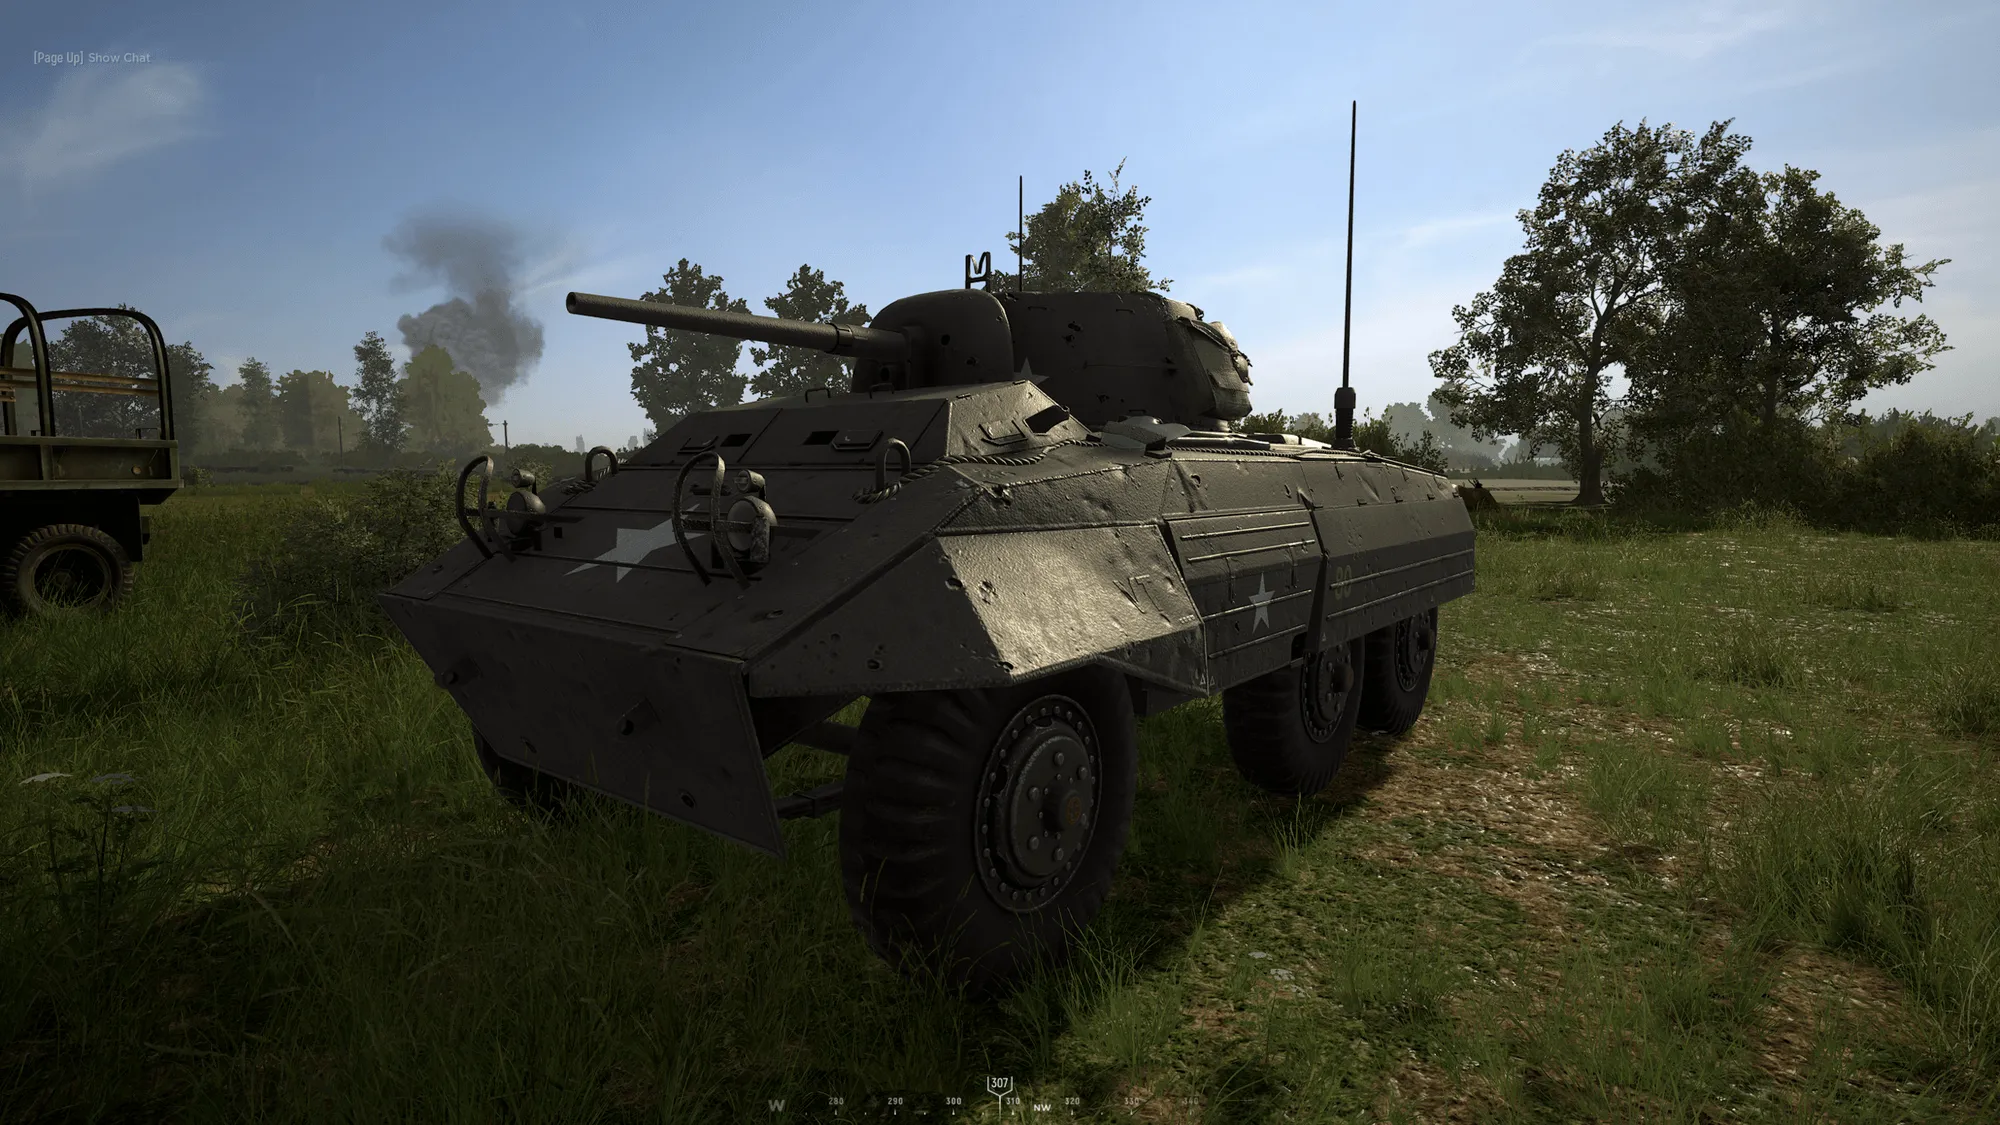
Figure 33: “The M8 Greyhound”
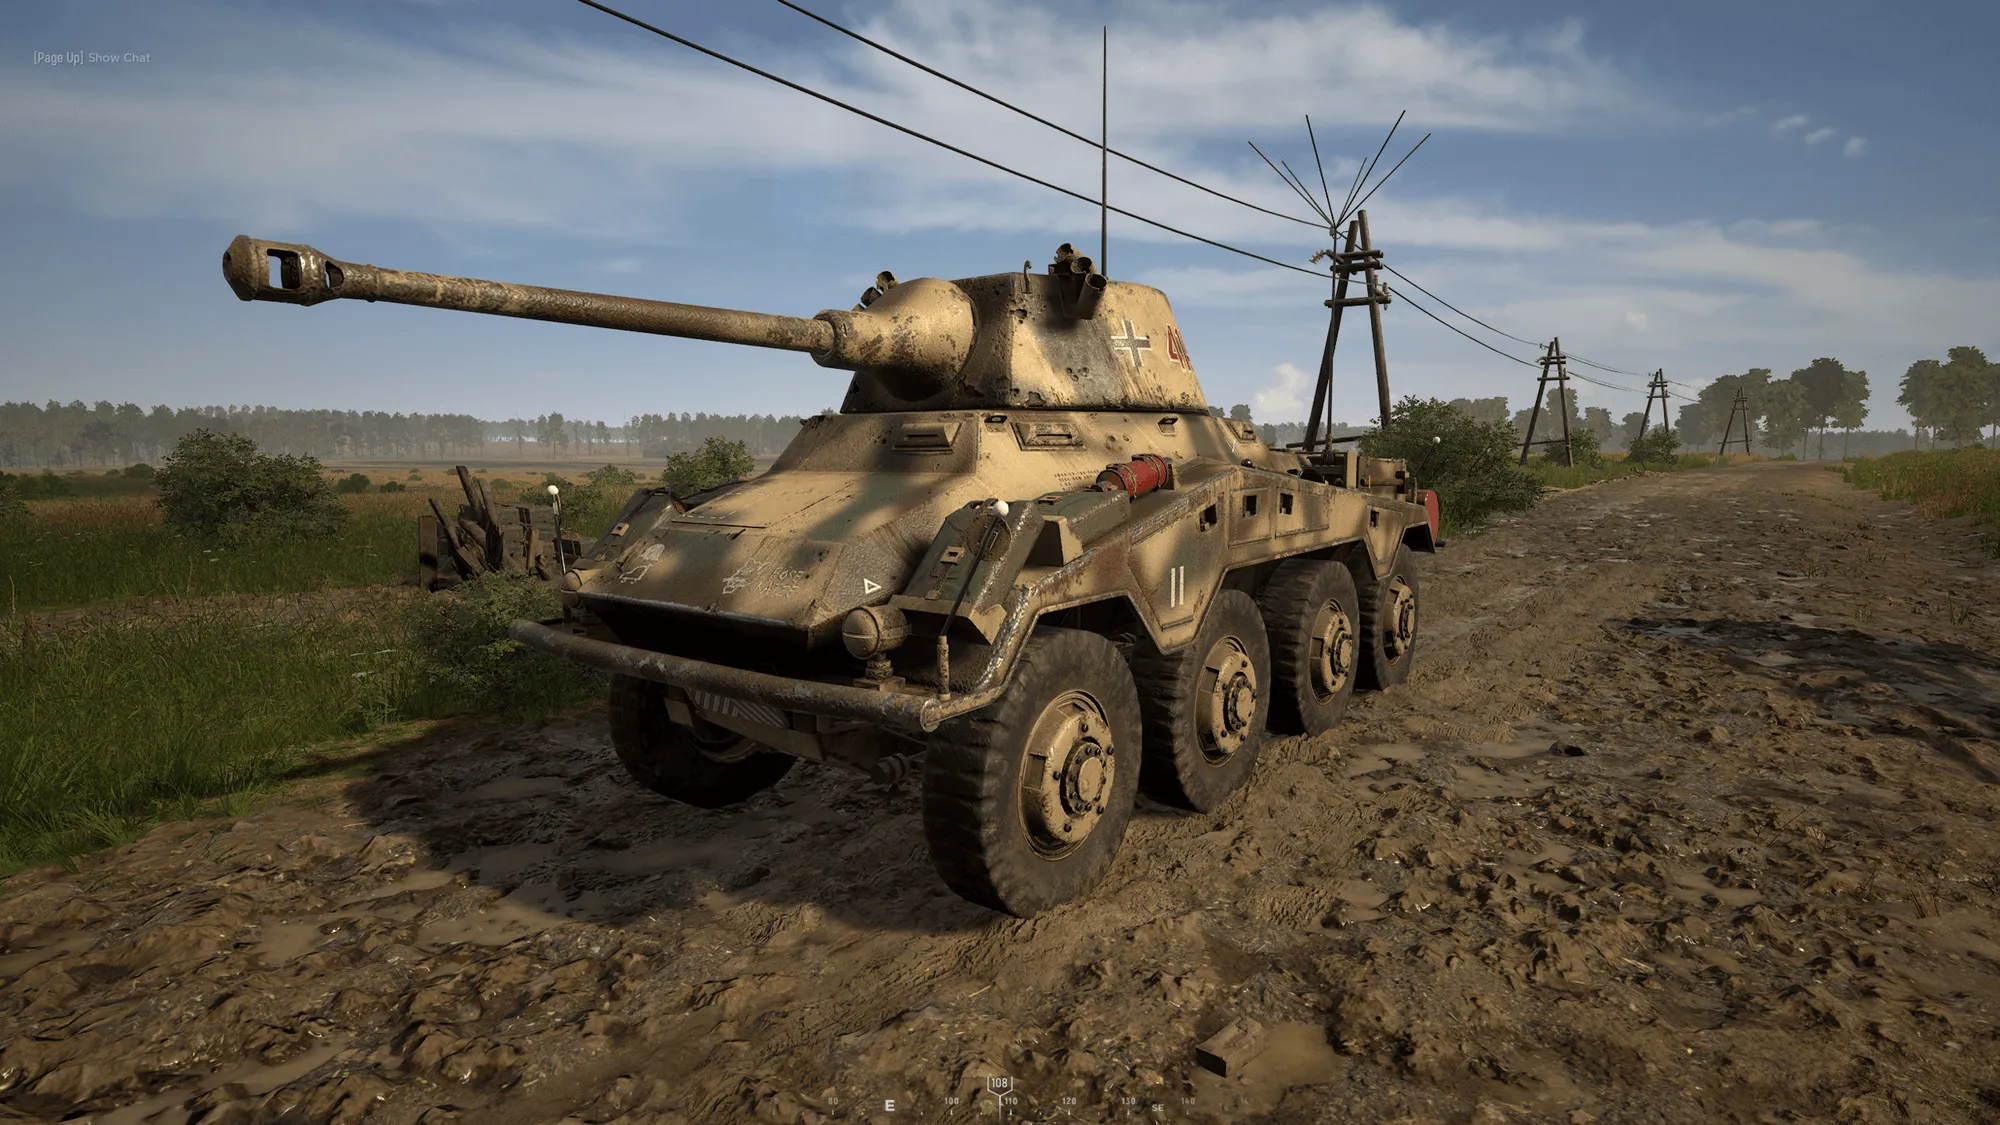
Figure 34: “The Puma”
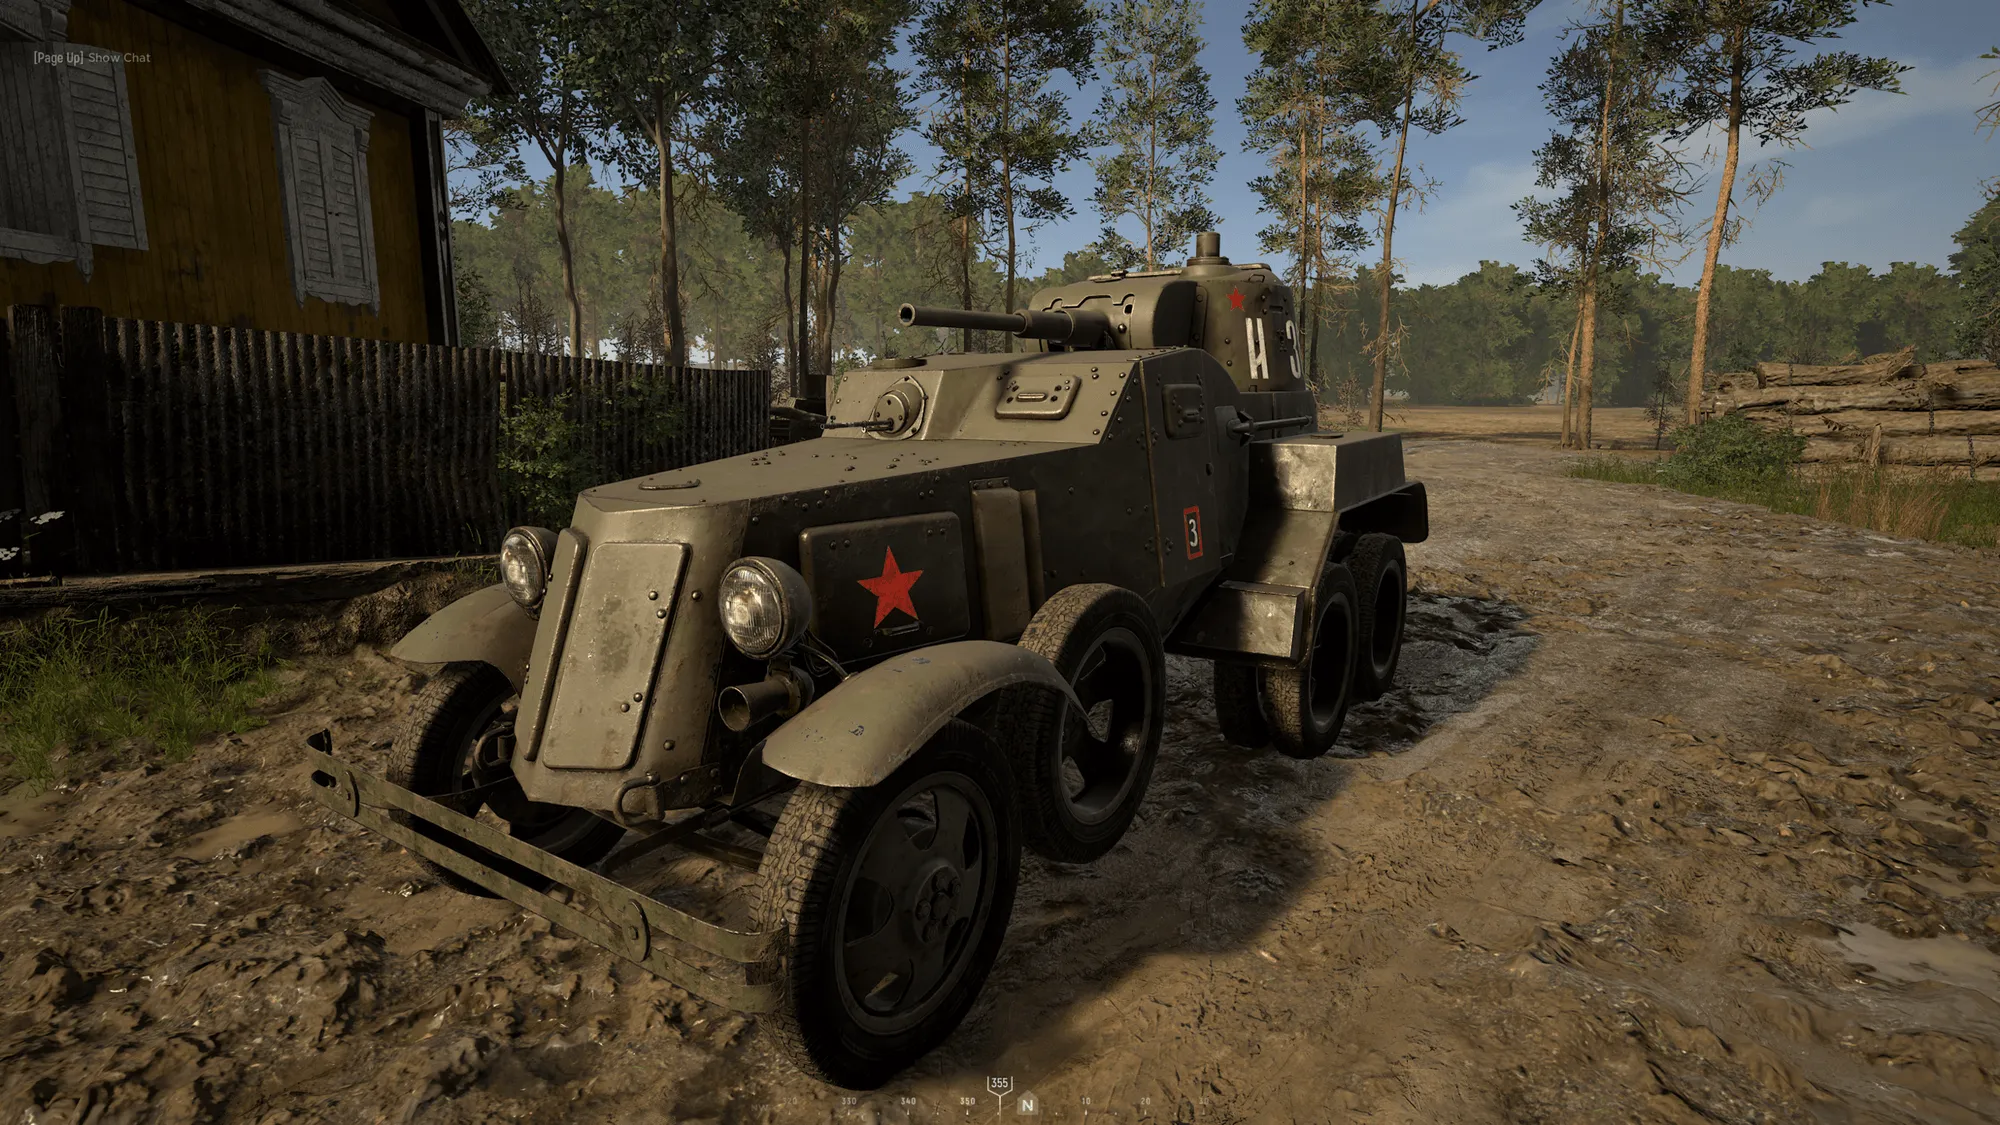
Figure 35: “The BA-10”
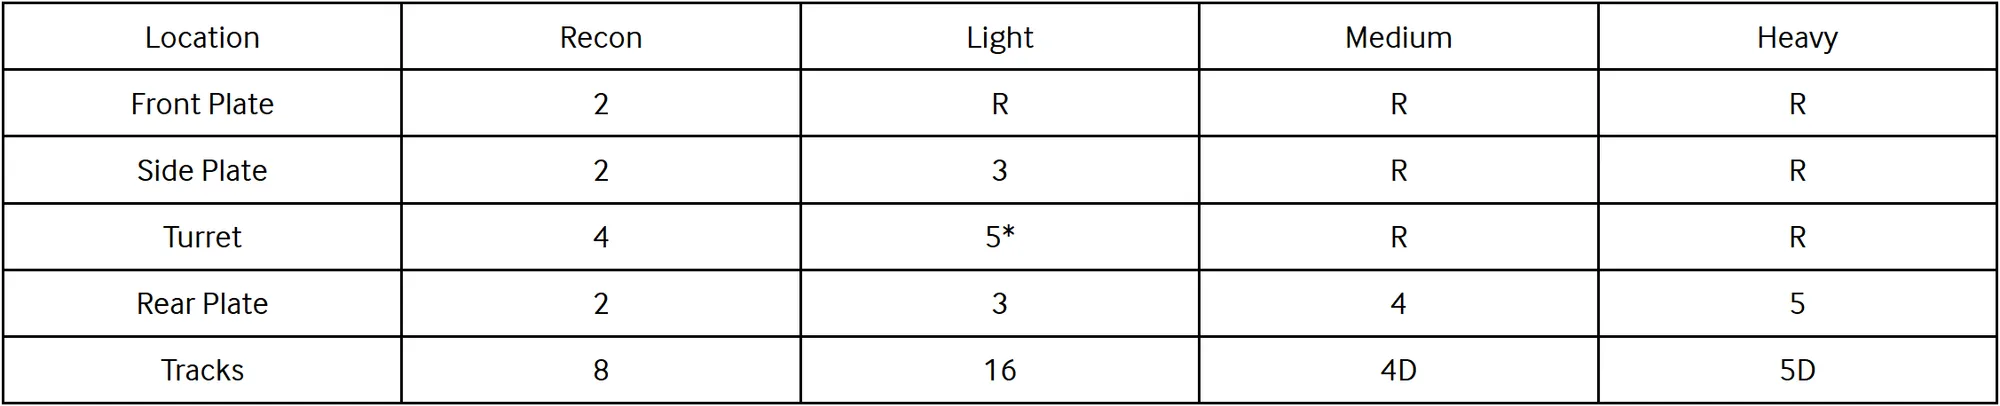
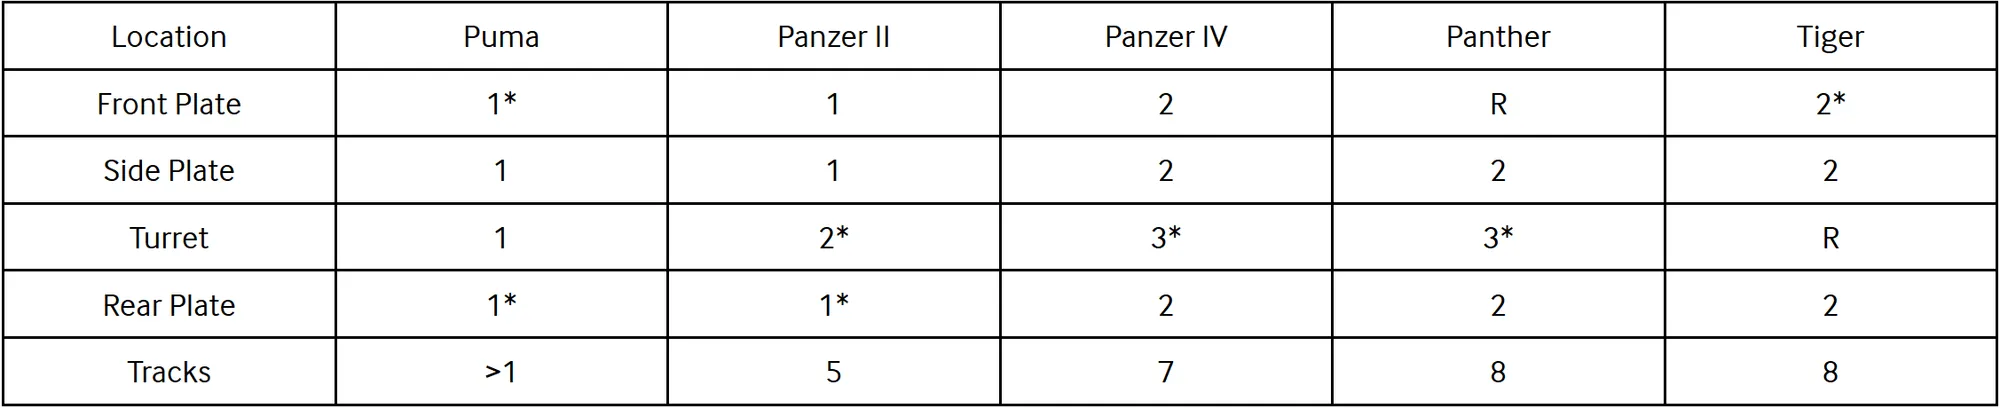
R - Ricochet or non-penetrating hit
#D - # shots to disable module (no hull damage), after which becomes non-penetrating hit
#* - # shots can only be achieved under specific circumstances or in special areas
When engaging a truck or halftrack:
- HE rounds will kill these vehicles anywhere in the body or tires in just 1 shot. AP rounds, on the other hand, require 2 shots to the engine and 4 shots to the body in Update 12, so just use HE if you can.
When engaging another recon vehicle:
-
If you can, load HE before engaging another recon vehicle. Recon HE rounds can destroy other recon vehicles in 1 shot unlike AP shells which take 2 shots (why this is in the game is a serious question for the developers). Aim for any part of the body or turret—try not to hit the tires since the other recon vehicle can also kill you in 1 shot with HE.
-
If you cannot load HE, AP will do the trick in 2 shots to the body. Again, do not aim for the turret or tracks.
When engaging a light tank:
-
Shooting the front plate or turret mantle will ricochet.
-
If you have access to a light’s rear, 1 shot of HE will destroy it instantly (AP takes 3 shots, don’t ask me why). HE will not penetrate any other surface except the rear though.
-
Shooting the side or rear plates will kill it in 3 shots of AP.
-
The side or rear of the turret can be utilized to kill in 5 shots.
-
Care should be taken to avoid the turret and tracks if possible, as hitting these will take longer to kill the tank.
When engaging a medium tank:
-
Hitting any front plate, side plate, or turret shots will never penetrate. There is no reason why you should be aiming for these anyways.
-
The tracks can be completely disabled in 4 hits, but this will deal no hull damage and you cannot kill the tank this way.
-
It is inadvisable in general to engage a medium tank unless you can see it’s rear, and even then it’s situational. The back plate will kill it eventually, but requires getting around it in the first place and staying long enough to at least disable the engine (3 shots of AP or HE) which is difficult.
-
HE does not penetrate mediums anywhere (except tracks, which you can only disable without hull damage)
When engaging a heavy tank:
-
Any shots to the front plate, side plate, or front, side, or back of the turret will not penetrate.
-
The tracks cannot be used to kill the heavies. You may disable the tracks in 5 shots of AP or HE, but none will do hull damage. This is not advantageous to do even if the heavy does not see you or cannot otherwise see you. A good heavy crew will figure out where you are and wipe you off the face of the earth with 1 shot because you have given your position away.
-
You should generally avoid engaging heavies solo because in Update 12 it takes too long to kill them. It is better to pepper and annoy the enemy heavies with your presence without actually engaging them so that they are distracted, allowing your friendly tanks and infantry to move up and gain position. If you must engage a heavy, you should only do so if you can see its back plate and are in a position where you can easily back out of the engagement. With the recon vehicle’s quick reload speed and a bit of luck, you may be able to kill its engine (3 shots) and then finish the job.
Opinion: Because all recon vehicles are identical, their purposes on the battlefield are the same—to provide reconnaissance of enemy tanks, trucks, garrisons, and infantry positions for your team, as well as work in tandem with heavier friendly tanks to flank, disable, and destroy those tanks and trucks. This is a very high-risk, high reward playstyle—even just a light sneeze is enough to make a recon vehicle’s armor crumple like a napkin. On the other hand, if you can break through the enemy infantry and tanks and get around to the flank you can provide massive value to your team in the form of disruption of the enemy backline. Trying to play recon vehicles like you might play a medium or a heavy tank by locking down an area and shelling infantry will get you killed.
4.2 The American Tanks
Section titled “4.2 The American Tanks”The M5 Stuart light tank is a small and mobile tank that can run circles around heavier tanks like the Tiger and “Jumbo”s. Although its firepower is weak in comparison to even the Sherman medium (as mentioned before it has equivalent firepower to the “Bazooka”), its mobility and versatility allow this tank to rise to the top of a lot of veteran tankers’ preferences.
That being said, what does a Stuart look like? The Stuart has the following outstanding features (Figure 36):
-
A small overall build—this tank is one of the smallest in the game.
-
The plate towards the back and sides forms a boxy shape behind the turret.
-
There are curved plates over the tracks on either side of the front plate.
-
Yellow letters and numbers on the side.
-
A striking resemblance to Thomas The Tank Engine (Figure 37).
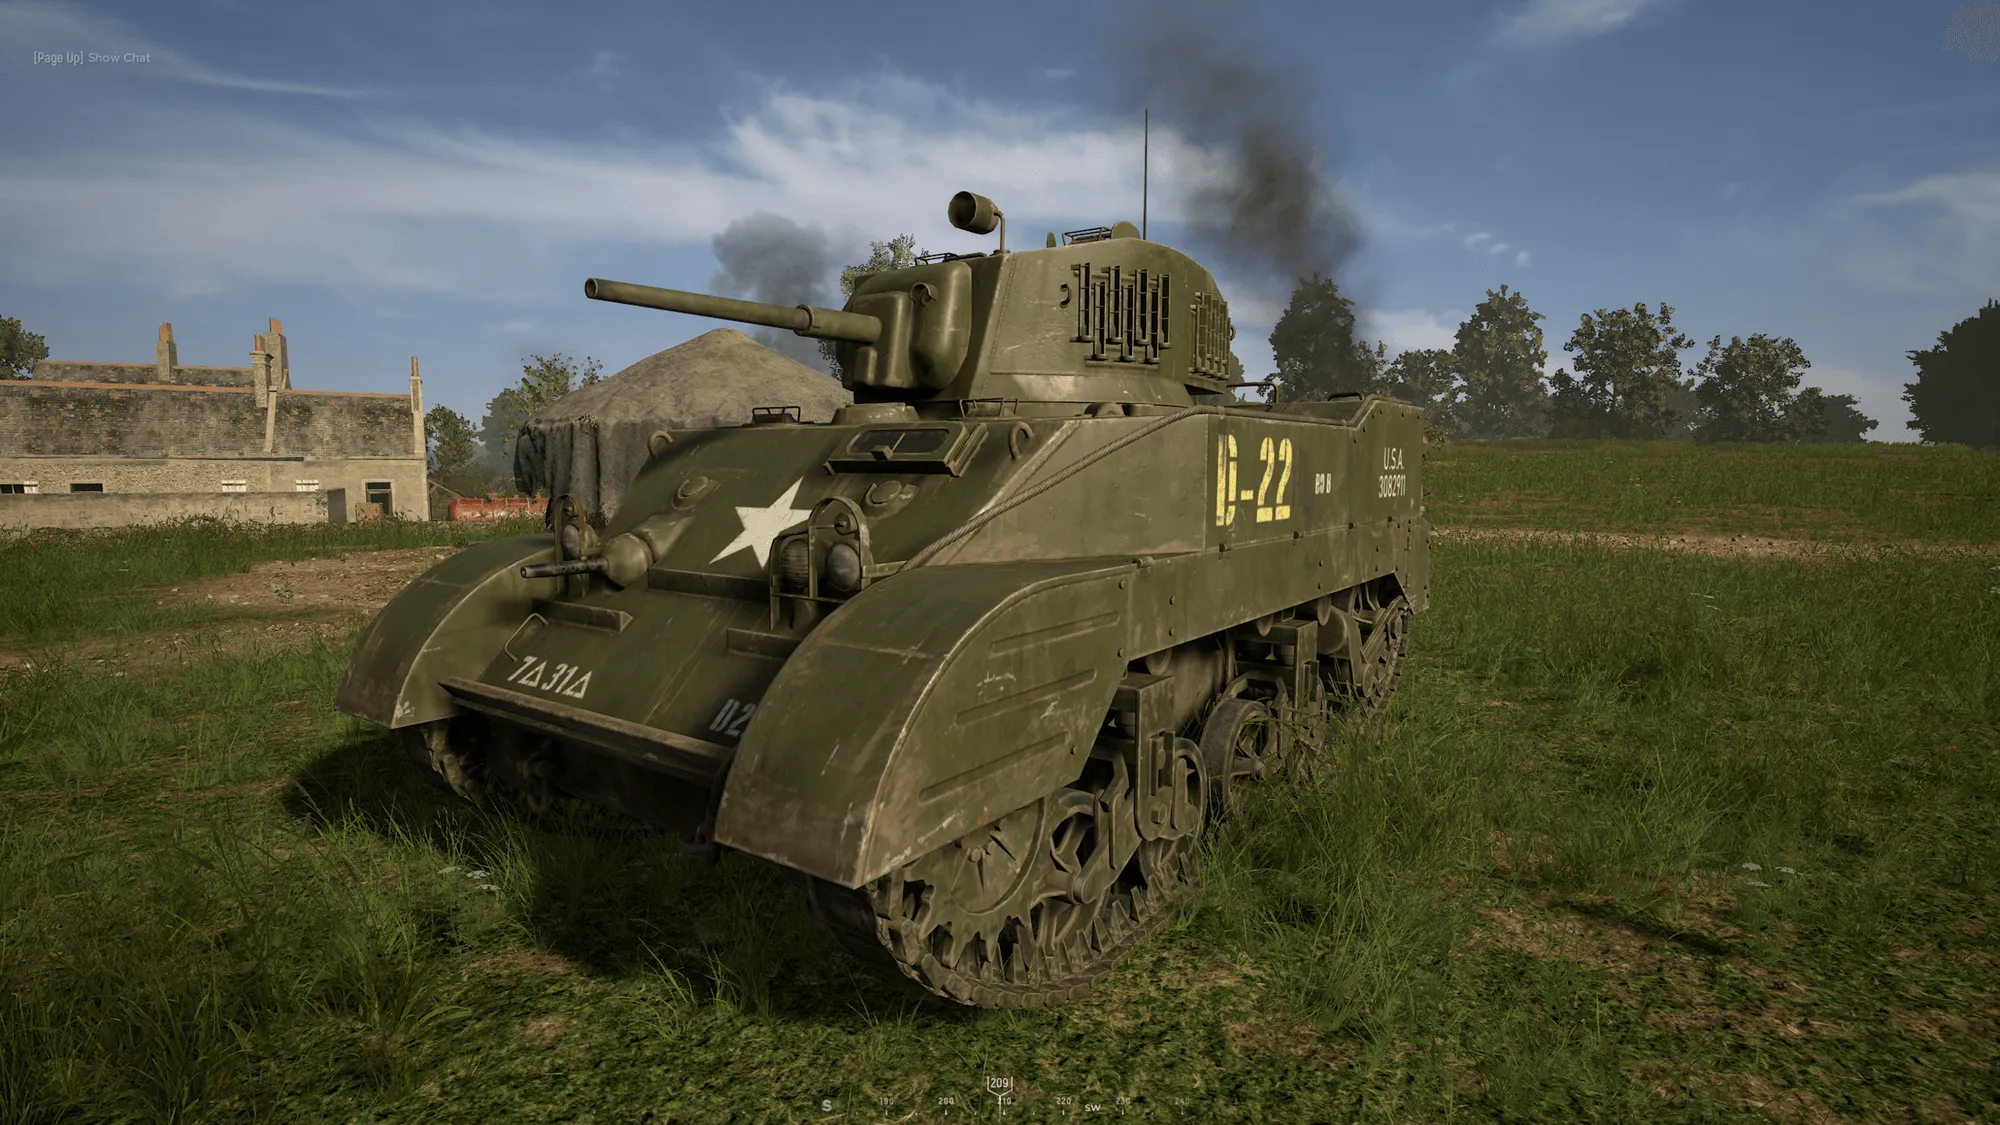
Figure 36: “The M5 ‘Stuart’ Light Tank”
Figure 37: “Thomas The Tank Engine”
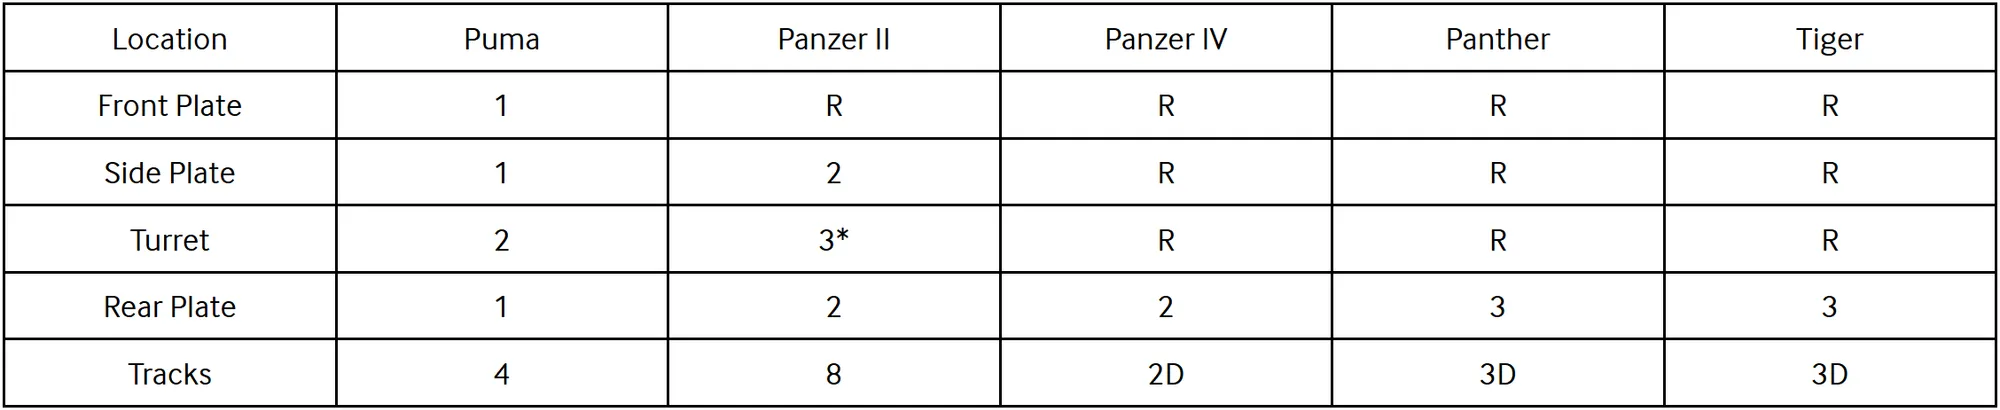
R - Ricochet or non-penetrating hit
#D - # shots to disable module (no hull damage), after which becomes non-penetrating hit
#* - # shots can only be achieved under specific circumstances or in special areas
When engaging a Puma:
-
Using HE is more effective than AP and is the recommended way to deal with enemy recons as a Stuart. This is because HE kills enemy recon vehicles in 1 shot in the body and the turret, giving you more options in the field to quickly dispatch them.
-
Care must be taken not to hit the stoplights on either side of the rear or the gas canisters on top of the side skirt on either side of the front plate because these areas are bugged and will not penetrate (see section 4.5.3 for more on this).
-
If you are using AP, aim for any part of the body—try not to hit the turret or tires since this will take longer to kill it, and it may be able to run away to safety because of its quick speed.
When engaging a Panzer II:
-
Shooting the front plate or turret mantle (which covers the whole turret from the front) will ricochet.
-
If you are engaging a Panzer II and can only see its front plate and mantle, you can actually ricochet AP rounds into the top of its chassis by shooting the lower half of the turret mantle, allowing the Stuart to 2 shot it from the front. This shot is a bit tricky especially if the Panzer II is moving or currently blasting you, but with some practice you can start doing it consistently.
-
Shooting the side or rear plates will kill it in two shots, and if hitting the rear, the engine is disabled in 1 shot (there are some impenetrable regions on the rear of the tank, make sure to check section 4.5.4 for more on this). This is always the best option if you have the angle.
-
Care should be taken to avoid penetrating the turret or tracks if possible, as hitting these will take longer to kill the tank.
When engaging a Panzer IV:
-
Hitting any front, side, or turret shots will always ricochet. There is no reason why you should be aiming for these anyways.
-
The tracks can be completely disabled in 2 hits, but this will deal no hull damage and you cannot kill the tank this way.
-
It is inadvisable in general to engage a Panzer IV unless you can see it’s rear. The back plate will kill it quickly, but requires getting around it in the first place.
-
To damage the engine of a Panzer IV, care must be taken to aim at the section of the rear with the cylindrical canister. Anywhere else will only deal hull damage (Figure 26).
When engaging a Panther:
-
Any shots to the front plate, side plate, or front, side, or back of the turret will not penetrate.
-
The tracks cannot be used to kill the Panther. You may disable them in 3 shots, but none will do hull damage. This is not advantageous to do even if the Panther does not see you or cannot otherwise see you. A good Panther crew will figure out where you are and wipe you off the face of the earth with 1 shot because you have given your position away.
-
You should only engage a Panther if you can see its back plate. With the Stuart’s quick reload speed, you should be able to kill its engine relatively quickly (2 shots) and then finish the job. The Panther has a slow turn speed in 1st gear or reverse compared to the Tiger or Panzer IV, so you (counterintuitively) stand a better chance of killing enemy Panthers if you can get the drop on them.
-
There are areas of the Panther rear that are impervious to damage. See section 4.5.6 for more on where these are located.
When engaging a Tiger:
-
Any shots to the front plate, side plate, or front, side, or back of the turret will not penetrate.
-
The tracks cannot be used to kill the Tiger. You may disable them in 3 shots, but none will do hull damage. This is not advantageous to do even if the Tiger does not see you or cannot otherwise see you. A good Tiger crew will figure out where you are and wipe you off the face of the earth with 1 shot because you have given your position away.
-
You should only engage a Tiger if you can see its back plate. With the Stuart’s quick reload speed, you should be able to kill its engine relatively quickly and then finish the job. Tigers can turn very quickly in 1st gear or reverse, so you need to make sure you are landing every single shot after you give away your position or else a good Tiger crew will be able to quickly turn and close off the angle you have on their rear plate, ensuring your death.
-
There are areas of the Tiger rear that are impervious to damage. See section 4.5.7 for more on where these are located.
Opinion: In conclusion, the M5 Stuart light tank is a very interesting specimen. Depending on your playstyle as a tanker this could be the best tank in the game or the worst. The Stuart’s strengths lie in getting behind enemy lines and around enemy tanks, as well as destroying enemy garrisons and trucks in the backline, much like the Greyhound. It differs from the Greyhound however in that it has greater armor all around, which means that the Puma and Panzer II cannot damage it in the front plate or front turret, it takes 2 “Panzerschreck” AT rockets to kill, and can take 2 shots instead of 1 from the Panzer IV if it happens to shoot the Stuart’s turret (not to mention that it cannot use HE to kill the Stuart except from the rear). This greater protection does come at a small cost to maneuverability, but the Stuart’s low weight can be used to mitigate this through the agility techniques outlined in section 2.6.2. On top of that, the greater firepower with respect to the Greyhound afforded to the Stuart in Update 12 makes the Stuart a strictly superior tank to the Greyhound. The high top speed, good turn rate, better protection than a recon vehicle, and quick reload speed of the Stuart lets this tank keep enemies on their toes. Flanking is the soundest strategy, as a frontal assault against any other tank will get you killed 99% of the time. This is not a tank that should be used to sit in a position like the Shermans and lock down an area against enemy infantry. You have mobility, use it!
4.2.2 The M4A1 Sherman “Medium” Tank
Section titled “4.2.2 The M4A1 Sherman “Medium” Tank”Surprise surprise folks, the Sherman medium is back to being a hunk of garbage—just like it was always meant to be. After a long history of being the worst medium tank (and possibly the worst tank outright) in Hell Let Loose, there was a brief stint in Update 11 where the Sherman medium was stronger than the Panzer IV in head to head engagements and could do some damage during the first minutes of the game, propelling it from the depths of hot garbage into the dull light of mediocrity. That has all changed with the introduction of a brand new version of the Sherman medium in Update 12, complete with a new hitbox and new textures. Compared to the Update 11 variant, the new Sherman medium features (somehow) worse handling, a way more vulnerable front and side plate, less HE and AP ammo, a giant obstruction on the top of the tank turret that blocks the spotter’s field of view, and Rinky-Dink™ smoke rounds that dissipate in mere seconds, all while retaining the old Sherman medium’s many weaknesses.
Lovely! So how do you recognize the Sherman medium amongst the billions of other types of Shermans? The Sherman medium sports the following features (Figure 38):
-
A short, almost chubby, smooth cylindrical barrel with no muzzle brake on the end.
-
Hades written on the side of the barrel.
-
No equipment hanging off the side.
-
A giant white star on its side armor.
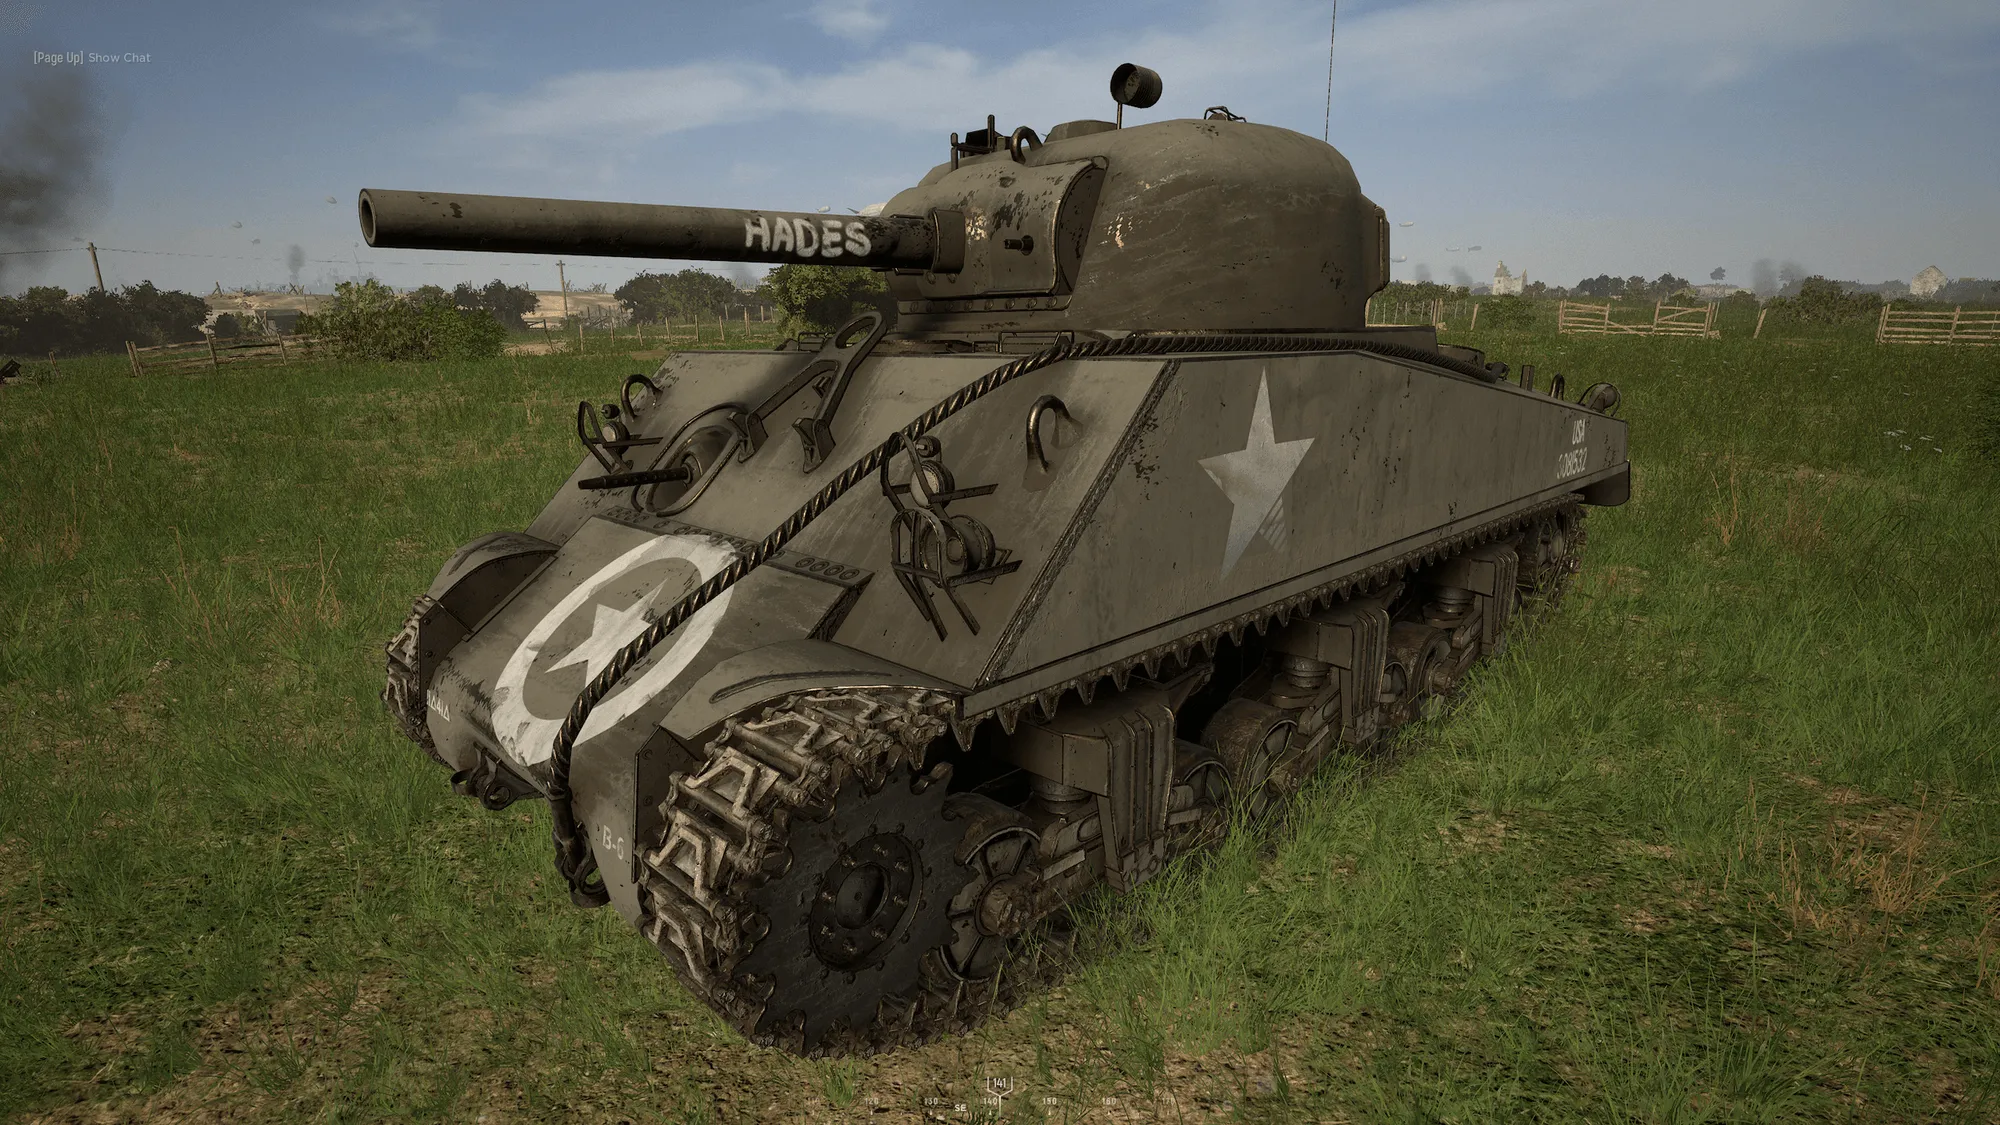
Figure 38: “The M4A1 Sherman Medium”

Notice that the new Sherman variant contains 13 rounds of the smoke variety. Smoke rounds coming from tanks have been changed in Update 12—these new smokes are slightly bigger in size and thicker in density than infantry smokes but last about as long, making them quite a bit less useful than the old “Jumbo” 75mm or artillery smoke varieties. They can still be utilized to moderate effect if your infantry is trying to push a specific area of the map or to blind enemy tanks temporarily and force them to move, but they dissipate very quickly so their uses are situational.
Another huge change for the medium is the reduced AP and HE ammunition. In a normal match, this means that you are running out of HE ammunition by the end of the opener of the game, assuming you are still alive, and that can make it problematic to be effective for longer periods of time against both infantry and tanks like other tanks can.
The next table shows the new medium’s turn speeds at different gears:

One thing to note here is that the new medium’s hitbox makes it difficult to drive over uneven or obstacle-ridden terrain in Update 12. This is because the front of the tank easily gets stuck on rubble piles, berms, and other garbage, forcing you to downshift all the way to 1st gear to get over these things. If you are intent on going over a berm or mound in this thing, get ready to hit it at a 45 degree angle at least if you want to stay in 4th gear.
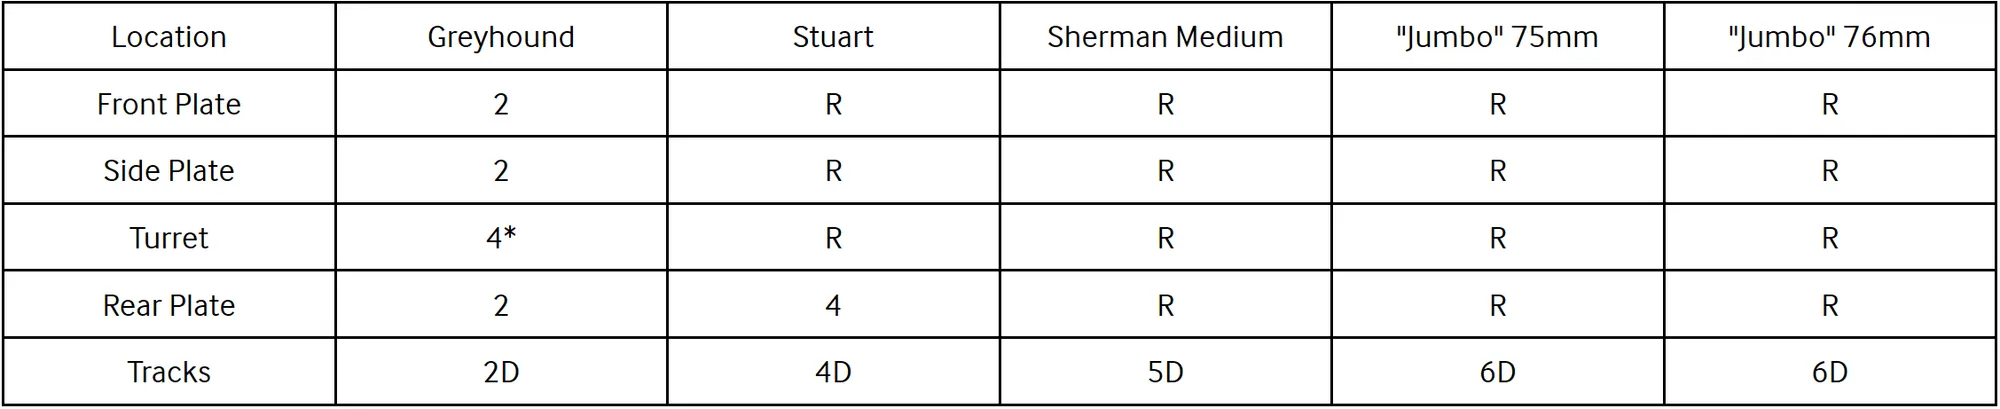
Next, here is the amount of shots it takes to kill enemy tanks of different types when shooting rounds from a Sherman medium:
R - Ricochet or non-penetrating hit
#* - # shots can only be achieved under specific circumstances or in special areas
Based on these statistics, we can extrapolate the optimal place to hit each tank as follows.
When engaging a Puma:
-
Aim for the center of the body or the turret for a 1 shot kill. Care must be taken not to hit the stoplights on either side of the rear or the gas canisters on top of the side skirt on either side of the front plate because these areas are bugged and will not penetrate (see section 4.5.3 for more on this). You may use an HE shell if you wish to conserve AP shells, since they will also 1 shot everywhere.
-
Avoid hitting the barrel or the base of the barrel, this will only do barrel damage (and it will not kill the tank).
-
Hitting the wheels will take longer than 1 shot. Avoid them.
When engaging a Panzer II:
-
Make certain to hit anywhere in front, side or rear plates, as it is always a 1 shot kill.
-
Make certain not to hit the tracks or the turret, as this can increase the shots it takes. The turret mantle is also impenetrable. You can ricochet into the top of the Panzer II chassis by aiming for the bottom half of the turret mantle for a one shot.
-
Do not shoot the top half of the fuel canisters on either side of the turret as well as the back of the side skirt on the rear of the tank as these areas are bugged and do not penetrate. For more on this, see section 4.5.4.
-
Since the Panzer II cannot do any real damage to you in a Sherman medium, it is not a foe you should be worried about.
When engaging a Panzer IV:
-
Just like the “Jumbo” 76mm vs the Tiger, the medium Sherman will penetrate the Panzer IV anywhere in the front, side, or rear plates for a 2 shot kill.
-
Trying to kill the Panzer IV by hitting the tracks is impossible from the front and inadvisable from the side, as it takes many shots to do so and the turret or side takes less shots to kill.
-
Hitting the turret is a viable approach to killing a Panzer IV whose body is obscured from view, but care must be taken not to hit the barrel or the small mantle either side of it as this will not penetrate. Left/right of the mantle, or side/rear of the turret will kill the tank in 3 hits.
-
If you want to engage a Panzer IV, try to position yourself so that you can hide your front plate and only show your turret. Your turret can be penetrated by the Panzer IV from the front, but hiding your body will force the Panzer IV to take one more shell to kill you, thereby securing your kill if you are shooting the Panzer IV’s body. Hard cover or hills on maps like Foy will allow you to do this.
-
The Achilles Heel shot is viable. Since the Sherman medium can penetrate the side plate of the Panzer IV, both the red and green outlines are penetrable and both will disable the engine in 1 shot (Figure 23). Hitting the red outline is relatively simple, provided you are at the right angle—aim for the space above the tracks and below the side skirt towards the rear of the side of the tank.
-
As with any other medium, 2 shots to the back plate at most angles will kill it. The first shot disables the engine if aimed at the canister (Figure 26).
-
There are some locations where the Sherman medium cannot penetrate the Panzer IV. For more on where these are located, see section 4.5.5.
When engaging a Panther:
-
Any shots to the front plate will not penetrate.
-
Side and rear plates can be penetrated for a 2 shot kill. If hitting rear, 1 shot will kill the engine and render the Panther immobile. If you are lucky enough to be in a position where you see the side armor of the Panther, 2 shots will kill the tank as long as the projectile lands at an angle less than 55 degrees with respect to the perpendicular of the side armor (35 degrees with respect to the front plate). A greater angle than 55 degrees will bounce. Care must also be taken not to aim too low when attempting to hit the side armor. The top half of the side skirt that extends over the tracks penetrates the side plate for hull damage, and the bottom half penetrates tracks.
-
While the front mantle and cupola of the turret are impenetrable by the Sherman medium, the turret can still be penetrated from the front by shooting the small triangular corners, or “cheeks”, of the Panther’s turret either side of the mantle (Figure 39). Hitting the side or rear of the turret will also penetrate, and both of these shots kill the Panther after 3 rounds. While this can be done in a regular game, it’s extremely rare that a Panther who isn’t already damaged will allow a Sherman medium to unload 3 AP rounds into its turret without blowing it up in 1 shot, so this should only ever be done in emergency cases or if there is no other choice.
-
The Sherman medium can hit the Achilles Heel shot to kill the Panther’s engine instantly. Both the green and red sections of the shot work, and the red section in particular—which is just the top half of the side skirt of the Panther towards the rear of the tank—deals hull and engine damage at the same time and is really straightforward to hit. The Achilles heel is the recommended way to engage Panthers if you are at the correct angle so that they do not have the chance to turn around.
-
You can use your smoke rounds to disengage from or temporarily blind enemy Panthers you are engaging with. This allows you to safely reposition your tank to avoid getting killed by a Panther, or to force the Panther to move from its entrenched position.
-
Take care not to shoot some specific locations, outlined in section 4.5.6 that will not penetrate the Panther when hit.
📹 Figure 39: “Sherman Medium Penetrating Panther ‘Cheeks’” — watch clip on YouTube
The shot that allows the medium Sherman (or indeed the “Jumbo” 75mm or the T-34/76) to kill a Tiger from the front is a little tricky to land, but if done correctly can kill it from the front in only 2 shots. The shot itself is likely a bug not intended to be in the game, but the basic idea is that you can ricochet a shot off of the bottom of the turret mantle below the barrel into the top of the chassis for a penetrating hit (Figure 40). To do this, aim to land the shell anywhere along the bottom of the mantle, right above the turret ring (at 100m, for example, the Sherman crosshair’s horizontal line should be in line with the very bottom of the mantle). Below is an example of this shot in action (Figure 42).
There are two major caveats to the front plate Tiger shot. The first is that in order to consistently land it the Tiger must be pointing its barrel directly at your tank. When the Tiger’s barrel is off to the left or right with respect to your tank, the shots may or may not land depending on the elevation or depression of the Tiger’s barrel and the difference in elevation between both tanks. If the Tiger’s barrel is pointing upwards, the shot will be easier to land since you will have a better angle on the surface of the underside of the mantle needed to make the shot. If instead the Tiger’s barrel is facing downwards with respect to your tank, the shot becomes impossible to hit. That being said, you can still land the shot even if the barrel is not turned towards you if you are close enough or are in an advantageous position (on high ground, for instance), as shown in Figure 43.
The second caveat is distance. Not only is it harder to hit such a small target at longer ranges, but after about 300m, the trajectory of the shell makes the shot impossible to hit. This is because the shell’s acceleration due to gravity makes it fall more and more the farther it travels, meaning that the gunner must aim higher by greater and greater amounts as distance increases. This creates an arc in the shell’s trajectory, instead of a relatively straight line, which makes the shell ricochet off of the bottom of the mantle at an angle that hits the turret ring (which is impenetrable) instead of the top of the chassis. In other words, past approximately 300m the shot becomes impossible to hit no matter how accurately you fire the projectile. This is illustrated in the following wonderfully hand-crafted definitely legit ms paint diagrams (Figures 40 and 41):
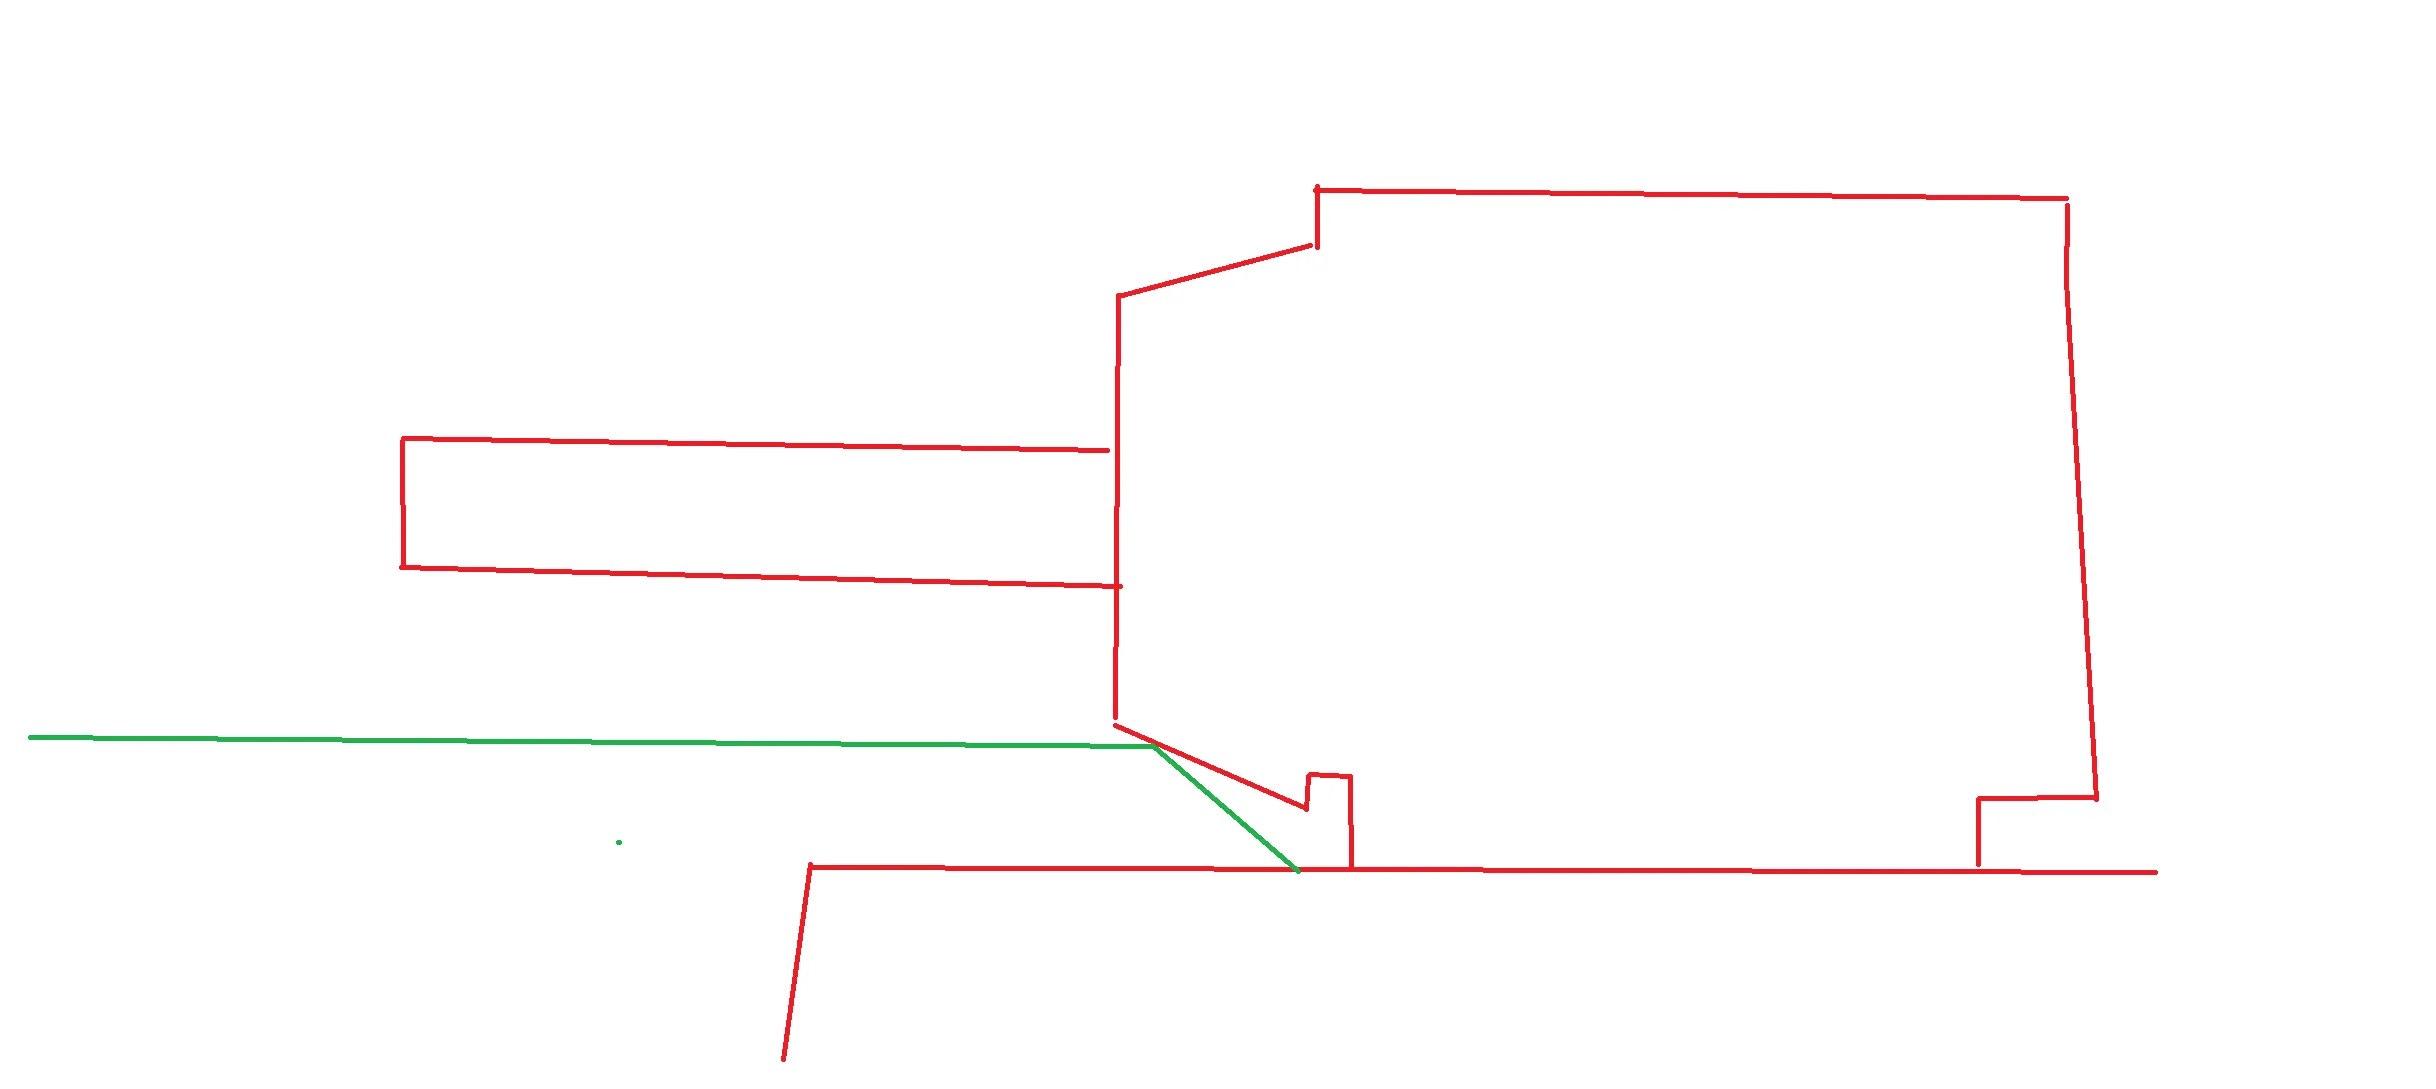
Figure 40: “Front Plate Tiger Shot at 100m”
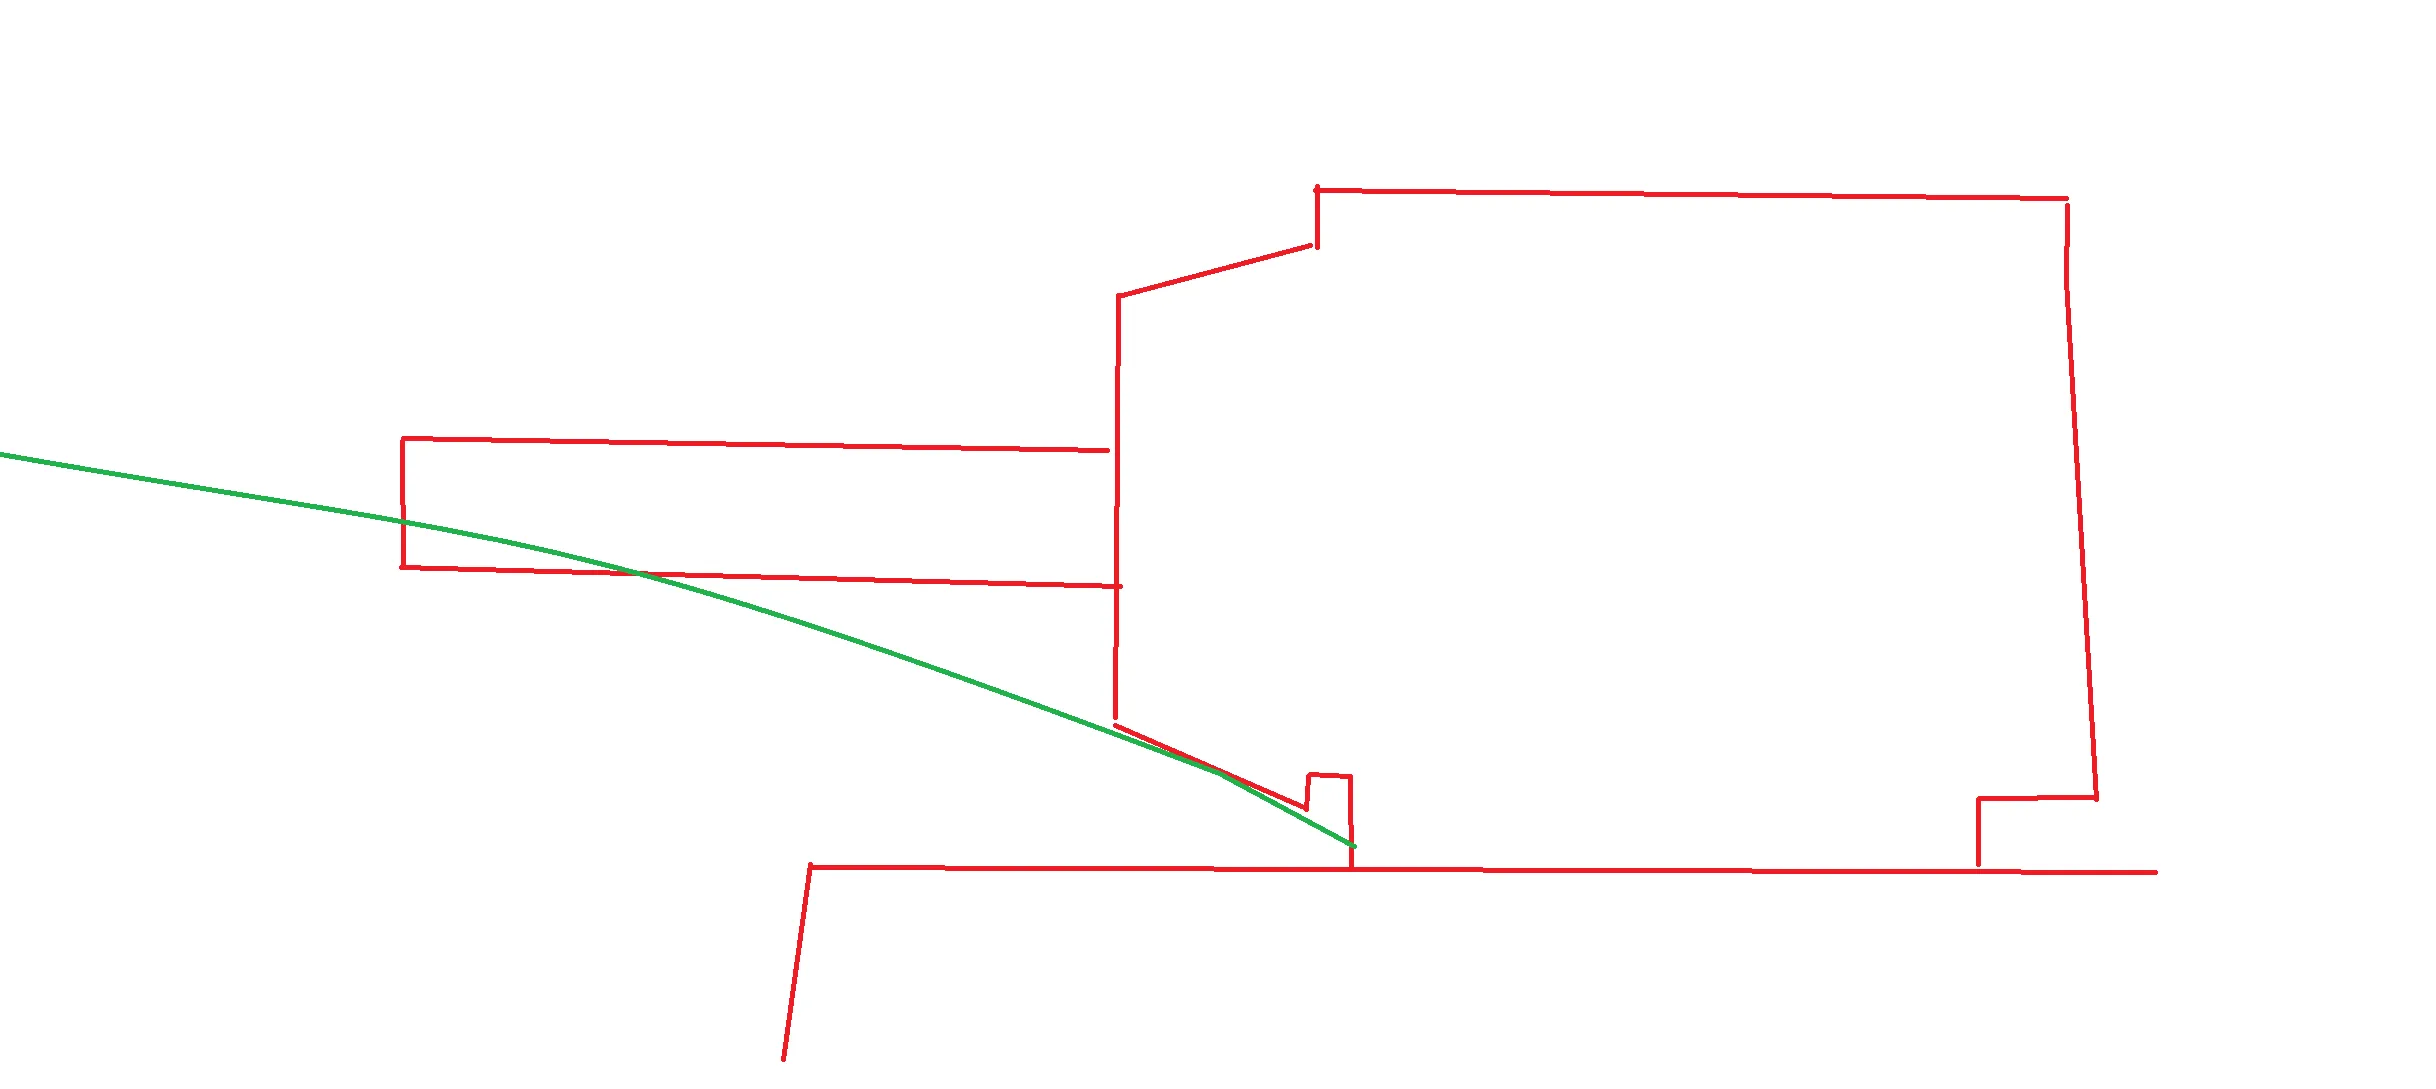
Figure 41: “Front Plate Tiger Shot at 400m”
📹 Figure 42: “Front Plate Tiger Shot, Barrel Straight” — watch clip on YouTube
📹 Figure 43: “Front Plate Tiger Shot, Barrel Angled” — watch clip on YouTube
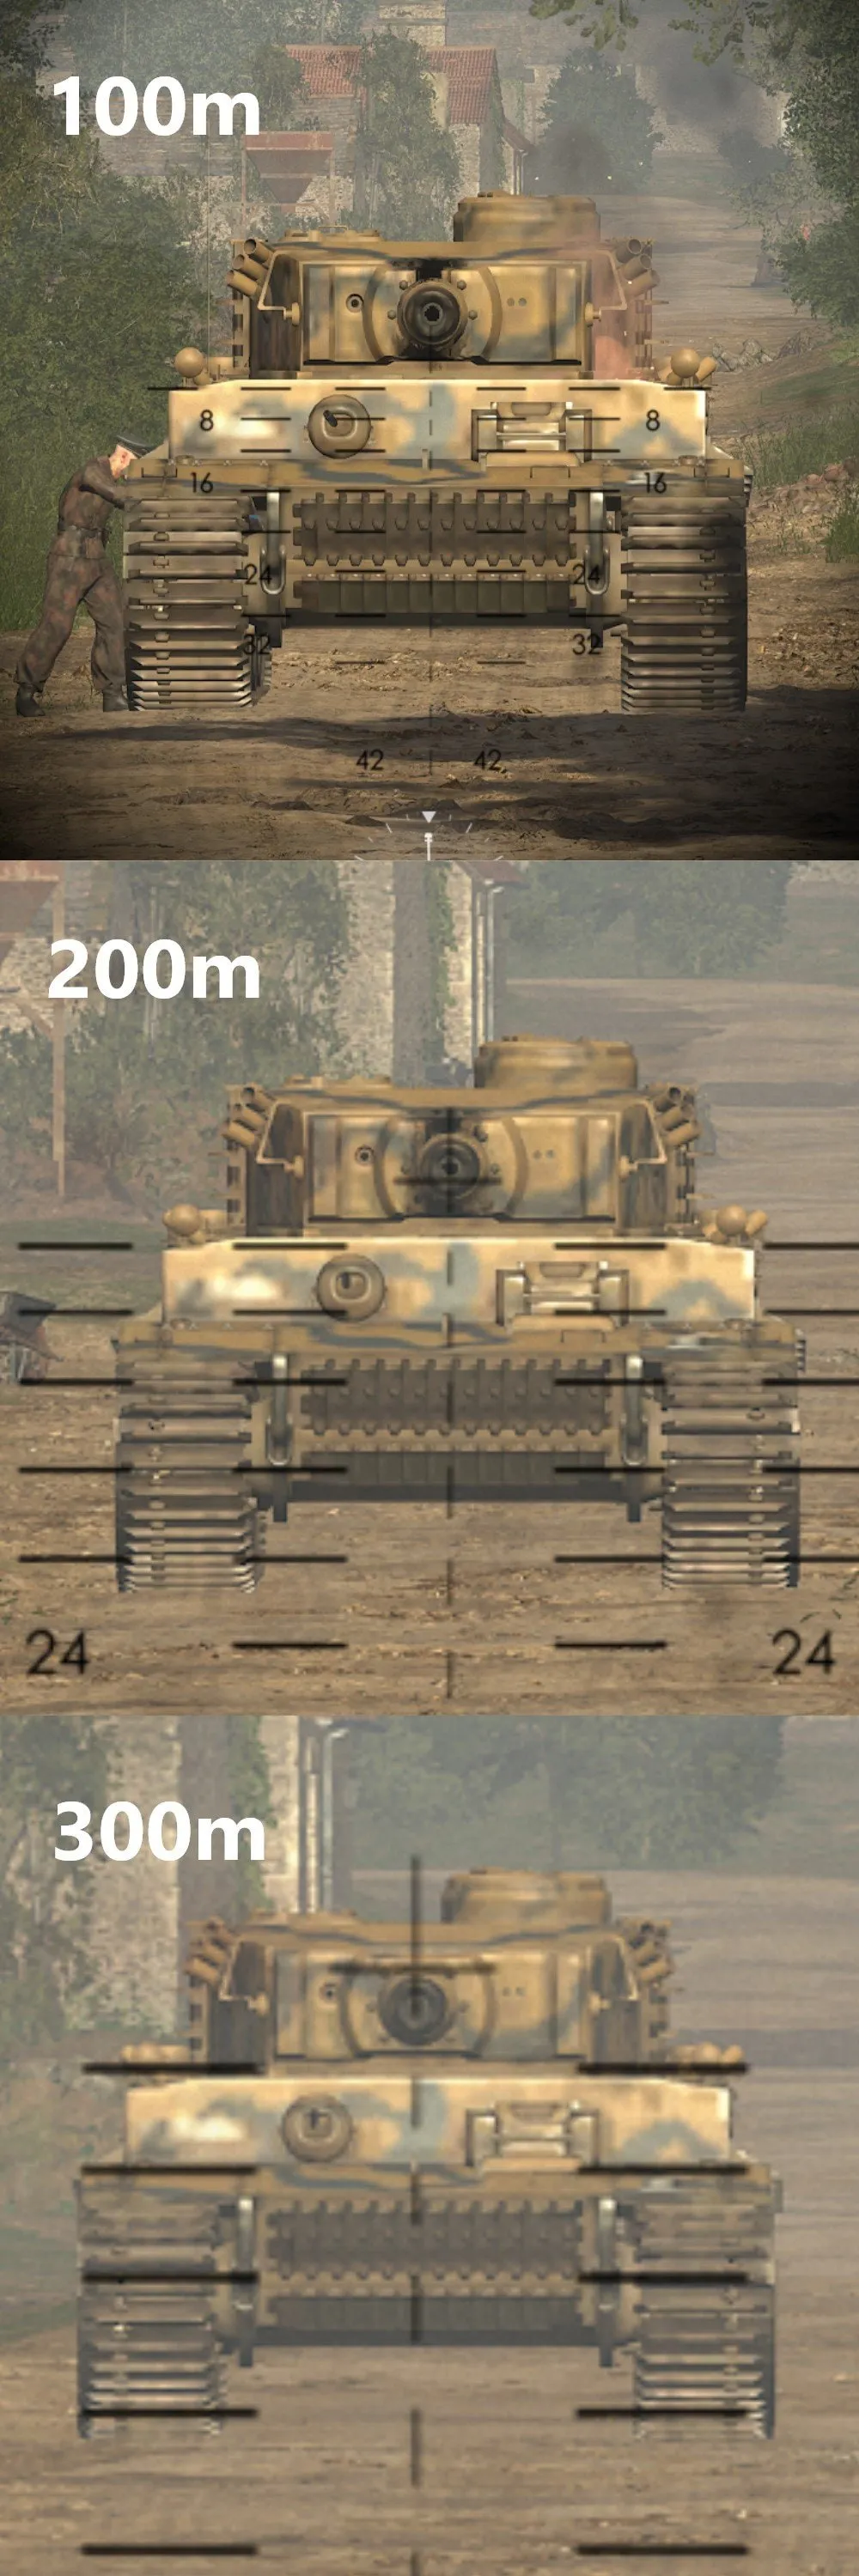
Figure 44: “Distance Reference for the Tiger Shot”
4.2.3 The M4A3E2 Sherman “Jumbo” 75mm
Section titled “4.2.3 The M4A3E2 Sherman “Jumbo” 75mm”The 75mm “Jumbo” Sherman, like its 76mm counterpart, boasts a thicker front armor as well as a bigger and sturdier turret than it’s medium variant. It is equipped with AP, HE, and 6 of the same exact smoke rounds that the Sherman medium has. The greater tenacity and its smokes allow this tank to fill somewhat of a more supportive role on the battlefield.
So what does the 75mm Sherman “Jumbo” look like? How do you recognize it in the field? The 75mm can be recognized by spotting these features (Figure 45):
-
The color of the paint on the hull is a lighter green than other Sherman variants. More of a Hulk color.
-
The barrel is short, stubby, and features no muzzle brake.
-
The “Jumbo” variants of the Sherman can be recognized by their larger, more boxy turrets as well as their thick turret mantles.
-
The sides of the plate and the turret of the 75mm “Jumbo” both have a bunch of equipment strapped to them.
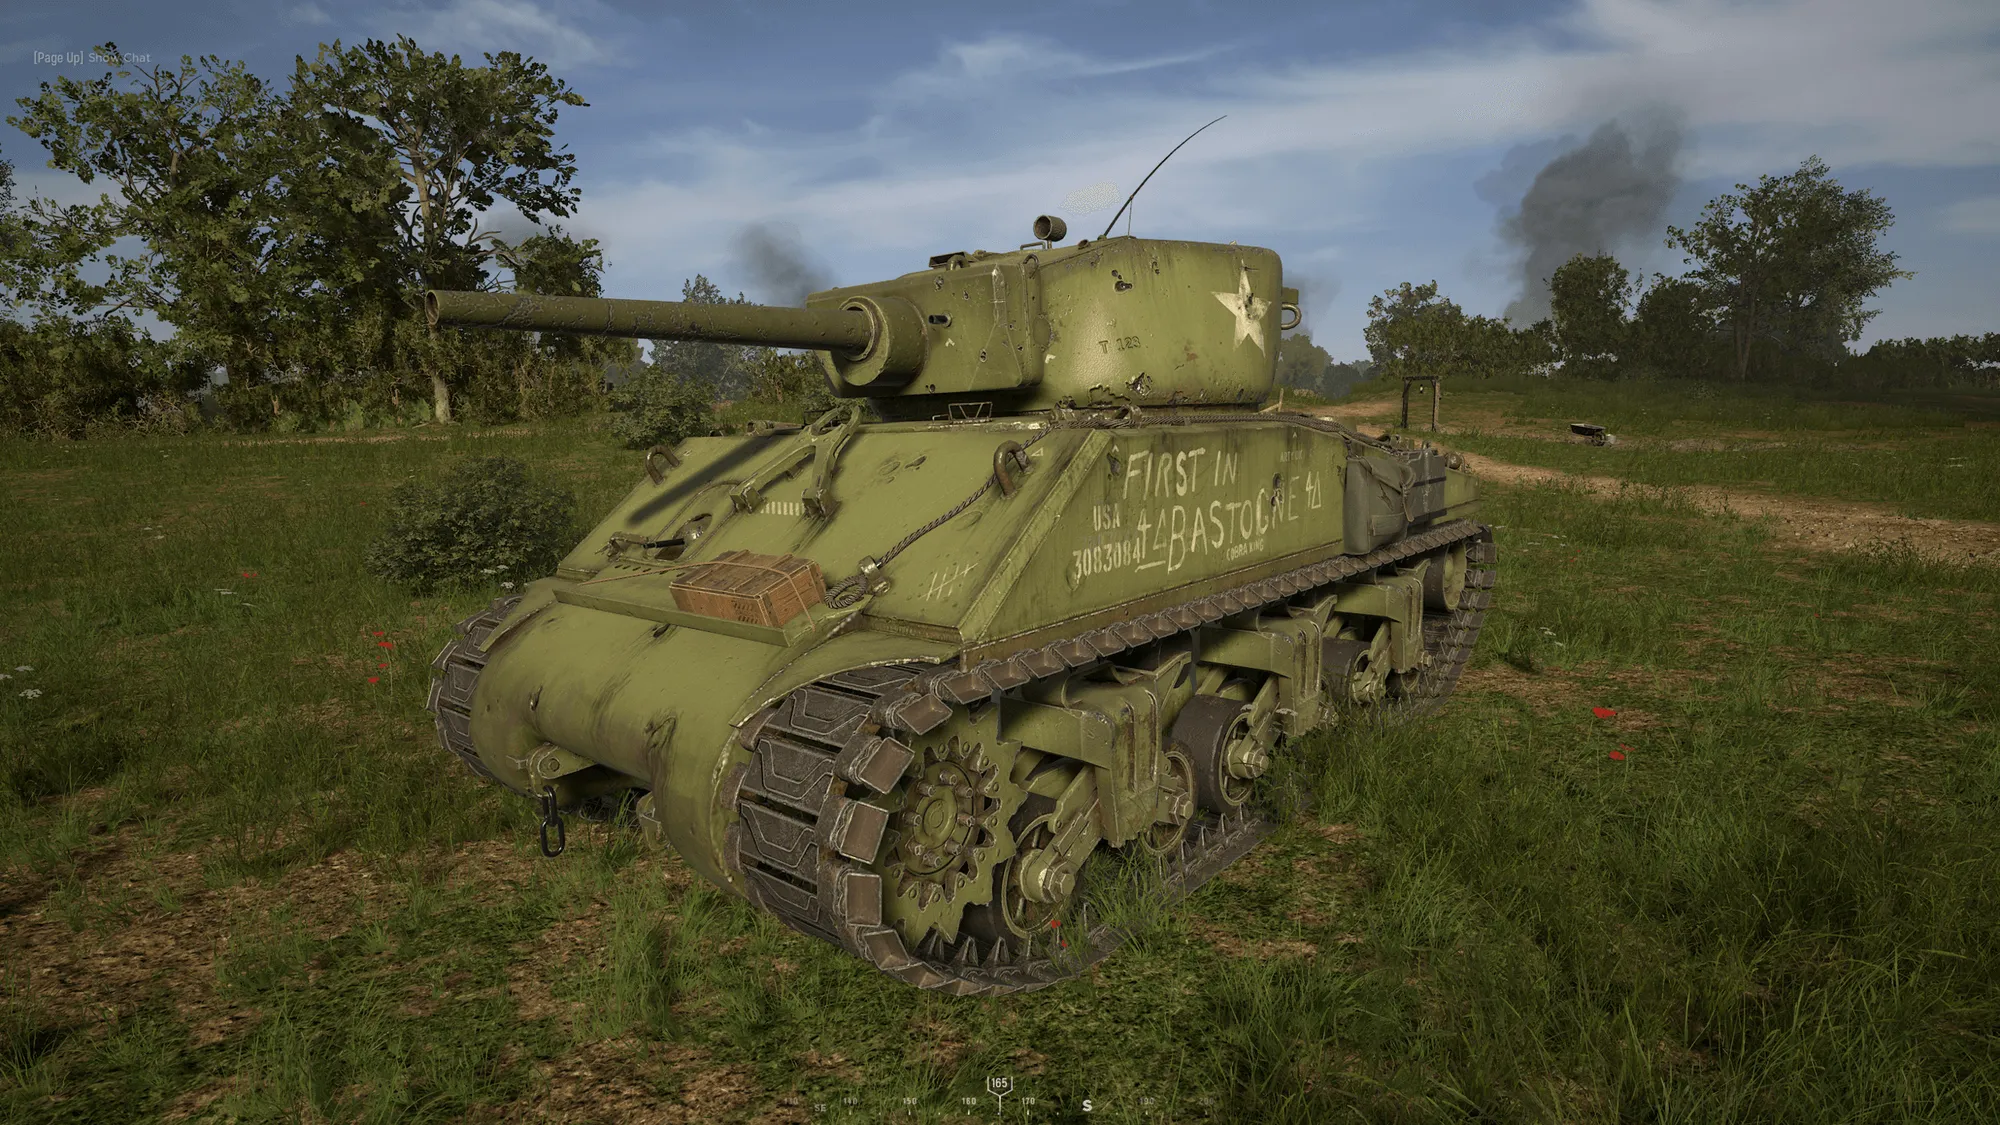
Figure 45: “The M4A3E2 Sherman ‘Jumbo’ 75mm”

The “Jumbo” 75mm is also equipped with smoke rounds, however much like the medium Sherman, these new smoke rounds in Update 12 are only marginally bigger than an infantry smoke and disperse about as fast. These facts, coupled with the 75mm “Jumbo”’s lackluster supply of only 6 smoke rounds, makes them practically useless in a real game. Notice as well that the reload speed of the 75mm “Jumbo” is 2 seconds longer than the reload speed for the medium Sherman and the Panther, making this tank even more of a meme than it already is.
Both “Jumbo” variants have identical transmissions and engines, meaning their turn speed and maximum speed are the same, and they drive exactly the same. They have a slow maximum speed, but in stark contrast to other heavies such as the Panther, the “Jumbo”s have the highest 1st gear and reverse turn speeds of all the heavy tanks.

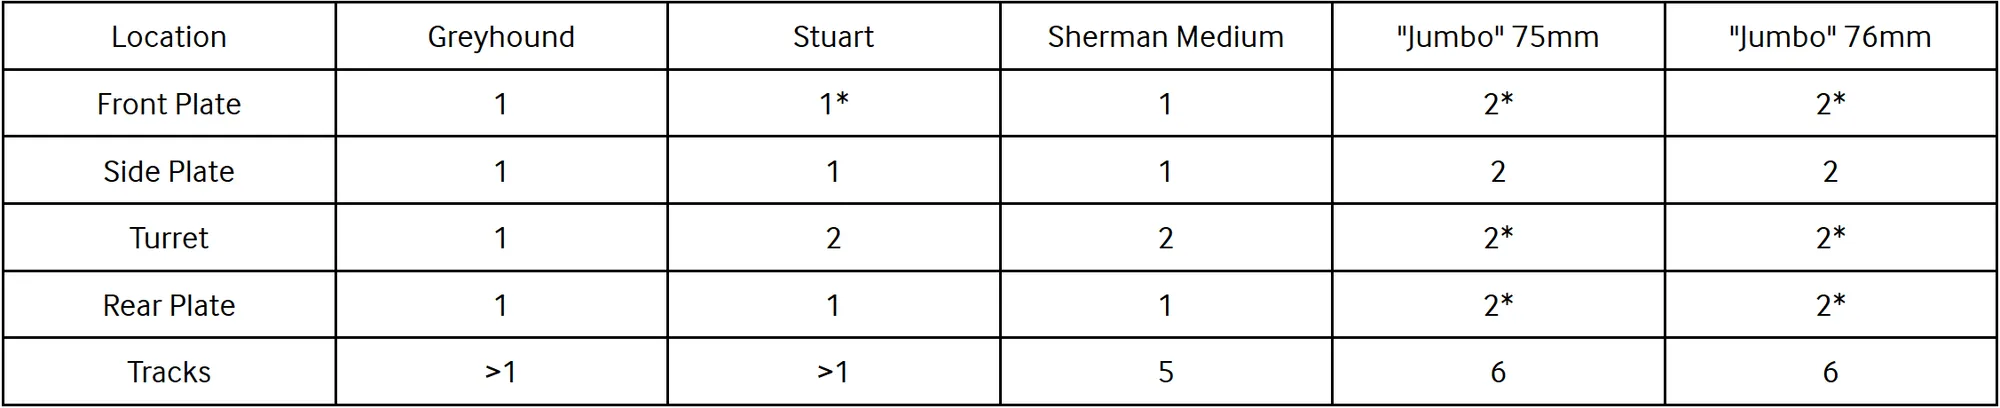
Once again, here are the amount of shots it takes to kill various types of enemy tanks using the 75mm gun. The “Jumbo” 75mm has the exact same gun as the Sherman medium.
R - Ricochet or non-penetrating hit
#* - # shots can only be achieved under specific circumstances or in special areas
When engaging a Puma:
-
Aim for the center of the body or the turret for a 1 shot kill. Care must be taken not to hit the stoplights on either side of the rear or the gas canisters on top of the side skirt on either side of the front plate because these areas are bugged and will not penetrate (see section 4.5.3 for more on this). You may use an HE shell if you wish to conserve AP shells, since they will also 1 shot everywhere.
-
Avoid hitting the barrel or the base of the barrel, this will only do barrel damage (and it will not kill the tank).
-
Hitting the wheels will take longer than 1 shot. Avoid them.
When engaging a Panzer II:
-
Make certain to hit anywhere in front, side or rear plates, as it is always a 1 shot kill.
-
Make certain not to hit the tracks or the turret, as this can increase the shots it takes. The turret mantle is also impenetrable. You can ricochet into the top of the Panzer II chassis by aiming for the bottom half of the turret mantle for a one shot.
-
Do not shoot the top half of the fuel canisters on either side of the turret as well as the back of the side skirt on the rear of the tank as these areas are bugged and do not penetrate. For more on this, see section 4.5.4.
-
Since the Panzer II cannot do any real damage to you in a “Jumbo” 75mm; it is not a foe you should be worried about.
When engaging a Panzer IV:
-
Just like the Sherman medium, the “Jumbo” 75mm will penetrate the Panzer IV anywhere in the front, side, or rear plates for a 2 shot kill.
-
Trying to kill the Panzer IV by hitting the tracks is impossible from the front and inadvisable from the side, as it takes many shots to do so and the turret or side takes less shots to kill.
-
Hitting the turret is a viable approach to killing a Panzer IV whose body is obscured from view, but care must be taken not to hit the barrel or the small mantle either side of it as this will not penetrate. Left or right of the mantle, or side/rear of the turret will kill the tank in 3 hits.
-
Unlike the Sherman medium, you can position yourself much more liberally when engaging a Panzer IV since it cannot penetrate you anywhere in the front plate or turret. This allows you to fire away at it without fear of death if you are facing your front plate towards it.
-
The Achilles Heel shot is viable. Since the “Jumbo” 75mm can penetrate the side plate of the Panzer IV, both the red and green outlines are penetrable and both will disable the engine in 1 shot (Figure 23). Hitting the red outline is relatively simple, provided you are at the right angle—aim for the space above the tracks and below the side skirt towards the rear of the side of the tank.
-
2 shots to the back plate at most angles will kill it. The first shot disables the engine if aimed at the canister (Figure 26).
-
There are some locations where the Sherman medium cannot penetrate the Panzer IV. For more on where these are located, see section 4.5.5.
When engaging a Panther:
-
Any shots to the front plate will not penetrate.
-
Side and rear plates can be penetrated for a 2 shot kill. If hitting rear, 1 shot will kill the engine and render the Panther immobile. If you are lucky enough to be in a position where you see the side armor of the Panther, 2 shots will kill the tank as long as the projectile lands at an angle less than 55 degrees with respect to the perpendicular of the side armor (35 degrees with respect to the front plate). A greater angle than 55 degrees will bounce. Care must also be taken not to aim too low when attempting to hit the side armor. The top half of the side skirt that extends over the tracks penetrates the side plate for hull damage, and the bottom half penetrates tracks.
-
While the front mantle and cupola of the turret are impenetrable by the “Jumbo” 75mm, the turret can still be penetrated from the front by shooting the small triangular corners, or “cheeks”, of the Panther’s turret either side of the mantle (Figure 39). Hitting the side or rear of the turret will also penetrate, and both of these shots kill the Panther after 3 rounds. While this can be done in a regular game, it’s extremely rare that a Panther who isn’t already damaged will allow a “Jumbo” 75mm to unload 3 AP rounds into its turret without blowing it up in 2 shots, especially with the much slower “Jumbo” reload speed (the Panther can fire 4 shells for every 3 that the “Jumbo” can, so your extra armor is useless here). This should only ever be done in emergency cases or if there is no other choice.
-
The “Jumbo” 75mm can hit the Achilles Heel shot to kill the Panther’s engine instantly. Both the green and red sections of the shot work, and the red section in particular—which is just the top half of the side skirt of the Panther towards the rear of the tank—deals hull and engine damage at the same time and is really straightforward to hit. The Achilles heel is the recommended way to engage Panthers if you are at the correct angle so that they do not have the chance to turn around.
-
You can use your smoke rounds to disengage from or temporarily blind enemy Panthers you are engaging with. This allows you to safely reposition your tank to avoid getting killed by a Panther, or to force the Panther to move from its entrenched position. The extra armor of the “Jumbo” 75mm allows you to position a little more liberally when performing these types of shenanigans.
-
Take care not to shoot some specific locations, outlined in section 4.5.6 that will not penetrate the Panther when hit.
When engaging a Tiger:
-
Any shots to the front plate, front of the turret, side of the turret, or back of the turret will ricochet at any angle. Even if the round does not bounce, no damage will be done to the hull itself.
-
If you are lucky enough to be in a position where you see the side armor of the Tiger, 2 shots will kill the tank as long as the projectile lands at an angle less than 55 degrees with respect to the perpendicular of the side armor (35 degrees with respect to the front plate). A greater angle than 55 degrees will bounce.
-
The “Jumbo” 75mm can hit the Achilles Heel shot to kill the Tiger’s engine instantly. Both the green and red sections of the shot work, and the red section in particular—which is just the side skirt of the Tiger towards the rear of the tank—deals hull and engine damage at the same time and is really straightforward to hit. Since the Tiger turns quickly in 1st gear and can close off the angle required to do damage in a “Jumbo” 75mm, the Achilles heel is the recommended way to engage Tigers if you are at the correct angle so that they do not have the chance to turn around.
-
The back plate is a 2 shot kill at any angle. The engine will die with the first shot, making securing the kill super easy. Be careful not to shoot the non-penetrating regions described in section 4.5.7.
-
You can use your smoke rounds to disengage from or temporarily blind enemy Tigers you are engaging with. This allows you to safely reposition your tank to avoid getting killed by a Tiger, or to force the Tiger to move from its entrenched position. The extra armor of the “Jumbo” 75mm allows you to position a little more liberally when performing these types of shenanigans.
-
There is a way to penetrate the Tiger in a “Jumbo” 75mm when engaging it from the front that has recently been discovered courtesy of -TL- EvilTactics (whose Hell Let Loose YouTube channel you can find here). For a full description of how exactly it works, see this section. This ability balances the engagement a little between the “Jumbo” 75mm and the Tiger because the “Jumbo”s heavier armor will allow it to survive a Tiger shell to the front plate and continue fighting, making the engagement technically 2 shots to 2 shots. The “Jumbo”s shots are considerably harder to land than the Tiger’s, but the “Jumbo” has smokes to disengage if it needs to, making engaging Tigers as a “Jumbo” 75mm a somewhat viable strategy.
Opinion: The Sherman “Jumbo” 75mm is passable as an infantry support/anti-personnel tank that has greater tenacity versus enemy infantry and enemy tanks than its Sherman medium variant. Its quick 1st gear turn speed, allowing it to quickly react to flanking enemy tanks and AT rocketeers, coupled with its heavy armor makes this tank harder to get rid of on the battlefield than its medium counterpart. The smoke rounds allow the 75mm to provide (admittedly mediocre) cover for friendly infantry to push a point, disengage from any tank engagement, or obscure enemy tanks to allow for a flank, and it’s newly discovered ability to damage Tigers from the front is an added bonus (but by no means does it mean that the 75mm can start hunting Tigers like the 76mm can). On top of that, it has a lot of HE ammunition compared to other tanks in the game as well.
Despite these pros, there are major cons. To start, it only has 6 smoke rounds and they don’t last very long, so any smoke oriented strategies are out of the window already. It costs 500 fuel, which is only 100 fuel away from the vastly superior 76mm “Jumbo”. Most importantly, however, it’s 8 second reload forces this tank to lose engagements against enemy Panthers and Tigers (despite the added armor) and have a tough time finishing off enemy Panzer IV’s while also reducing its total ability to deal damage to infantry. These are the biggest reasons why no sane person still uses this tank—at the end of the day, if you really want the smokes and maneuverability you’re better off picking the medium, and if you’re like everyone else and want armor and firepower you’re better off choosing the “Jumbo” 76mm. Don’t waste your fuel on this thing.
4.2.4 The M4A3E2 Sherman “Jumbo” 76mm
Section titled “4.2.4 The M4A3E2 Sherman “Jumbo” 76mm”The Sherman “Jumbo” 76mm tank is the 75mm’s big brother in terms of firepower. While the armor is effectively identical to that of the 75mm “Jumbo” Sherman, the AP rounds fired are far superior. By all accounts, this is the best tank that the Americans have to offer and the only hope you will ever have of standing up to enemy Panthers and Tigers.
So what does she look like? Well, the 76mm can be distinguished from other Shermans by noticing the following features (Figure 46):
-
The most important feature that is easily noticeable about the 76mm is the muzzle brake on the end of the barrel. No other American tanks have this muzzle brake.
-
The “Jumbo” variants of the Sherman can be recognized by their larger, more boxy turrets as well as their thick turret mantles.
-
The barrel is much longer than the “Jumbo” 75mm or the Sherman medium.
-
There is a white star with a circle around it between the two tracks.
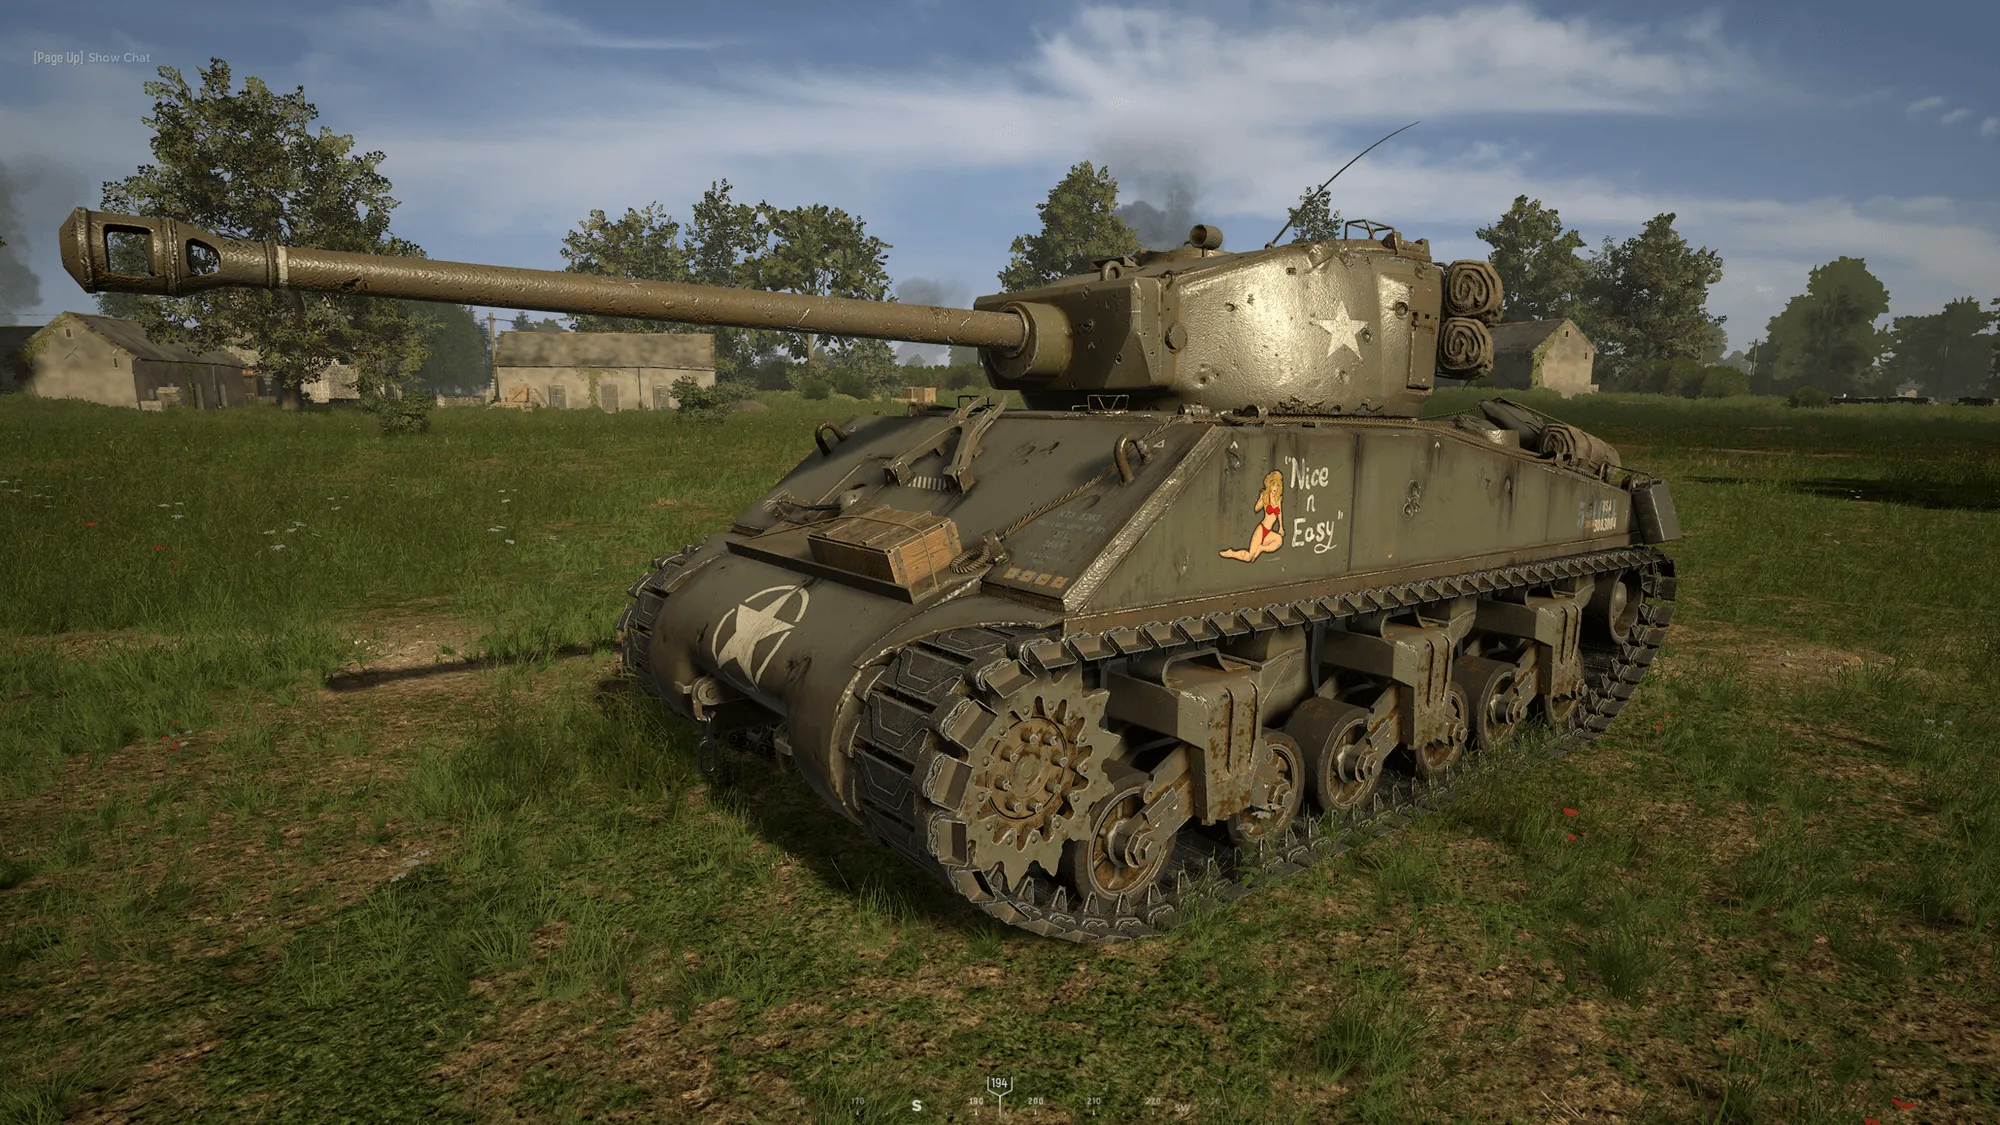
Figure 46: “The M4A3E2 Sherman ‘Jumbo’ 76mm”

The “Jumbo” 76mm has a large supply of HE rounds and a small supply of AP rounds, which does affect the optimal playstyle for this tank (i.e. you shouldn’t be trying to spam AP just to find that one small hole in the bush).
Both “Jumbo” variants have identical transmissions and engines, meaning their turn speed and maximum speed are the same, and they drive exactly the same. They have a slow maximum speed, but in stark contrast to other heavies such as the Panther, the “Jumbo”s have the highest 1st gear and reverse turn speeds of all the heavy tanks.
The “Jumbo” 76mm shares some of the same driving characteristics with other heavy tanks, namely a slow top speed and an extremely sluggish 3rd/4th gear turn speed (34s for a full turn is plenty of time for an AT player to shoot 2 rounds into a “Jumbo”s butt).
Below are the amount of rounds required to kill various enemy tank types with the 76mm slugger:
#* - # shots can only be achieved under specific circumstances or in special areas
When engaging a Puma:
-
Aim for the center of the body or the turret for a 1 shot kill. Even in the 76mm “Jumbo”, care must be taken not to hit the stoplights on either side of the rear or the gas canisters on top of the side skirt on either side of the front plate because these areas are bugged and will not penetrate (see section 4.5.3 for more on this). You may use an HE shell if you wish to conserve AP shells.
-
Hitting the wheels will take longer than 1 shot. Avoid them.
When engaging a Panzer II:
-
Make certain to hit anywhere in front, side or rear plates, as it is always a 1 shot kill.
-
The turret mantle is impenetrable.
-
Even in the 76mm “Jumbo”, the top half of the fuel canisters on either side of the turret as well as the back of the side skirt on the rear of the tank are areas that are bugged and do not penetrate. For more on this, see section 4.5.4.
-
Since the Panzer II cannot do any damage to you in a “Jumbo” 76mm, it is not a foe you should be worried about.
When engaging a Panzer IV:
-
Shooting the front plate, side plate, or rear plate obliterates this thing in 1 shot.
-
The turret will take 2 shots before the Panzer IV explodes, and this can be done from any angle. This method should only be used to kill Panzer IVs that are only visible by their turret. If you can see the body, shoot it in the body and do not waste your time.
-
The turret’s cupola and the inside of the barrel are penetrable but deal no hull damage—shots to those areas will just kill the turret module.
-
Going for the tracks is inadvisable because of the sheer number of shots required to kill the tank.
-
While the Achilles Heel shot is technically possible, it is not recommended to go for this shot since hitting the side plate will kill it in 1 shot anyway.
-
Even in the “Jumbo” 76mm, there are places of the Panzer IV front, side, and rear plates which are impenetrable. To see where, check out section 4.5.5.
When engaging a Panther:
-
This is where the 76mm “Jumbo” Sherman really shines. This is the only American tank that can actually pierce the front plate of a Panther tank (the other Shermans can penetrate the turret, sides, and rear only), and it can blow the Panther up in 2 shots anywhere in the front hull plate. Care must be taken not to hit the side skirt protruding above the tracks left and right of the front plate, as this will not penetrate at all (see section 4.5.6 for more). This is the go-to method for destroying a Panther tank.
-
The 76mm “Jumbo” has a much slower reload speed than the Panther (8 seconds vs 6 seconds respectively). This means that even if you land the first shot in an engagement with a Panther, you may still end up losing if you get hit up to 2 seconds after shooting your first shot. Assuming all shots land, the Panther will be able to fire its 2nd shot and blow you up before you have a chance to finish it off. This single fact makes the Panther a very scary tank on the battlefield, and one that needs to be attacked intelligently. If you try to engage a Panther head to head, assuming both crews are of equal skill, you will lose the engagement in a 1v1 in most scenarios. The reload speed dynamic between these two tanks forces the “Jumbo” 76mm to go for the element of surprise when engaging Panthers or double up with other “Jumbo” 76mms or AT guns to land two blows at once and end the engagement early.
-
The second spot that is very effective against a Panther is the sides, which can be hit twice for a kill even from a very shallow angle. In fact, if you can see the side at all then you can penetrate it. This is a strictly inferior method to hitting the front though because there is less surface area, so only do this if you can’t hit the front for some reason.
-
If for some reason the front and sides of the body are obscured or otherwise inaccessible, the turret is the next best place to hit. It takes 2 shots to kill the Panther if you shoot it anywhere in the front, sides or rear of the turret. Do not hit the barrel or the cupola instead of the plates on the turret, as these will only destroy the turret and not damage the hull.
-
Under almost no circumstances should you be hitting the tracks of a Panther tank given the aforementioned methods of dispatching the tank, as it takes three times as long in the best case scenario (by that time you’d be dead).
-
The “Jumbo” 76mm can hit the Achilles Heel in both the red and green sections. This can be useful to mitigate the potential for the Panther to turn around and land a shot in your plate, since the engine dies in 1 shot, but in general if the 76mm has the angle to hit the Achilles Heel it will kill the Panther before the Panther can kill it.
-
The rear plate of the Panther is still a 2 shot kill, just like the front and sides, except the engine gets disabled after the first shot.
When engaging a Tiger:
-
Similar to the Panther, the Tiger tank can be blown up in 2 shots anywhere in the front hull plate. This is the go-to method for destroying a Tiger tank.
-
The 76mm “Jumbo” and the Tiger have the same reload speed, so first shot wins.
-
The second spot that is very effective against a Tiger is the sides, which can be hit twice for a kill even from a very shallow angle. In fact, if you can see the side at all then you can penetrate it. This is a strictly inferior method to hitting the front though because there is less surface area, so only do this if you can’t hit the front for some reason.
-
If for some reason the front and sides of the body are obscured or otherwise inaccessible, the turret is the next best place to hit. It takes 2 shots to kill the Tiger if you shoot it in the front mantle, or the sides and rear of the turret. This means that if the Tiger is looking directly at you, the flat plates on either side of the barrel are where you want to aim, and hitting other surfaces will likely ricochet. Care also must be taken not to hit the barrel or the cupola instead of the plates on the turret, as these will only destroy the turret and not damage the hull.
-
Under almost no circumstances should you be hitting the tracks of a Tiger tank given the aforementioned methods of dispatching the tank, as it takes three times as long in the best case scenario (by that time you’d be dead).
-
The “Jumbo” 76mm can hit the Achilles Heel in both the red and green sections. This can be useful to mitigate the potential for the Tiger to turn around and land a shot in your plate, since the engine dies in 1 shot, but in general if the 76mm has the angle to hit the Achilles Heel it will kill the Tiger before the Tiger can kill it.
-
The rear plate of the Tiger is still a 2 shot kill, just like the front and sides, except the engine gets disabled after the first shot. Note that the air filters and exhaust pipes on the back of the Tiger are impenetrable from the sides or the rear, even to the 76mm “Jumbo”. See section 4.5.7 to see an illustration of these areas.
Opinion: The Sherman “Jumbo” 76mm is the best the Americans can do when it comes to firepower and armor. While the armor is the same as the 75mm, the bigger gun allows the 76mm to take on a more offensive role. This tank’s responsibility is to engage and destroy enemy tanks of all kinds, but especially enemy heavy tanks—namely, the Panther and the Tiger. While the 76mm and the Tiger are relatively evenly matched, the Panther outclasses the 76mm mainly due to its faster reload speed. This is a major problem for game balance because all else being equal, Panthers (especially when they work together) can roll over allied tanks of all kinds with relative ease and subsequently put immense pressure on your infantry and your defensive points.
Because all of the other tanks on the American side are put in more of an anti-personnel/support role, and because those other American tanks cannot engage enemy Panthers or Tigers with great proficiency, the 76mm is left to do the job and make the most out of what it’s got despite its disadvantages. Two schools of thought exist with regards to how to deal with Panthers. The first is doubling up your tanks and AT guns to allow you to dispatch single enemy Panthers without posing a danger to either of the tanks by having two guns be able to instantly kill a Panther before they can even get their second shot off. This requires coordination with your other tank squads and can be very hard to achieve even at the higher levels of play because tank engagements can many times be through small slivers of cover where only one tank can engage at a time. On top of that, it requires pooling 1200 fuel and 2 decent crews together which can be extremely hard to do if the Panthers are preventing you from grouping up. The other school of thought is to keep the Panthers on their toes. You can beat Panthers in 1v1 engagements as a 76mm “Jumbo” if you peek them while they aren’t looking at you, but this requires you to constantly change position lest you be marked by enemy infantry. Even if you have the element of surprise, you need to be in a position where the Panther cannot simply turn and shoot you within the 2 second window and still win the engagement, which can be difficult.
All of that being said, the 76mm still has a quick 1st gear turn speed and the ability to QuickTurn™ on a dime allowing it to easily turn and react to German AT and flanking tanks of all kinds. It’s armor allows it to take more aggressive positioning when compared to the other American tanks, and a good crew can still create problems for enemy Tigers and Panthers under the right circumstances.
4.3 The German Tanks
Section titled “4.3 The German Tanks”The following chapters on German tanks will be somewhat longer to cover both engagements with American tanks and engagements with Soviet tanks, since the German force can be seen on western front as well as eastern front maps.
4.3.1 The Panzerkampfwagen II Light Tank
Section titled “4.3.1 The Panzerkampfwagen II Light Tank”The Panzer II is the light tank on the German side in Hell Let Loose. This little guy is equipped with a 20mm autocannon that fires HE rounds in a continuous fashion for a limited time until it has to be reloaded. The nature of only having HE available makes this tank unable to penetrate most American or Soviet tanks, even in the rear. Update 10 has however introduced buffs to the Panzer II, allowing it to penetrate certain parts of Stuarts and most surfaces on enemy recon vehicles, while adding protection to its front plate from light tanks, recon vehicles, and AT rockets and rifles. Additionally, this tank is agile and can put out a tremendous amount of anti-personnel firepower in a short time because of the autocannon’s continuous fire, not to mention the fact that its small overall stature and fast speed allow it to hide behind bushes and low buildings. It should be noted, however, that the Panzer II does not have a hull MG.
“Ok, so it can’t kill me, but I want to kill it anyway! How do I recognize it?” Good question. Here are its defining features (Figure 47):
-
A forest tricolor camouflage pattern on the hull.
-
A really tiny cannon. We’re talking -TL- tacotastic level pecker.
-
A German white and black cross on its side.
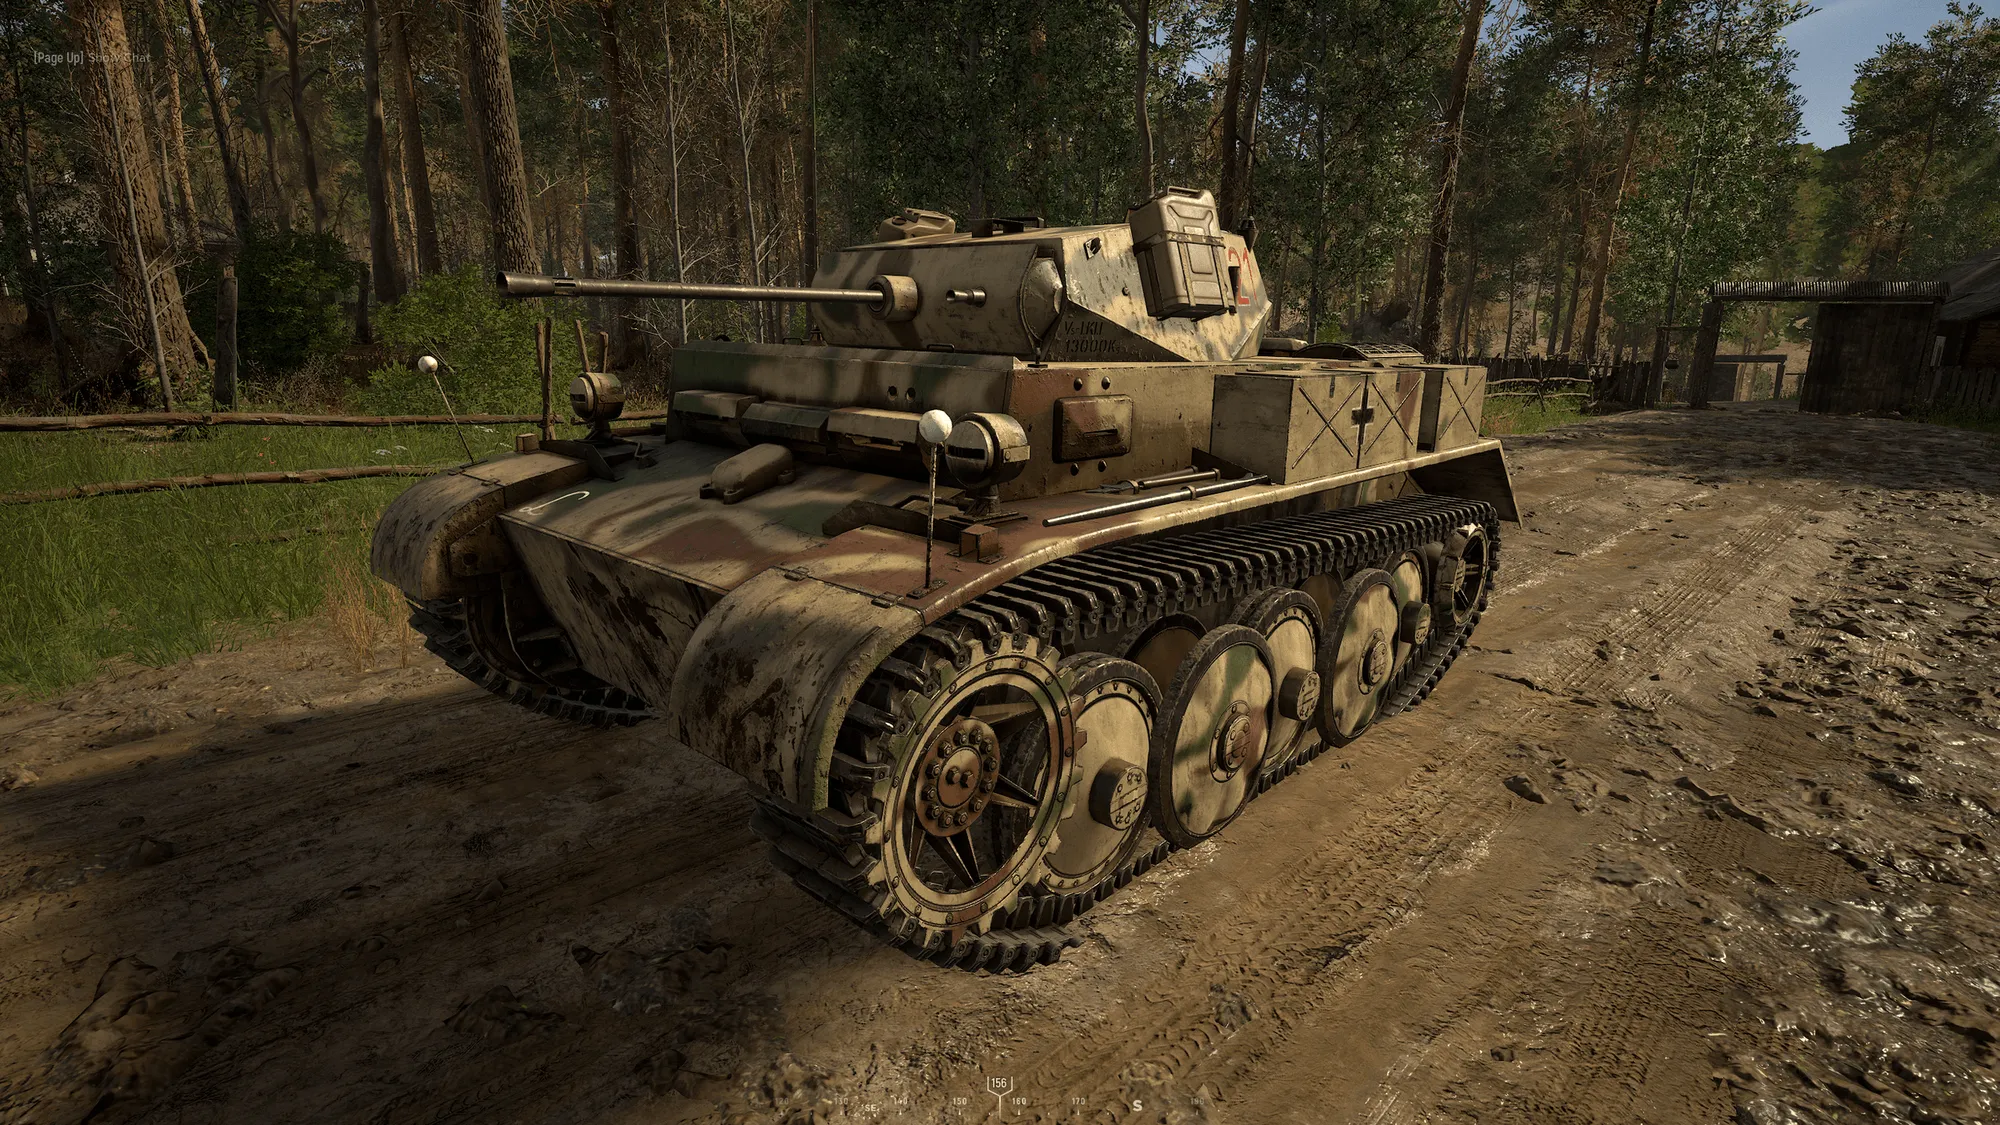
Figure 47: “The Panzerkampfwagen II”
R - Ricochet or non-penetrating hit
#D - # shots to disable module (no hull damage), after which becomes non-penetrating hit
#* - # shots can only be achieved under specific circumstances or in special areas
When engaging a Greyhound:
-
The front plate will penetrate for a 2 shot kill. Because of the speed of the Panzer II canon, this happens very quickly.
-
The sides and rear also penetrate for a 2 shot kill.
-
Because of the nature of HE in Update 12, the tracks will never kill the tank, only disable the module after 2 shots.
-
The turret is 4 shots to kill, but the mantle will ricochet.
When engaging a Stuart:
-
The front and side plates ricochet, and the turret at any angle ricochets.
-
Hitting the rear will kill the tank in 4 shots, and 3 will disable the engine.
-
Because of the nature of HE in Update 12, the tracks will never kill the tank, only disable the module after 4 shots.
When engaging everything else:
-
If you have a shot on the tracks and the tank doesn’t see you, you can disable the tracks. Otherwise, don’t bother.
-
The Panzer II cannot take advantage of the Achilles Heel.
Next, we have the Soviet tanks:
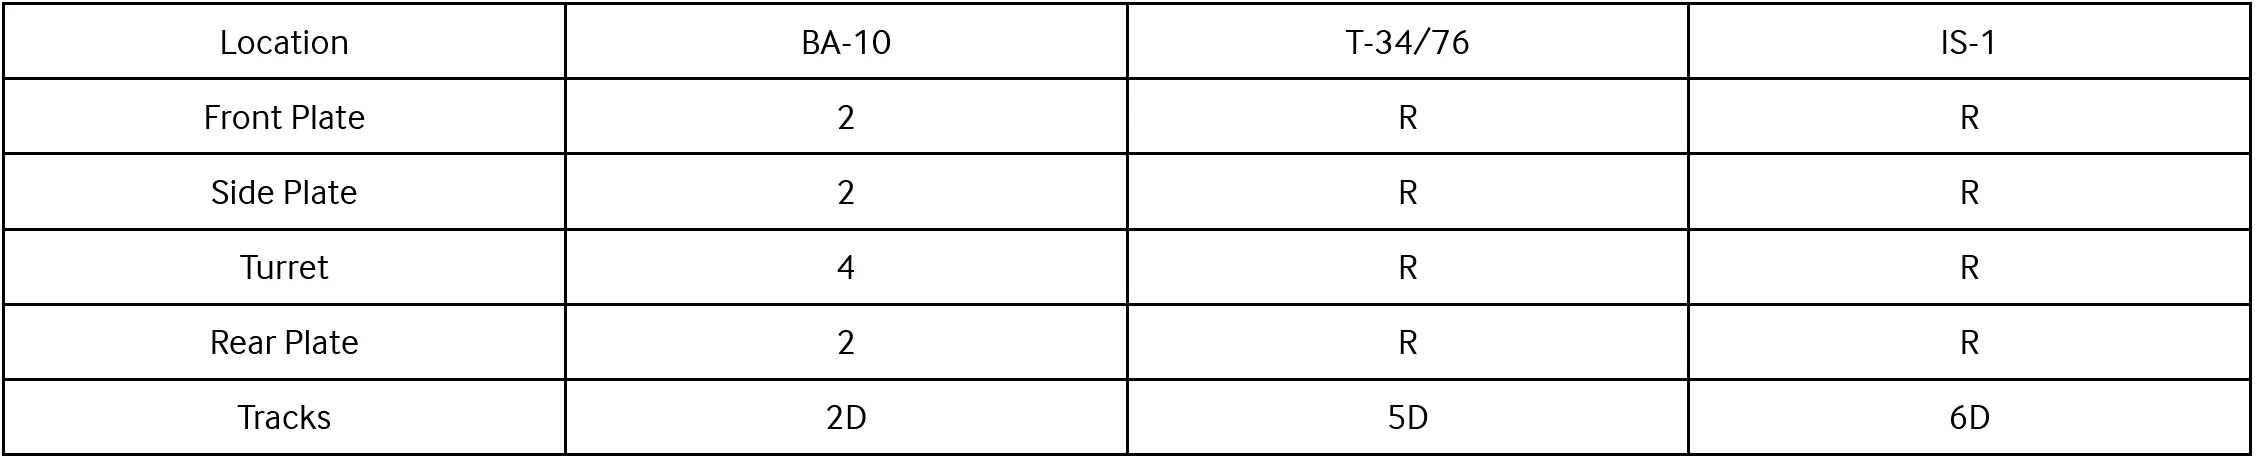
R - Ricochet or non-penetrating hit
#D - # shots to disable module (no hull damage), after which becomes non-penetrating hit
When engaging a BA-10:
-
Aim for anywhere in the front plate. Incidentally this also damages the engine since the BA-10 is an armored car. The sides and rear also penetrate for a 2 shot kill.
-
Because of the nature of HE in Update 12, the tracks will never kill the tank, only disable the module after 2 shots.
-
The turret is a 4 shot kill anywhere.
When engaging everything else:
-
If you have a shot on the tracks and the tank doesn’t see you, you can disable the tracks. Otherwise, don’t bother.
-
The Panzer II cannot take advantage of the Achilles Heel.
Opinion: The Panzer II has a unique place in the range of tanks that Hell Let Loose has to offer. It is the only tank that can fire automatically and has a very large amount of ammunition (8 belts of 20 rounds each, for a total of 180 shells). It has a high top speed and a decent turn rate, with the ability to absorb most enemy “Bazooka”, PTRS, Stuart, Greyhound, and BA-10 fire from the front without taking damage. That being said, a good Stuart crew or at player can still penetrate the Panzer II by ricocheting a shell off the bottom of the turret mantle into the top of the chassis, so it loses out in head to head engagements that aren’t against recon vehicles or trucks. Its purpose is solely to engage enemy infantry and lock down areas of effect while hiding behind solid cover. If you try to flank in this thing you will not be able to get any value, since it cannot actually kill any medium or heavy tanks and is still quite vulnerable behind enemy lines, not to mention the unique and easily discernible sound of its auto cannon. On the other hand, picking a safe position and forcing enemy tanks to come to you while you engage enemy infantry is the best strategy with the Panzer II.
4.3.2 The Panzerkampfwagen IV
Section titled “4.3.2 The Panzerkampfwagen IV”The German medium tank in Update 12, the Panzer IV, is a mediocre stepping-stone tank that is useful only during the opening few minutes in the game until all of the German tank squads can outfit themselves with the mind-blowingly superior Panther. It has a top speed that is slightly slower than the Sherman medium and, as is standard in Update 12, can penetrate and be penetrated by the other mediums in the game in almost every surface. Its more forgiving driving as well as its armor vs American and Soviet AT players give it the slight edge vs the Sherman medium and the T-34/76 when manned by a capable crew.
The list below shows the unique features that can be used to recognize a Panzer IV in the wild (Figure 48):
-
A forest green and beige camouflage (the other German tanks have a tricolor camouflage) .
-
A moderately long barrel with a muzzle brake on the end.
-
A flat side skirt on top of the tracks that does not extend over the side of them.
-
Two extra wheels strapped to the side plate on the right side of the tank (when looking at it from the front).
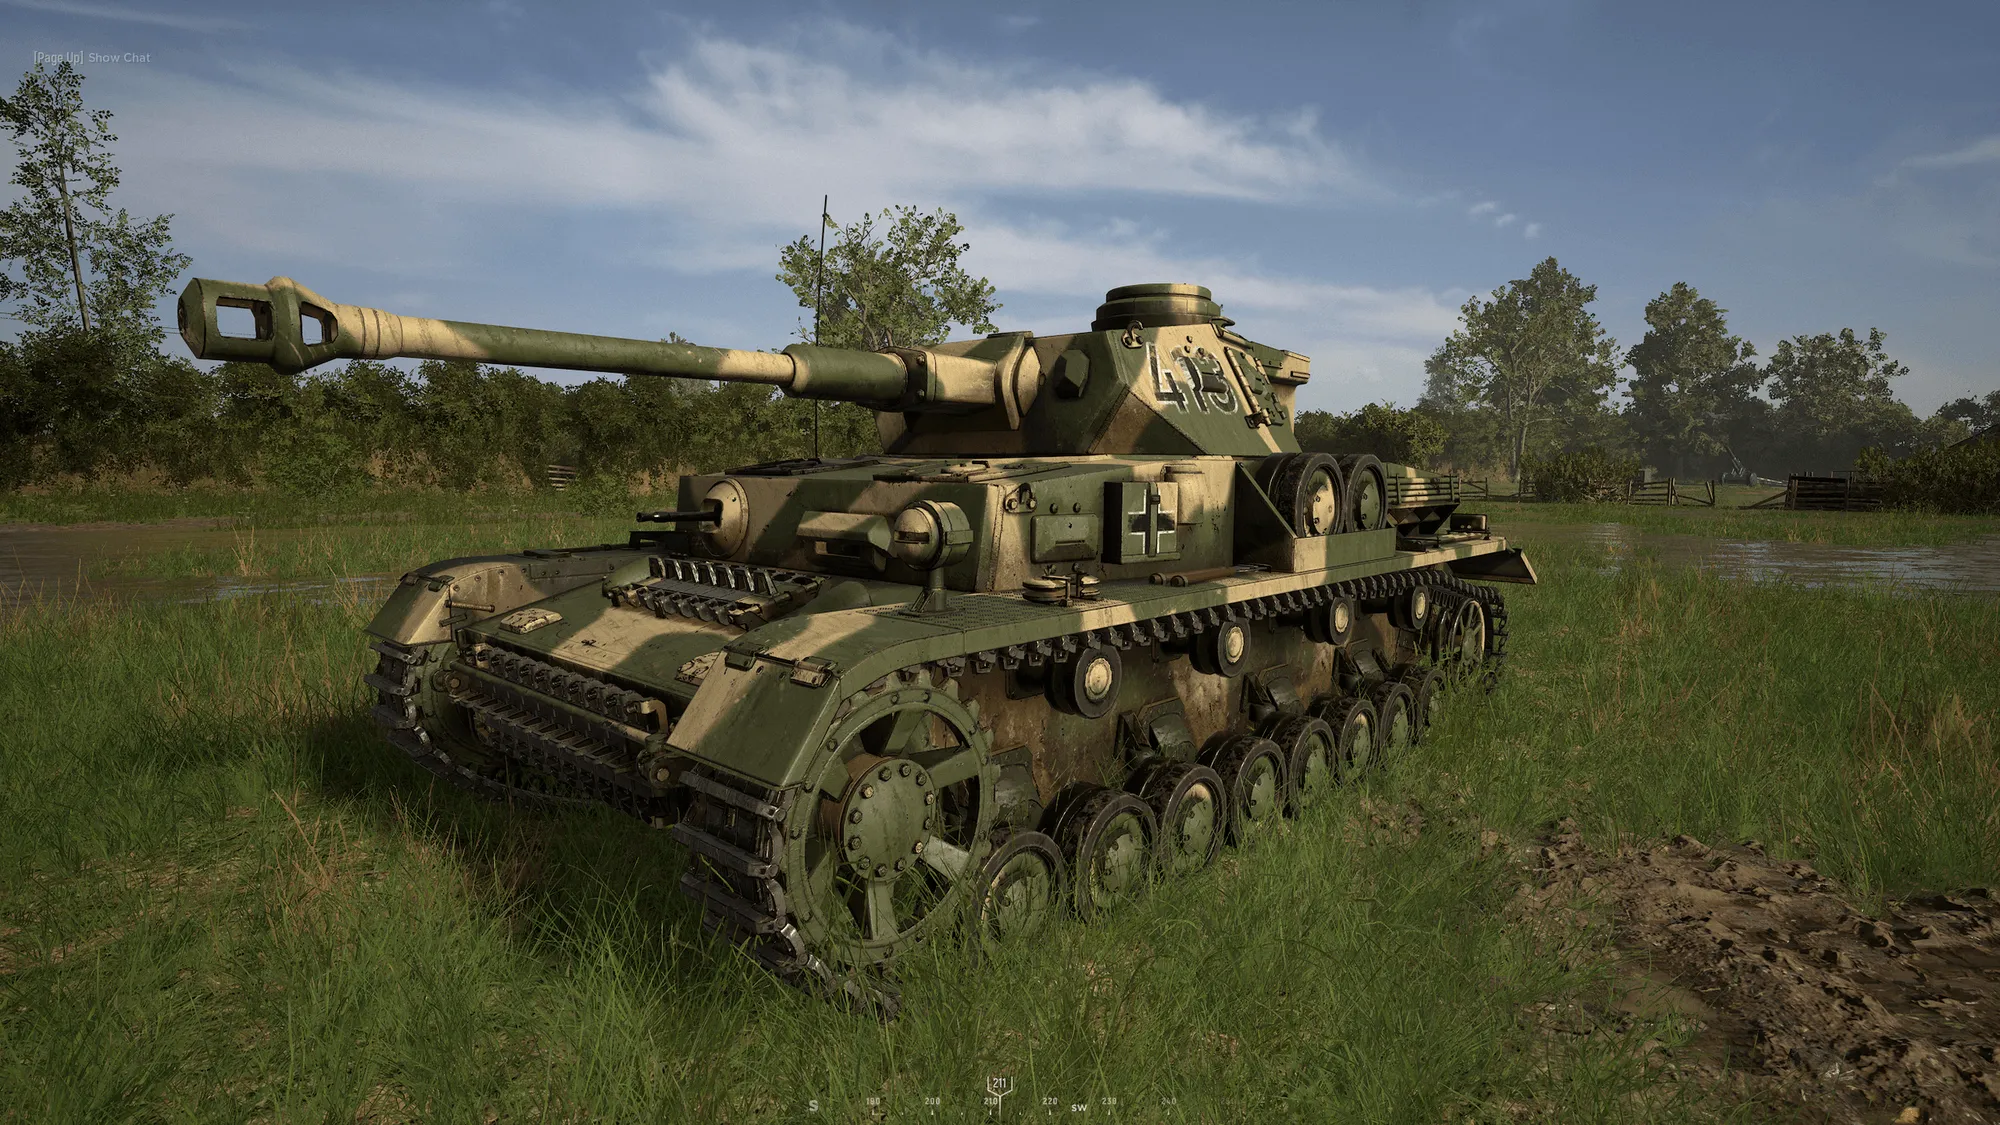
Figure 48: “The Panzerkampfwagen IV”

And here’s how it drives:

The Panzer IV enjoys a very fast 3rd and 4th gear turn speed rivaled only by the T-34/76 and the Panther. This is useful when swerving against enemy AT players, rounding corners, and making maneuvers. It should be noted that the front hull of the Panzer IV sits very low to the ground, so it can snag on even small obstacles such as rocks, rubble piles, dirt mounds, train tracks, etc. If this ever happens, you can quickly downshift to 3rd gear to give yourself some extra leeway and keep your momentum going without stalling. If you aren’t quick enough and stall the tank, you’ll have to go all the way back down to 1st gear. Panzer IV drivers should also note that you should take at least a 45° angle to get over steep berms or obstacles if you wish to stay in 4th gear.
Next up, the interesting bit—the amount of shells it takes to kill enemy tanks—starting with the Americans:
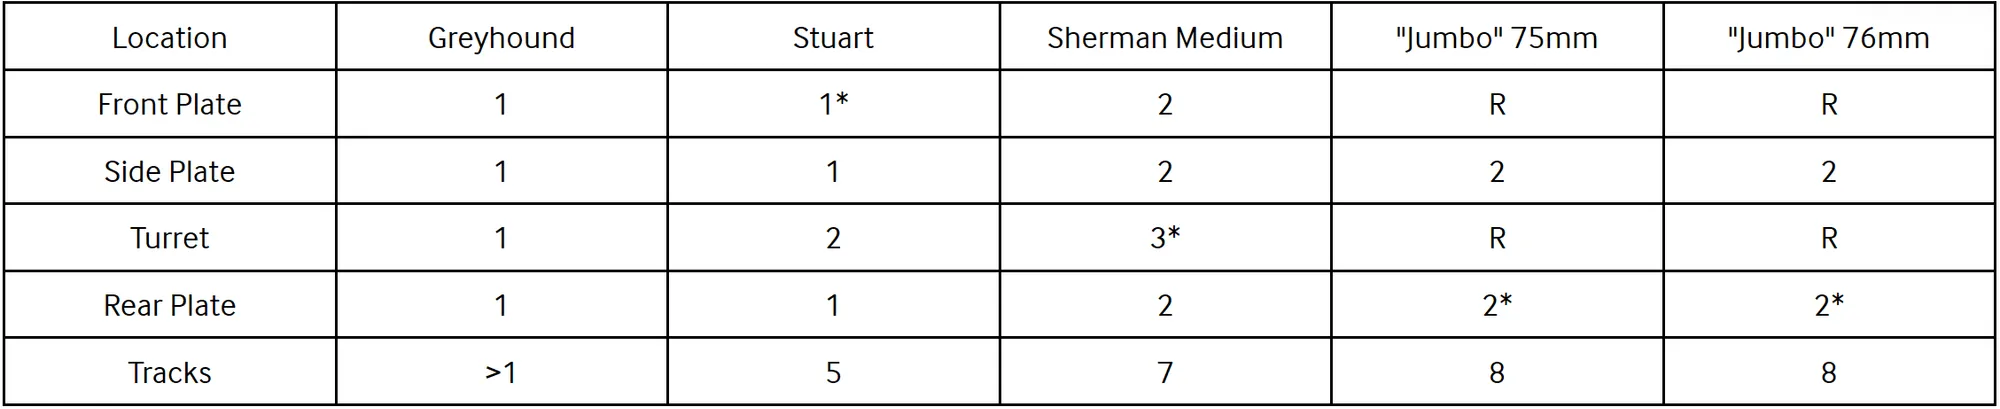
R - Ricochet or non-penetrating hit
#* - # shots can only be achieved under specific circumstances or in special areas
When engaging a Greyhound:
- Aim anywhere except the tires—they will take more than 1 shot to kill. You can use an HE shell if you wish to conserve AP shells.
When engaging a Stuart:
-
Hit it anywhere in the body for a 1 shot kill. Take care not to hit the tracks or turret, although it’s not the end of the world if you do.
-
The top of the side skirt hanging over the tracks on the front of the tank is impenetrable (see section 4.5.1 for more).
When engaging a Sherman medium:
-
The Sherman medium has been fundamentally changed in Update 12. The front plate can now be penetrated by the Panzer IV anywhere except at the sharpest point of the curvature between the tracks. If you want to ensure you hit, aim anywhere at the front plate above the tracks for a 2 shot kill.
-
Shooting the turret from the front now penetrates so long as you hit left or right of the mantle. The new Sherman medium’s mantle is relatively small, so you can easily avoid it and kill the Sherman in 3 hits. Aiming at, above, or below the mantle will ricochet, so don’t even try it. You can shoot the turret from the side or rear for 3 shots as well, but this is inadvisable unless that is all you can see. If a Sherman medium is engaging you by only showing you its front turret, then you may have to disengage unless only your turret is visible as well.
-
Shooting the side plate above the tracks for a 2 shot kill is also a viable option, and can be done from a relatively shallow angle with respect to the front plate (35°). The new Sherman medium has no rounded surfaces (other than the turret), so you need not worry about ricochets here.
-
Shooting the tracks is almost never advisable given the much better aforementioned options.
-
As outlined in section 2.10, the Achilles Heel shot is a potential tool in the Panzer IV’s arsenal, but it isn’t recommended. This is because the only viable area to land engine damage is very small and you cannot deal hull and engine damage at the same time, meaning you would have to land another 2 shots on the side or rear plates to kill the tank. If you land the shot the engine is disabled with 1 projectile (Figure 23).
-
The Panzer IV can penetrate the Sherman medium in the back plate for a 2 shot kill. The first shot kills the engine.
When engaging a Sherman “Jumbo” 75mm/”Jumbo” 76mm:
-
Shots to the front plate and all sides of the turret ricochet 100% of the time, and thus are inadvisable to aim for.
-
Hitting the side will kill a “Jumbo” in 2 shots. This can be done at a relatively shallow angle exactly 35° with respect to the front plate (55° with respect to the perpendicular).
-
The Achilles Heel shot is viable. Since the Panzer IV can penetrate the side plate of the “Jumbo”s, both the red and green outlines are penetrable and both will disable the engine in 1 shot (Figure 23). Hitting the red outline is relatively simple, provided you are at the right angle—aim at the large gap between the last and 2nd to last cog in the tracks and penetrate the side. This is a great way to cripple enemy “Jumbo” tanks, allowing your teammates in Panthers or Tigers to dispatch them easily or opening them up for a flank, and is one of the few counterplay maneuvers that a Panzer IV can employ against a “Jumbo”.
-
Hitting the tracks is inadvisable since it takes a long time to kill them, and if the “Jumbo” turns around to face your tank, you lose the opportunity to kill it through the tracks.
-
Shooting the back plate is a 2 shot from any angle if you get the opportunity to do so. The first shot kills the engine. When shooting the rear, care must be taken to avoid the bags of equipment and fuel canisters on the rear of these tanks, outlined in section 4.5.2, as these areas will not penetrate. Aim below them.
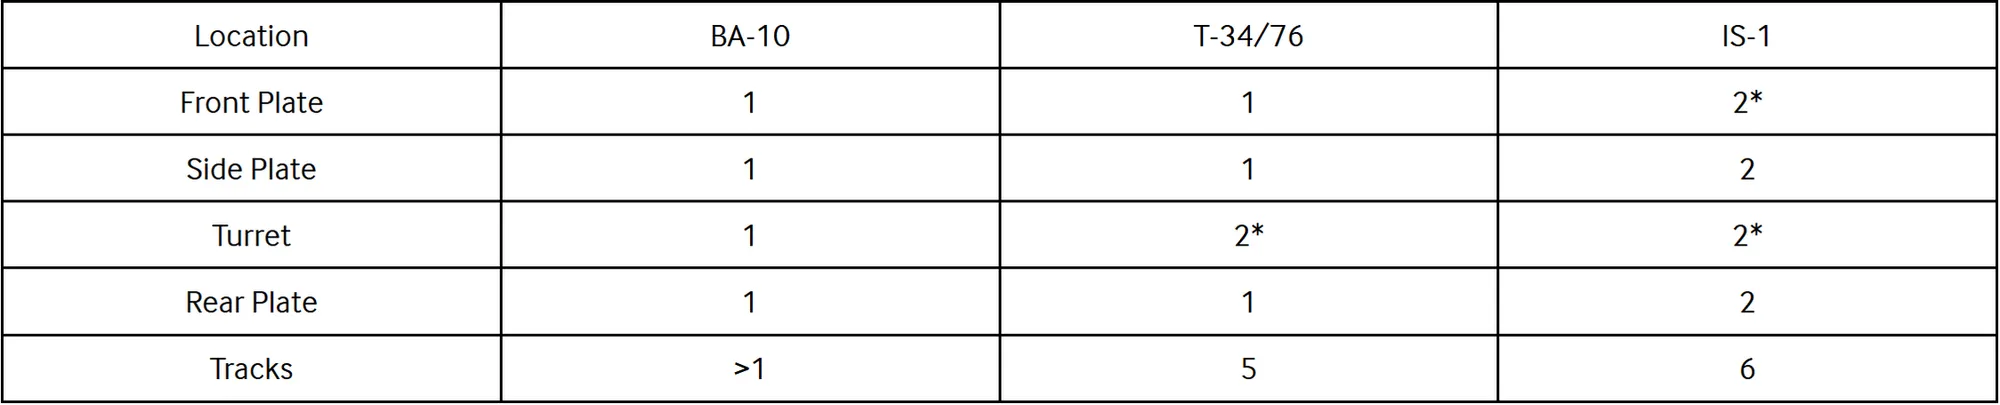
Having said all that, let’s move on to the Panzer IV’s performance against the Soviet tanks. This area of the game is probably where the most interesting tank vs tank engagements occur because of the deviation from the game’s standardization. Here is the table:
R - Ricochet or non-penetrating hit
#* - # shots can only be achieved under specific circumstances or in special areas
When engaging a BA-10:
- Aim anywhere except the tires—they will take more than 1 shot to kill. You can use an HE shell if you wish to conserve AP shells.
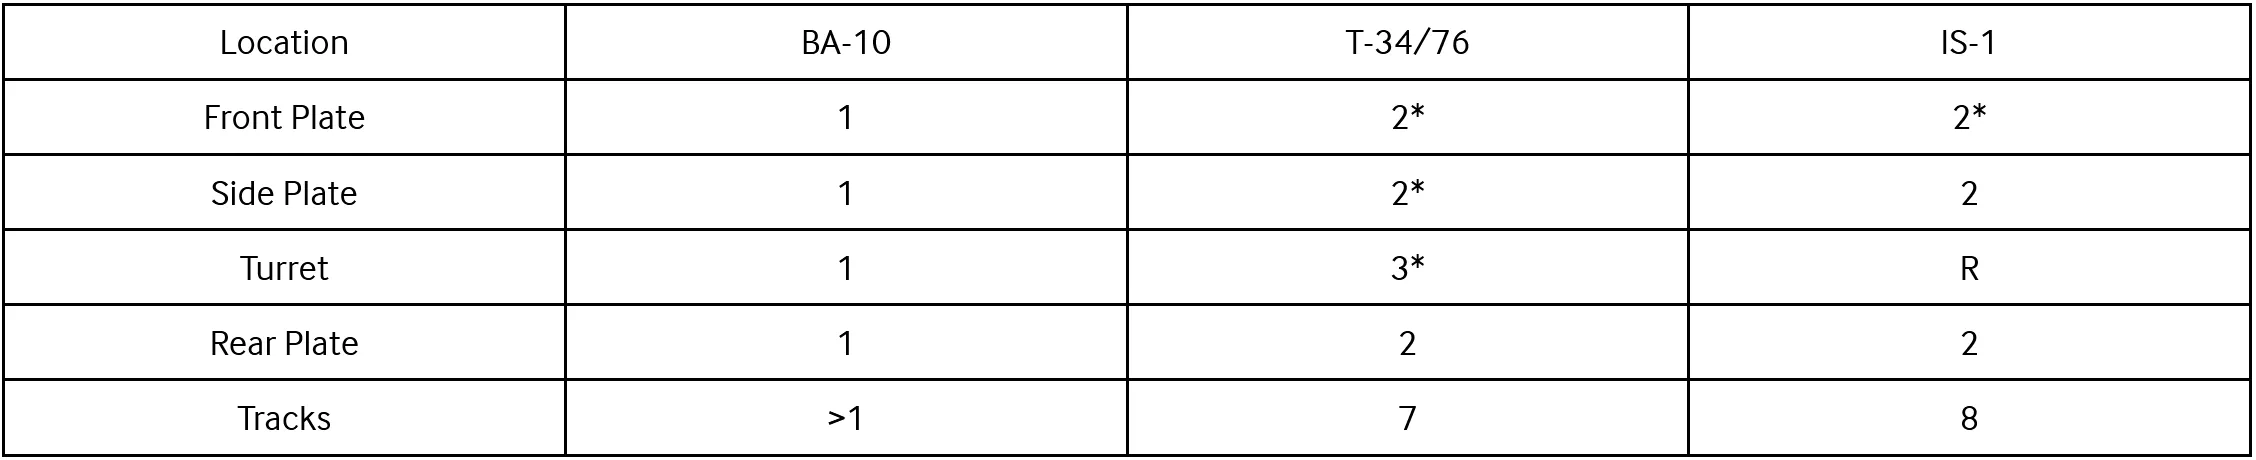
When engaging a T-34/76:
-
The T-34/76 can be penetrated anywhere in the front plate for a 2 shot kill provided the shot is either perpendicular to the front of the tank or within 35° degrees from the perpendicular. If the T-34/76 angles between 35° and 40° with respect to the Panzer IV, the majority of the front plate and the side will not penetrate but rather ricochet. Even in this scenario, however, the part of the front plate between the tracks that is angled towards the floor is still penetrable. To illustrate this dynamic, see Figure 49.
-
Shooting the turret of a T-34/76 in a Panzer IV will kill it in 3 shots except in the mantle. Because the mantle ricochets and because it takes up the majority of the front of the turret, penetrating the turret from the front can be a challenge. There are two ways to go about this. The first shot consists of the sides of the turret that stick out to the left and right of the mantle in triangular shapes, also known as the “cheeks”. Because of the small profile of the T-34/76 turret, this shot is exceedingly hard to land at any distance over 100m and is generally not advised. The second shot is the part of the turret that is directly above the mantle. This area, known as the “forehead”, is a very thin line above the mantle that, if hit, will penetrate the turret. Any higher than that small area will go over the tank, and any lower will ricochet off the turret (Figures 50 and 51). Although the “forehead” seems like a harder shot than the “cheeks”, because of the way the hitboxes of the turret are constructed, at ranges longer than 100m it is actually an easier shot to hit. As for the sides and rear of the turret, all hits here penetrate for a 3 shot kill.
-
Shooting the side plate above the tracks for a 2 shot kill is also a viable option, but as mentioned before will only start penetrating at a 35° angle with respect to the side’s front (55° from the side’s perpendicular).
-
Shooting the tracks is almost never advisable given the much better aforementioned options.
-
The Achilles Heel shot is possible, but the T-34/76 has no area where you can damage the engine and the hull at the same time by shooting through the tracks. Shooting anywhere in the green section will kill the engine with 1 projectile (Figure 23).
-
The Panzer IV can penetrate the T-34/76 in the back plate for a 2 shot kill. The first shot kills the engine.
📹 Figure 49: “Angled T-34/76 and Where To Hit It” — watch clip on YouTube
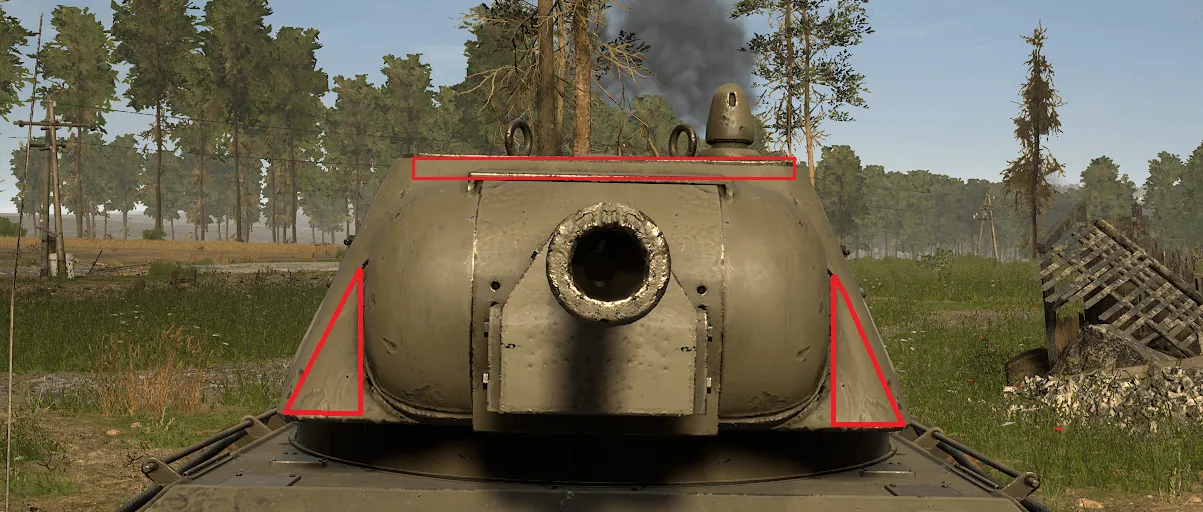
Figure 50: “Penetrable Spots on the T-34/76 Turret”
📹 Figure 51: “Panzer IV Penetrating the T-34/76 ‘Forehead’” — watch clip on YouTube
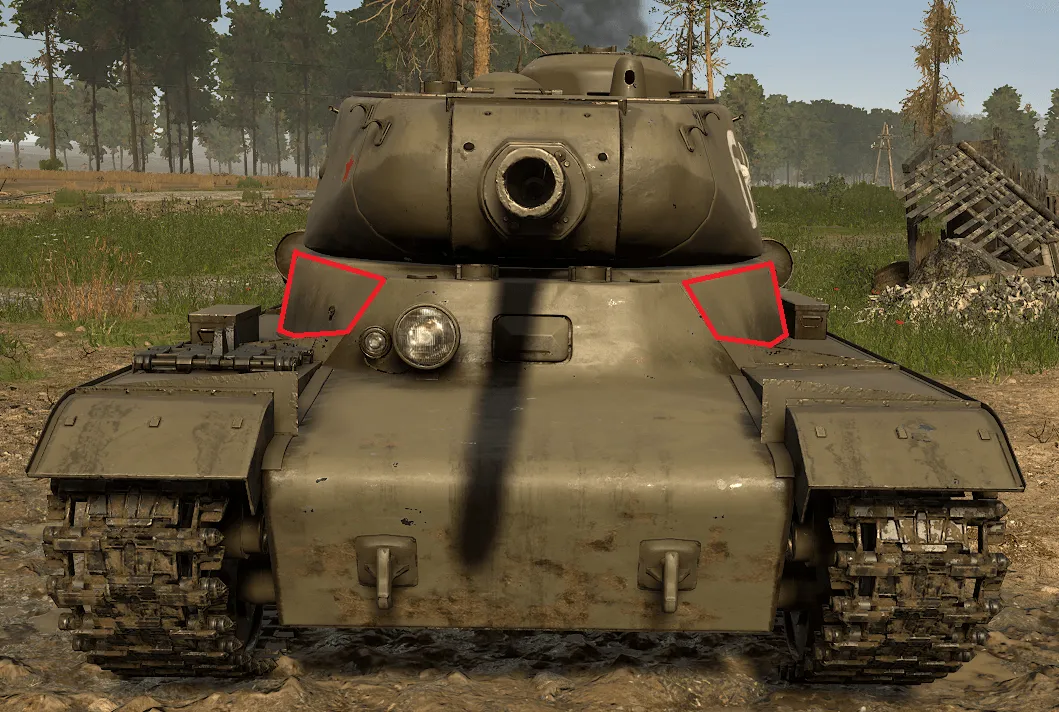
Figure 52: “Where to Penetrate an IS-1 in a Panzer IV, A.K.A. ‘Shoulders’”
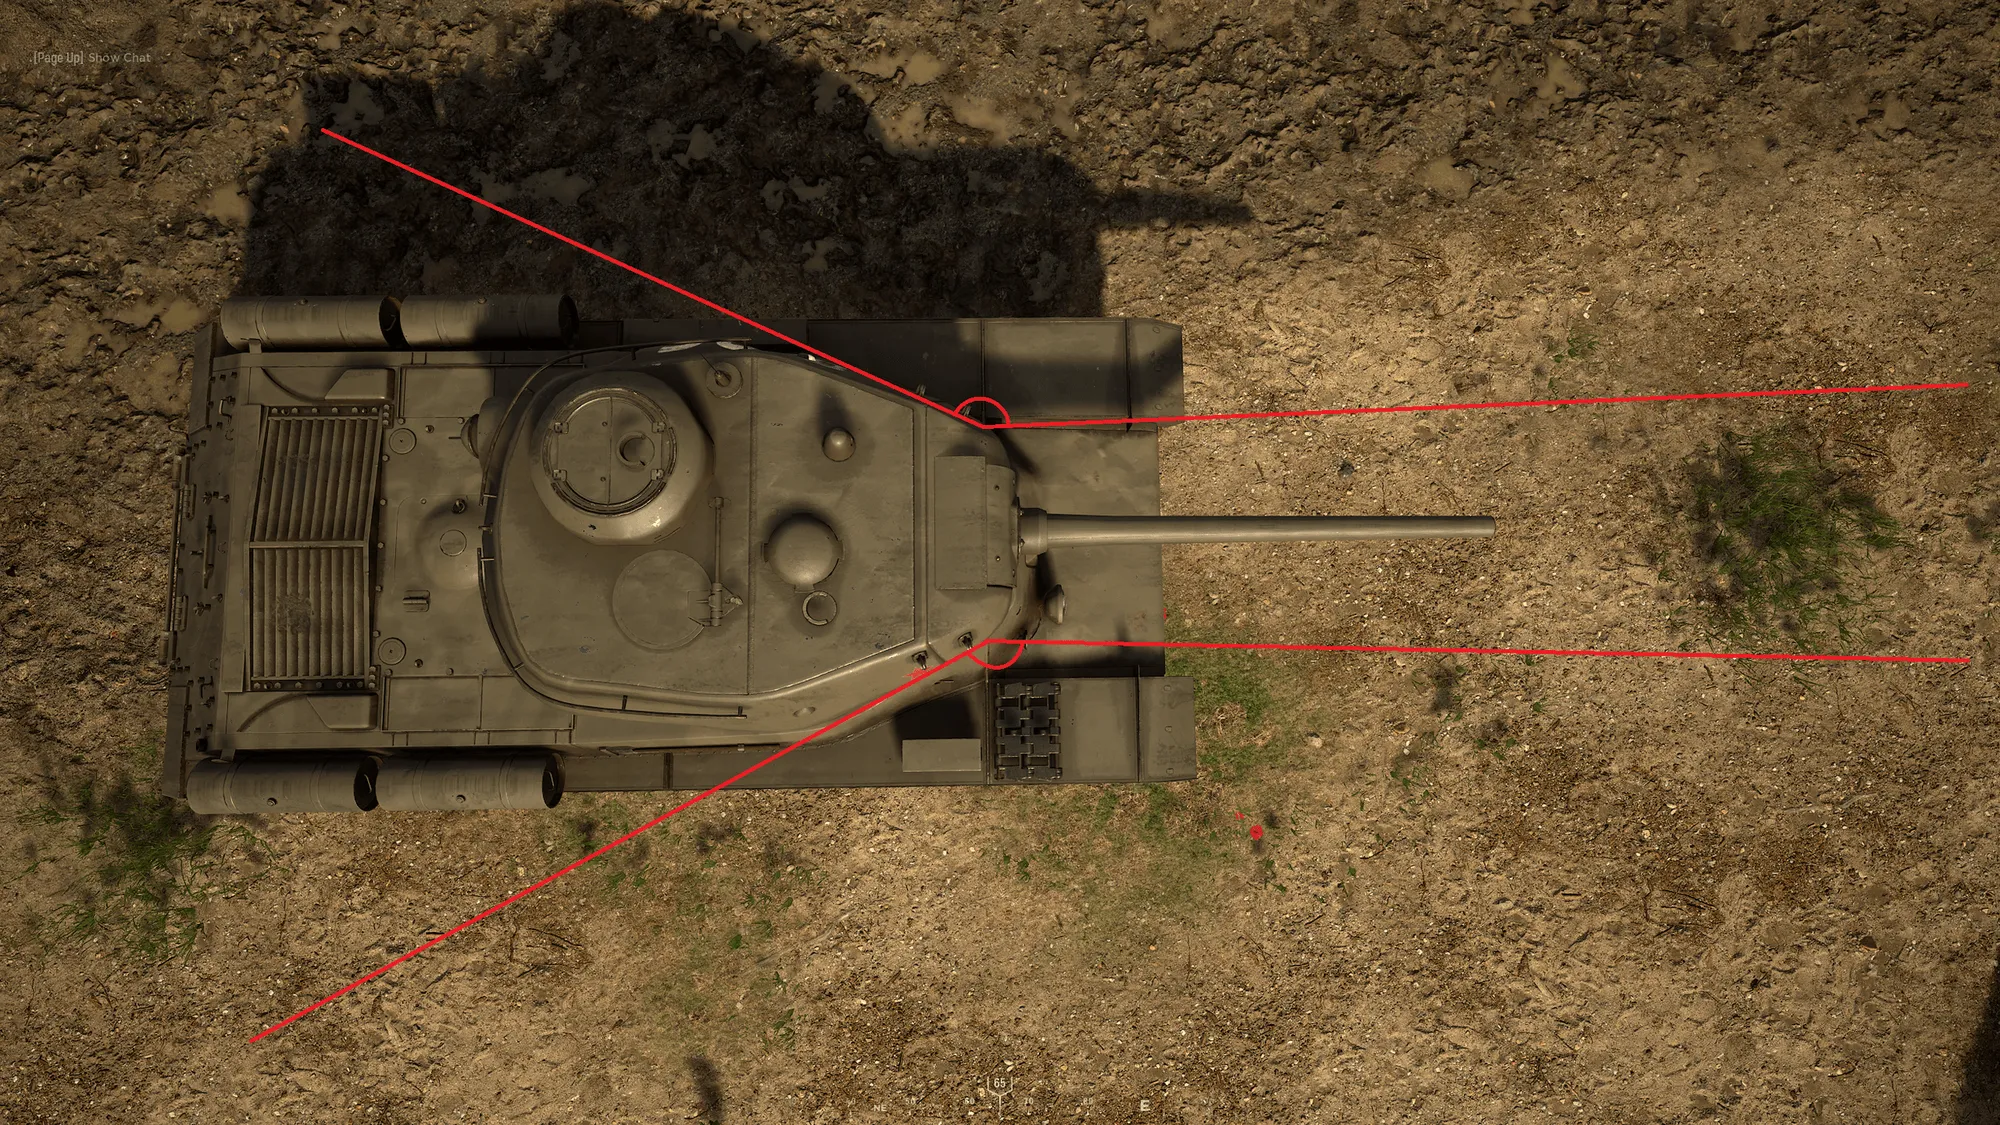
Figure 53: “Angles Needed to Hit ‘Shoulders’ on IS-1 as a Panzer IV”
📹 Figure 54: “IS-1 Angled 2° to the Left with Respect to the Panzer IV” — watch clip on YouTube
📹 Figure 55: “IS-1 Angled 2° to the Right with Respect to the Panzer IV” — watch clip on YouTube
📹 Figure 56: “IS-1 Directly Facing the Panzer IV” — watch clip on YouTube
4.3.3 The Panzerkampfwagen V “Panther”
Section titled “4.3.3 The Panzerkampfwagen V “Panther””The Panther is back, baby! And let Tank God himself smite me where I sit if this tank isn’t the most over-powered, broken metal box on wheels to have ever existed in this game. It’s not for us mere mortals to understand why the developers saw fit to give the Panther all the armor and firepower of a heavy AND the mobility and speed of a medium tank. All I can say for sure is that if you are on the German side, USE THIS THING.
We’ll get into the glorious specifics below, but first thing’s first: what does it look like (Figure 57)?
-
Slanted front and side plates. The other German tanks are boxy.
-
A side skirt that extends partially over the side of the tracks.
-
A weird, rough texture on the front and side plates as well as the turret.
-
Extra tracks strapped to the rear end of the side plate.
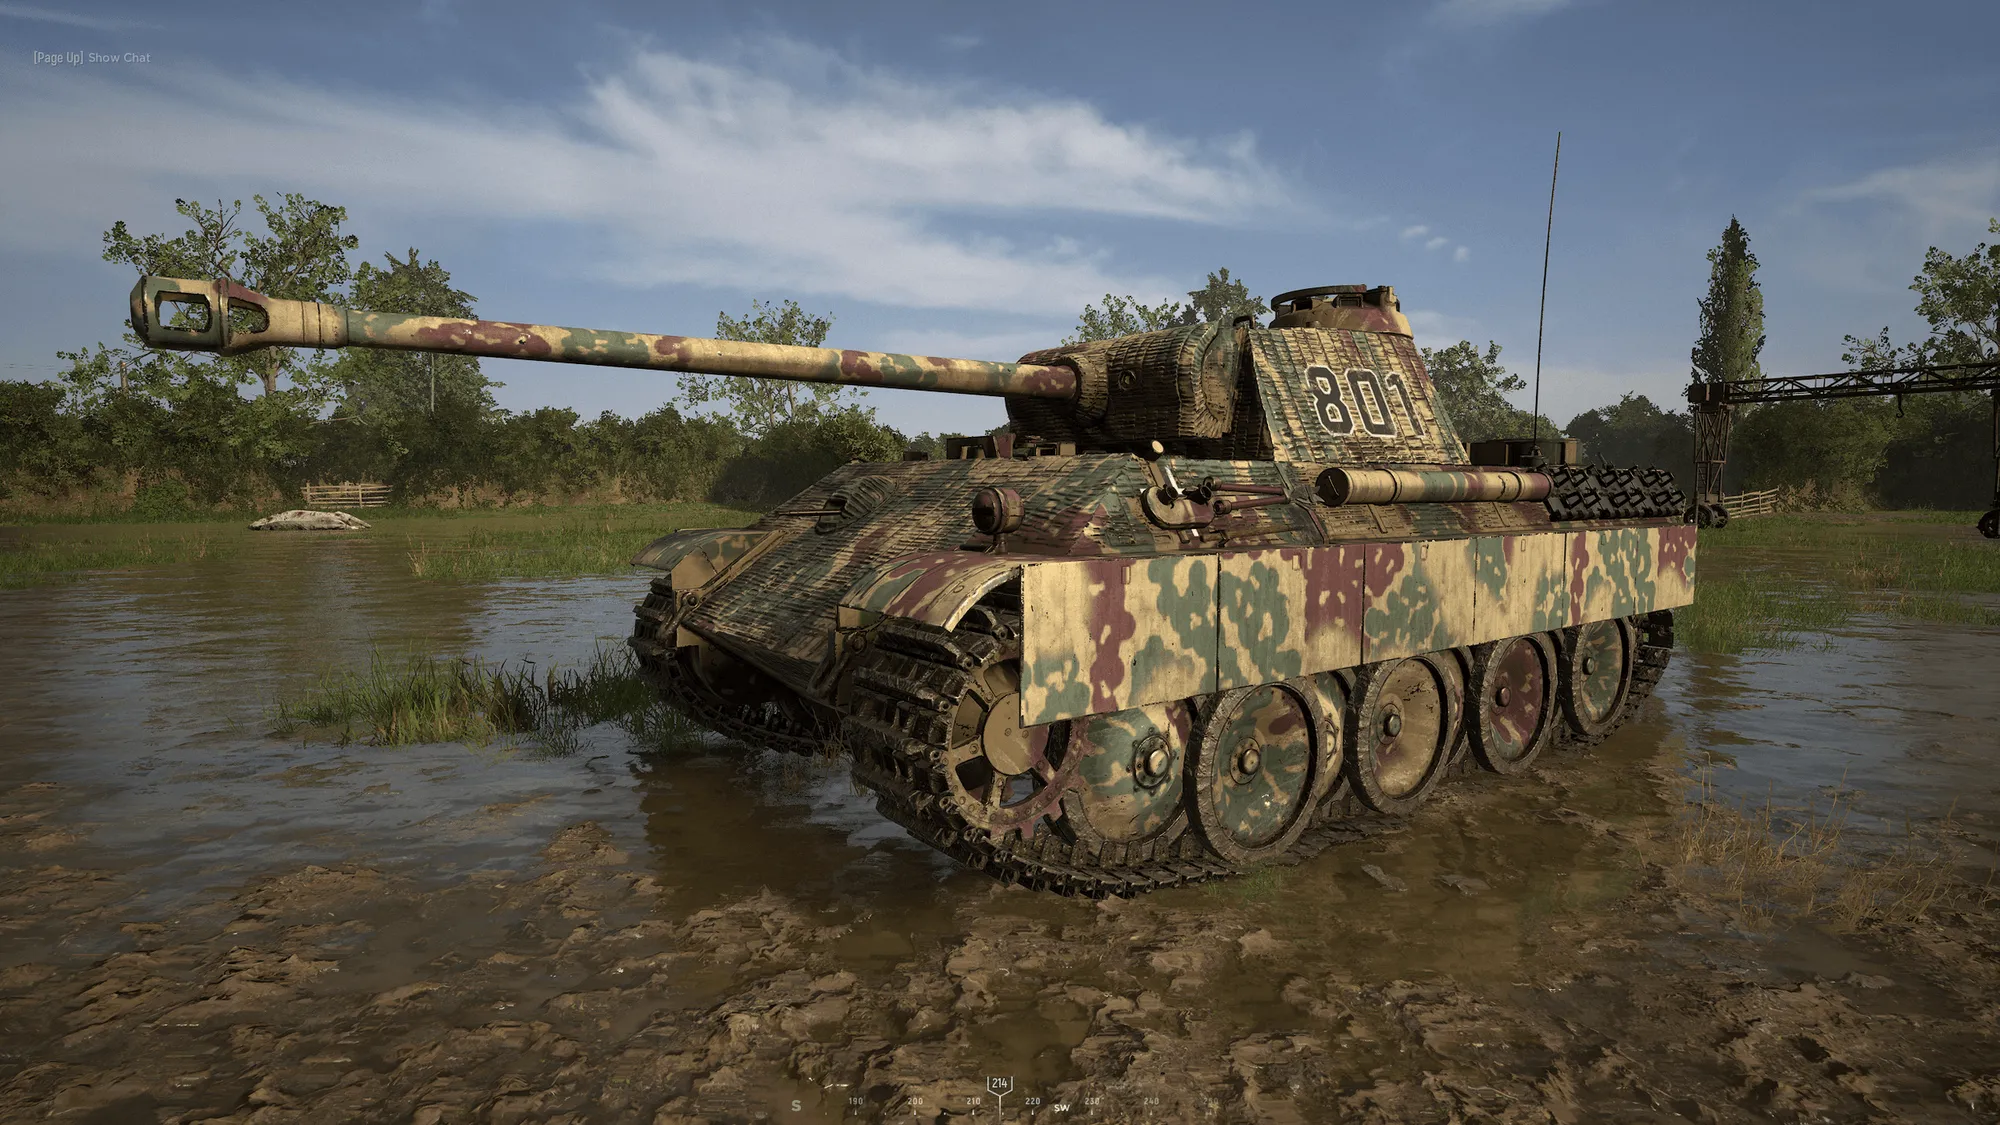
Figure 57: “The Panzerkampfwagen V ‘Panther’”

By far the most important change in Update 12 to the tank meta is the reload speed of the Panther. As we will see below, the Panther is a heavy tank in terms of its ability to penetrate enemy heavies as well as its ability to be penetrated by other heavies. Unlike other heavies, however, the Panther has the reload speed of a medium tank (6 seconds instead of 8 seconds). This means that all else being equal, in a head to head engagement, the Panther will usually win due simply to the fact that it can land the killing blow more quickly than its opponents can.
Another thing to notice is the top speed. Heavies like the “Jumbo”s and the Tiger have a top speed of 18-19 km/h, whereas mediums like the Panzer IV and the Sherman medium have a top speed of 22-25 km/h. The Panther has a top speed of 23 km/h, in line with the rest of the medium tanks. This means that together with the reload speed, the Panther has the best qualities of the medium tanks while retaining the best qualities of the heavy tanks.
Next, let’s look at the mobility of the Panther:

As if the stats of the Panther were not already stacked enough, it turns out that the Panther has the highest 3rd and 4th gear turn speed of any heavy in the game, even rivaling that of the mediums (which are supposed to have more mobility). Interestingly, the Panther has a unique quirk among the rest of the tanks in the game in that its 4th gear turn speed is actually its fastest turn speed (usually the 3rd gear or 1st gear are the fastest gears). The Panther’s mobility coupled with its high top speed allows Panther drivers to really whip this thing around and get to places faster than most other tanks. By contrast, the Panther’s 1st gear and reverse turn speeds are much slower than other heavies like the Tiger and the “Jumbo”s, which promotes really aggressive flank gameplay where you never stop moving. Unlike some of the more recently introduced tanks, the Panther has no trouble getting over obstacles and berms or performing any of the mobility tricks outlined in section 2.6.2, allowing it to adopt this style of play easily, and its driver viewport takes up almost the entire screen, affording the Panther driver much greater visibility than drivers of other factions’ heavy tanks.
Finally, we come to the good stuff. How does it handle against American tanks?
#* - # shots can only be achieved under specific circumstances or in special areas
When engaging a Greyhound:
- Aim anywhere except the tires—they will take more than 1 shot to kill. You can use an HE shell if you wish to conserve AP shells.
When engaging a Stuart:
-
Hit it anywhere in the body for a 1 shot kill. Take care not to hit the tracks or turret, although it’s not the end of the world if you do.
-
The top of the side skirt hanging over the tracks on the front of the tank is impenetrable (see section 4.5.1 for more).
When engaging a Sherman medium:
-
The Sherman medium is a 1 shot kill anywhere in the front, side, or rear plates. Easy peezy, lemon squeazy.
-
If you for some reason cannot hit the body, shoot the turret anywhere twice for a kill. Ricochets are hard to do here, so don’t discriminate.
-
Do not hit the tracks.
-
As outlined in section 2.10, the Achilles Heel shot is possible, but practically useless since you can kill it in 1 shot to the side armor.
-
It should be noted here that the Sherman medium can penetrate you for a 3 shot kill from the front by hitting the “cheeks” of your turret. If you notice this, don’t panic too much—he has to land 3 shots on you and you need only land 1 shot on it, so stay calm, find the bugger, and blow him to smithereens.
When engaging a Sherman “Jumbo” 75mm/”Jumbo” 76mm:
-
You can kill these tanks in 2 shots to the front plate. Care must be taken to avoid the rounded portion of the transmission towards the bottom of the hull between the tracks because that will ricochet unless the shell is perfectly perpendicular to the surface. (Figure 58).
-
Another very viable 2 shot kill strategy is aiming for the side plate. Even if you can see only a sliver of the side plate, you can land the shot. You should only do this if you cannot see the front plate or turret mantle for some reason.
-
The difference in cannons between the Panther and the 76mm “Jumbo” Sherman drastically changes the urgency of the engagement. Since the Panther and the “Jumbo” both need to land the same shots but the Panther has a faster reload speed, this means that the Panther has 2 full extra seconds of leeway in a head to head engagement to acquire the target and take careful aim. Even if a Panther gets hit first, it can still win the engagement by simply penetrating within 2 seconds of getting hit since it will still reload the 2nd round faster than the “Jumbo” can.
-
If you encounter a “Jumbo” 75mm meme tank in the field, congratulations! You have met an exceedingly rare specimen and you have the tremendous honor of killing the last of its species. Similar to the Sherman medium, it needs to land 3 shots to the “cheeks” of the Panther turret while the Panther can aim anywhere in the body or turret for just 2 shots, making this engagement a bit of a joke especially considering the Panther’s 2 second faster reload speed.
-
Shooting the turret from the front in the mantle is a 2 shot kill, but if you hit the slanted portions of the turret to either side of the mantle or the top of the turret itself, you will ricochet. The cupola also ricochets. If you can only see the side or rear of the turret, you can still penetrate for a 2 shot kill, but it’s easy to ricochet here since the turret itself is round.
-
As outlined in section 2.10, the Achilles Heel shot is viable, but not strictly necessary in a Panther. If you are able to see the side of a “Jumbo”, you likely already have the kill secured since you can shoot the first shot and have a faster reload, but killing the “Jumbo”s engine guarantees that it will not be able to shoot back and damage your tank, forcing you to repair. Both the green and red sections are penetrable in the Panther, but hitting the red section by aiming between the tracks is optimal since it does hull damage as well as engine damage (Figure 23).
-
Of course, 2 shots to the back plate at any angle will kill it, with 1 shot killing the engine. When shooting the rear, care must be taken to avoid the bags of equipment on the rear of these tanks, outlined in section 4.5.2, as these areas will not penetrate. Aim below them.
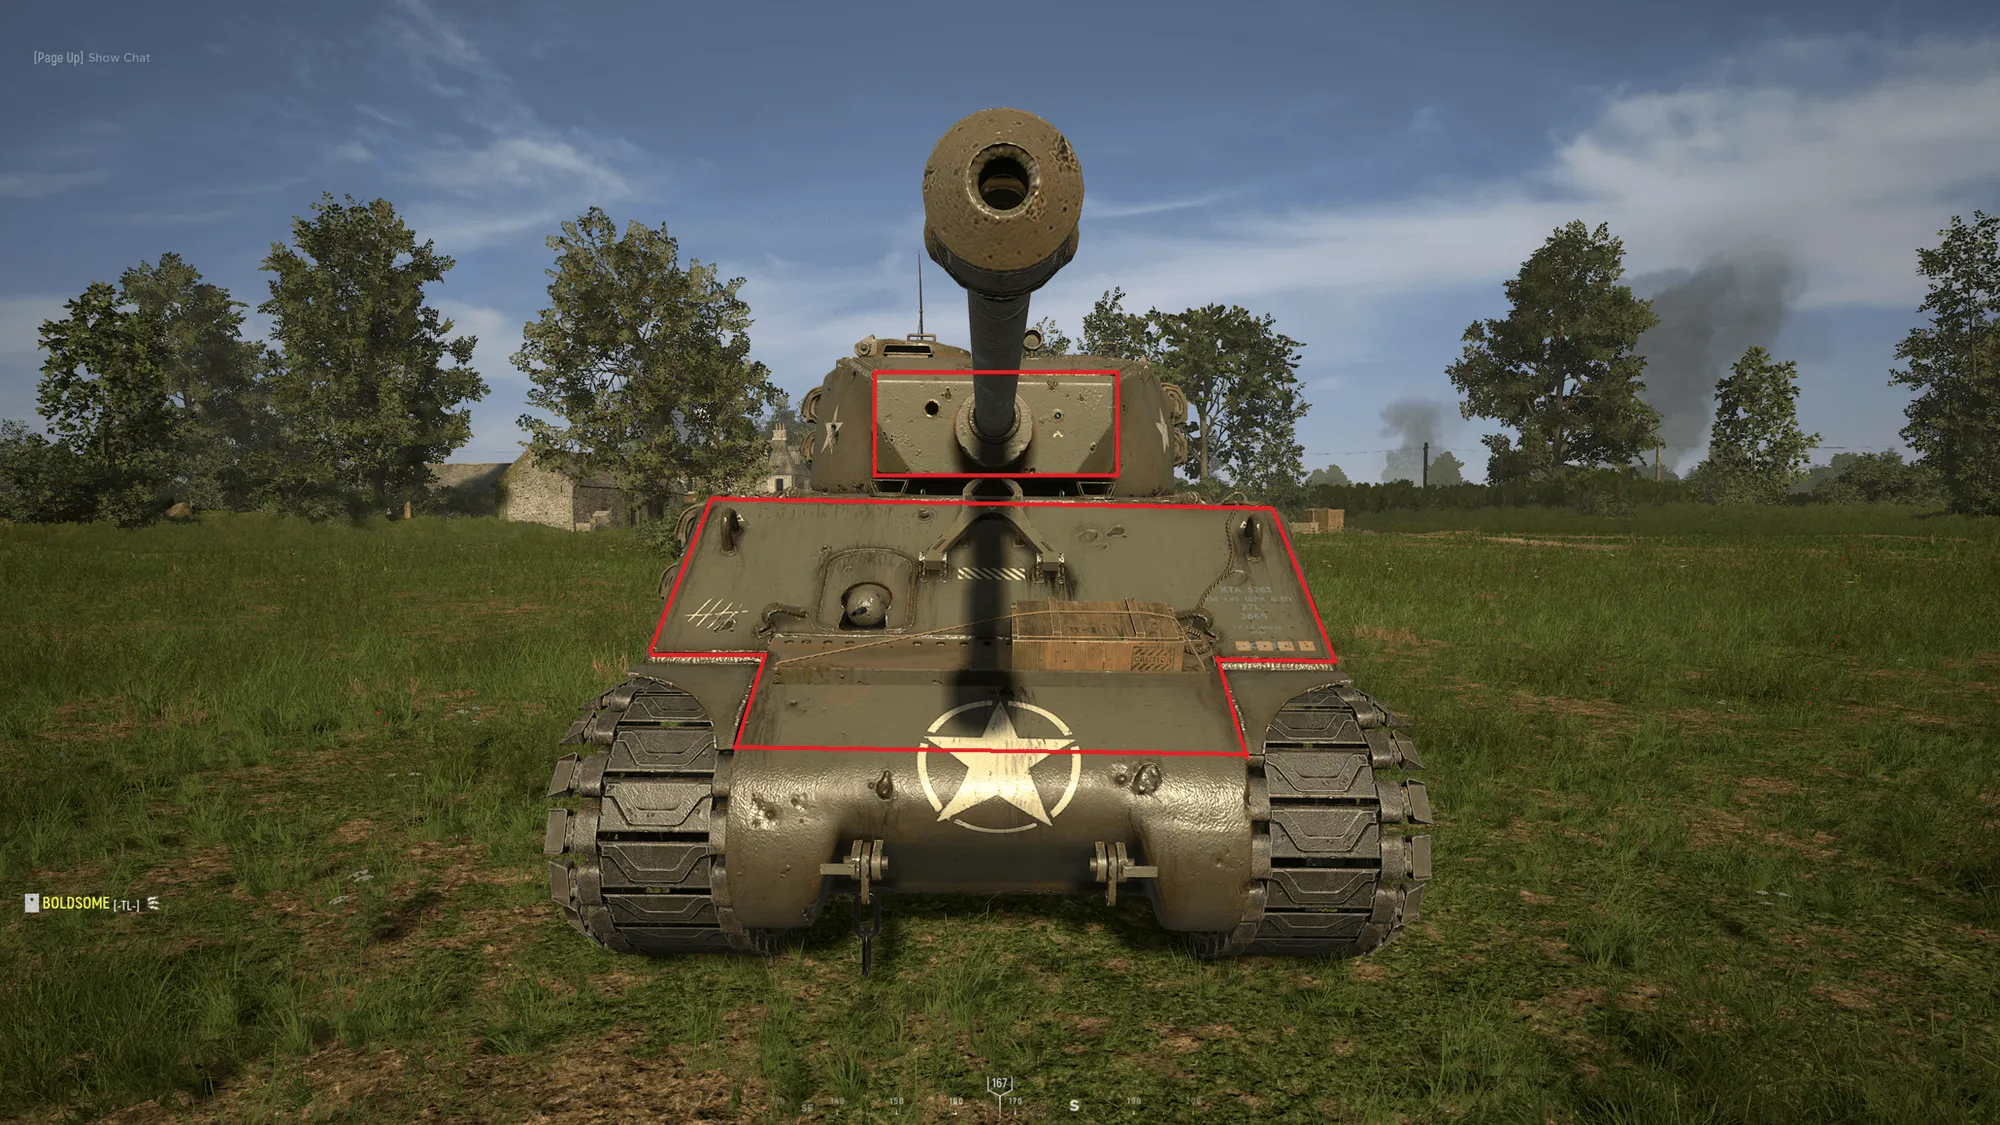
Figure 58: “Where to Hit the “Jumbo” Sherman as a Panther or Tiger”
#* - # shots can only be achieved under specific circumstances or in special areas
When engaging a BA-10:
- Aim anywhere except the tires—they will take more than 1 shot to kill. You can use an HE shell if you wish to conserve AP shells.
When engaging a T-34/76:
-
The T-34/76 can be 1 shot anywhere in the front, side, and rear plates. It cannot save itself even if it angles the body, so shoot away.
-
The mantle of the T-34/76’s turret will ricochet even Panther shots. Shooting any other part of the turret of a T-34/76, including the “cheeks” and “forehead” outlined in Figure 50, will kill it in 2 shots.
-
Do not hit the tracks.
-
The Achilles Heel shot is possible, but practically useless since you can kill it in 1 shot to the side armor.
When engaging an IS-1:
-
The Panther can 2 shot kill an IS-1 in the large flat front plate between the tracks as well as the smaller flat front plate right below the turret under the barrel (Figure 59). If you connect with the long part of the front armor that faces upwards, perpendicular to the other plates, you will ricochet. This may result in the shell ricocheting into the flat part of the front plate anyway and penetrate that, but if you want to reliably destroy IS-1’s, make sure to avoid aiming for that area.
-
With regards to the IS-1’s “shoulders”, the Panther’s ability to penetrate them is the same as the Panzer IV’s ability to penetrate them. The “shoulder” that is closer to the Panther will penetrate, and the farther one will ricochet. If the IS-1 is directly facing the Panther, both “shoulders” will ricochet. For more on this, see Figures 52-56 in the Panzer IV section. That being said, is not recommended to even aim for this shot, since the other body shots are much more reliable.
-
Hitting the side plate will kill an IS-1 in 2 shots. This can be done even if you only see a sliver of the side from the front, but is not recommended since the aforementioned shots are superior.
-
The turret can be killed in 2 shots as well, but is a little finicky. This is because the entire turret, including the mantle, is rounded off, meaning the vast majority of shots aimed here will ricochet. Only a very small square on either side of the barrel, where the mantle’s curvature makes it flat enough with respect to the Panther’s shell to pierce, can be penetrated (Figure 59). Everywhere else will ricochet.
-
The Panther has the reload speed advantage against the IS-1, so head to head engagements should come out in favor of the Panther, but keep in mind that clever IS-1 tankers will obscure their bodies behind cover and only peek with their turrets, meaning you have to aim for a relatively tiny surface and penetrate it twice to kill.
-
The turret’s cupola and the inside of the barrel will penetrate, but will never do hull damage. Instead, they simply disable the turret.
-
The Achilles Heel shot is applies. Since the Panther can penetrate the side plate of the IS-1, both the red and green outlines are penetrable and both will disable the engine in 1 shot (Figure 23). Hitting the red outline is relatively simple, provided you are at the right angle—aim at the large gap between the last and 2nd to last cog in the tracks and penetrate the side. This shot is not recommended in the Panther vs the IS-1 because the IS-1’s slow turn speed coupled with the Panther’s fast reload speed means that if the Panther is at the correct angle for the Achilles Heel, it can simply shoot the IS-1 in the side or rear twice before the IS-1 can respond.
-
Hitting the tracks is inadvisable given the aforementioned shots.
-
Shooting the back plate is a 2 shot from any angle if you get the opportunity to do so. The first shot kills the engine. If aiming from the rear, do not hit the cylindrical canisters hanging off either side of the rear, as these will not penetrate (see section 4.5.9 for an illustration of this).
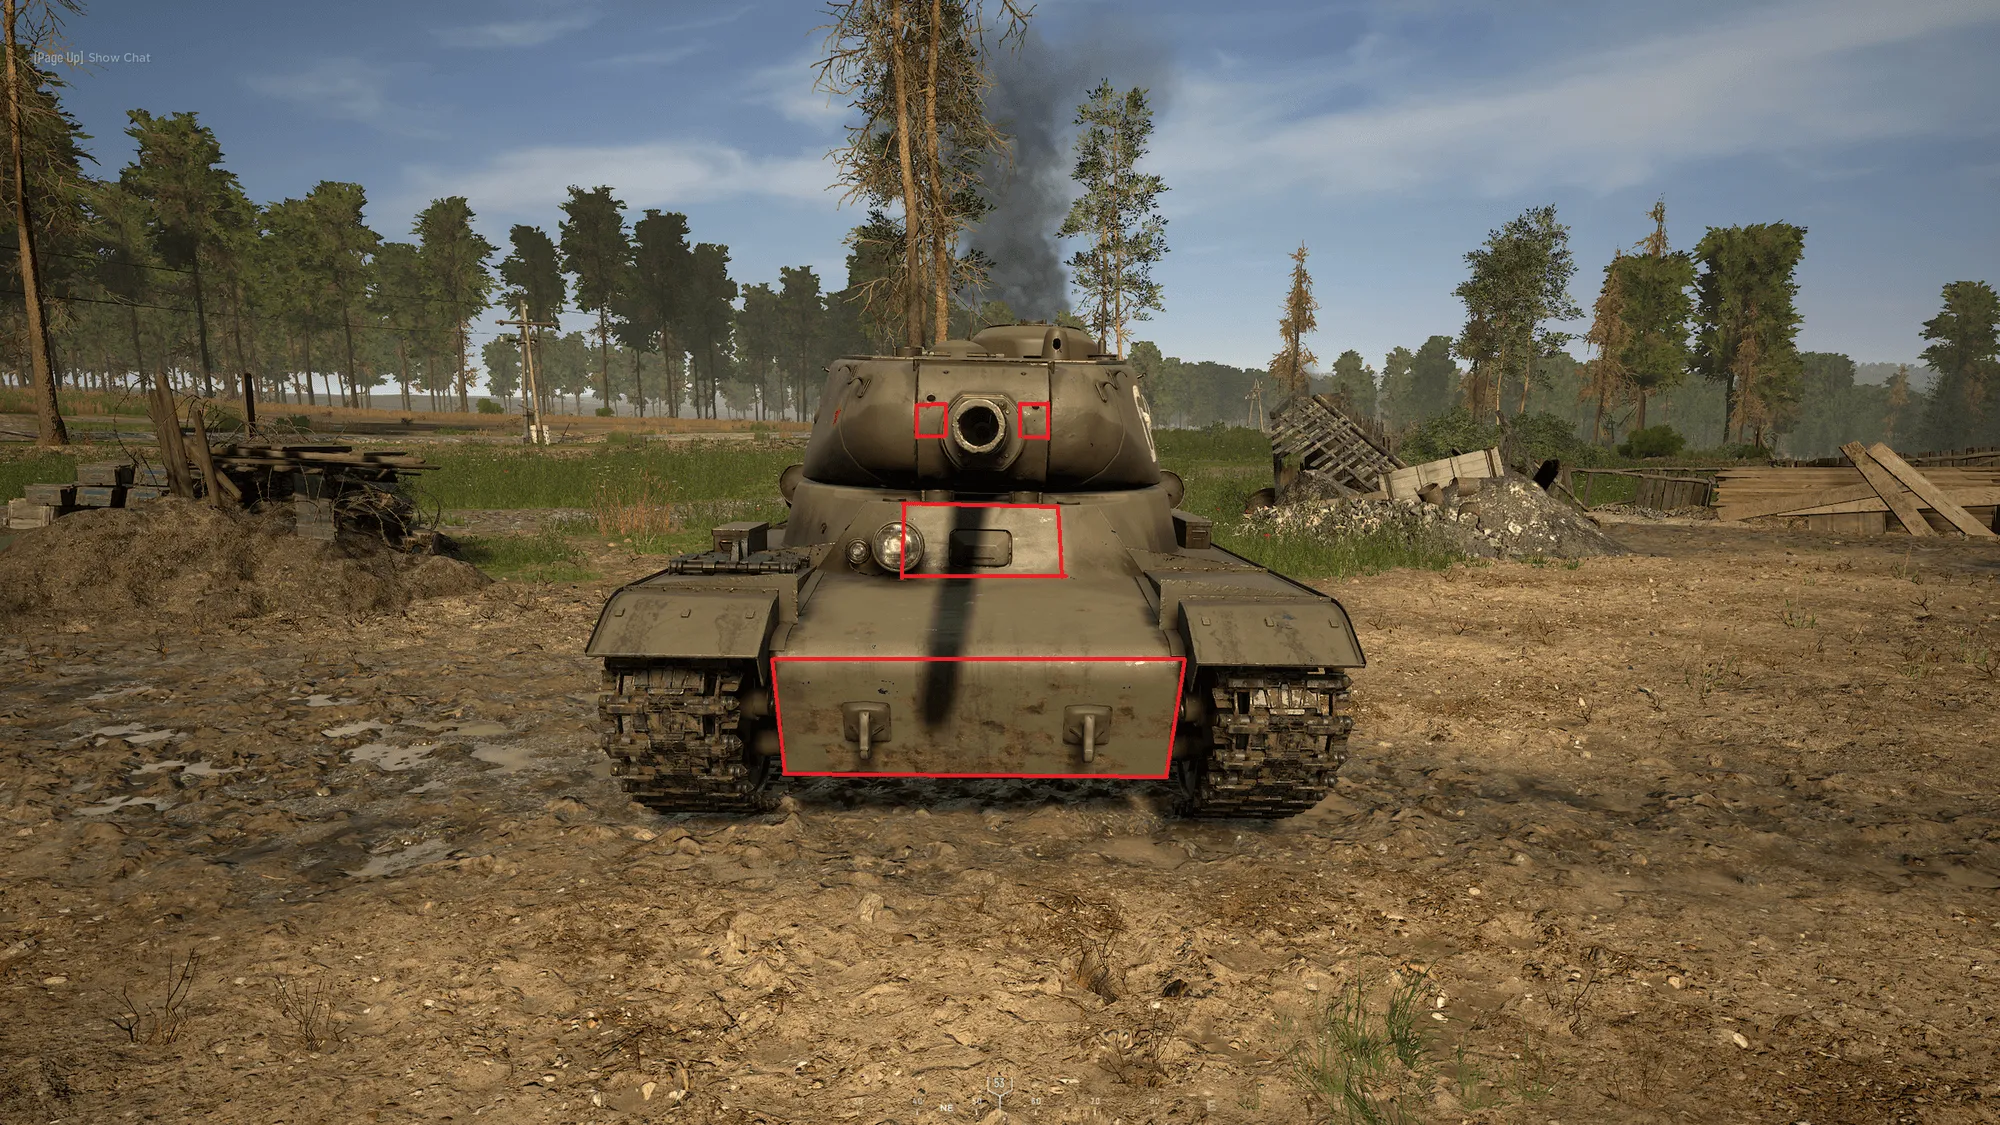
Figure 59: “Where to Penetrate the IS-1 as a Panther or Tiger”
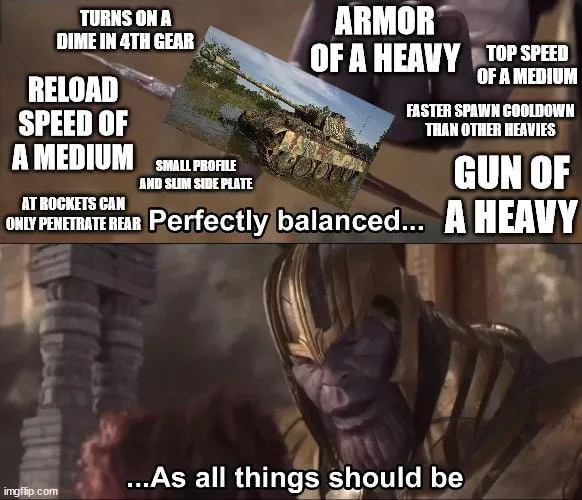
Figure 60: “A Quote From the Developers of Hell Let Loose”
4.3.4 The Panzerkampfwagen VI “Tiger I”
Section titled “4.3.4 The Panzerkampfwagen VI “Tiger I””In Update 12, the Tiger I tank has been reduced to off-brand Oreo status. It has not been directly changed—it still has a main cannon that can penetrate every tank in the game on almost any surface, armor that is difficult to penetrate by any tank other than a heavy, and a quick 1st gear/reverse turn speed—but the introduction of the insanely buffed Panther heavy tank at the exact same 600 fuel cost has made the Tiger essentially obsolete. Everything that the Tiger can do the Panther can do better. Most of this section will be showing why the Panther is better than the Tiger through direct comparison in every category.
First off, what does it look like? The Tiger is unmistakable on the battlefield, and can be spotted by looking for these features (Figure 61):
-
Size. The Tiger is the widest and longest tank in the game.
-
There is a beige/red/green tricolor camouflage pattern on the hull that somewhat resembles a tiger’s stripes.
-
A very long main cannon with a muzzle brake on the end.
-
A turret with spiked treads attached to its side.

Figure 61: “The Panzerkampfwagen VI ‘Tiger I’”

The Tiger has a 2 second slower reload speed than the Panther, putting it at the same level as the “Jumbo” 76mm and the IS-1. It also drives 5km/h slower than the Panther on average (which is more than you think when translated to in-game speed).
Next are the driving stats. As you can see, the Tiger has a good 1st gear/reverse turn speed but really poor 2nd, 3rd, and 4th gear turn speeds.

The Tiger has a much faster 1st gear and reverse turn speed than the Panther, almost twice as fast. This one caveat is nice, because it means that the Tiger can respond quickly to AT threats behind it when it is stationary and compliments a far back, static style of play well. That being said, the Panther’s 3rd and 4th gear turn speeds are still faster than any of the Tiger’s gears, and I need not tell you dear reader how abysmal 29.5 seconds is for a full turn in 4th gear. Another thing to note is that in Update 12, the Tiger’s driver window has been enlarged to fit almost the entire screen, meaning that the driver’s field of view is much greater than that of other heavies such as the “Jumbo” 76mm.
The Tiger’s cannon is just a slower version of the Panther’s, so it’s chart is the same:
#* - # shots can only be achieved under specific circumstances or in special areas
When engaging a Greyhound:
- Aim anywhere except the tires—they will take more than 1 shot to kill. You can use an HE shell if you wish to conserve AP shells.
When engaging a Stuart:
-
Hit it anywhere in the body for a 1 shot kill. Take care not to hit the tracks or turret, although it’s not the end of the world if you do.
-
The top of the side skirt hanging over the tracks on the front of the tank is impenetrable (see section 4.5.1 for more).
When engaging a Sherman medium:
-
The Sherman medium is a 1 shot kill anywhere in the body. Don’t overthink it and don’t waste your time.
-
If you for some reason cannot hit the body, shoot the turret anywhere twice for a kill. Ricochets are hard to do here, so don’t discriminate.
-
Do not hit the tracks.
-
As outlined in section 2.10, the Achilles Heel shot is possible, but practically useless since you can kill it in 1 shot to the side armor.
-
While the Sherman medium can penetrate the Tiger in the front by ricocheting off of the bottom mantle into the top of the chassis, this shot is hard to hit and can only be done from under 300m, so don’t worry too much about it. Simply turn your front body to avoid giving away side plate and obliterate the medium.
When engaging a Sherman “Jumbo” 75mm/76mm:
-
You can kill these tanks in 2 shots to the front plate. Care must be taken to avoid the rounded portion of the transmission towards the bottom of the hull between the tracks because that will ricochet unless the shell is perfectly perpendicular to the surface. (Figure 58).
-
Another very viable 2 shot kill strategy is aiming for the side plate. Even if you can see only a sliver of the side plate, you can land the shot. You should only do this if you cannot see the front plate or turret mantle for some reason.
-
The trick to engaging an enemy “Jumbo” 76mm from the front is landing the first shot. Since the Tiger and the “Jumbo” both have the same reload speed, the crew that lands the first shot will be the crew that wins the engagement, assuming all subsequent shots land.
-
The difference in cannons between the 75mm and the 76mm “Jumbo” Shermans drastically changes the urgency of the engagement. The 76mm can kill the Tiger in 2 shots almost anywhere while the 75mm has to land a very difficult and situational shot that depends on a lot of variables, giving you a lot more time. This means that you can take your time when engaging the 75mm and it’s not the end of the world if you miss a shot, but landing both shots and quickly destroying the 76mm is imperative. If a 76mm lands the first shot on you, the best course of action is to immediately disengage to cover.
-
Shooting the turret from the front in the mantle is a 2 shot kill, but if you hit the slanted portions of the turret to either side of the mantle or the top of the turret itself, you will ricochet. The cupola also ricochets. If you can only see the side or rear of the turret, you can still penetrate for a 2 shot kill, but it’s easy to ricochet here since the turret itself is round.
-
As outlined in section 2.10, the Achilles Heel shot is not just viable, but the recommended way to deal with “Jumbo”s provided you are at the correct angle. If you are able to see the side of a “Jumbo”, you likely already have the kill secured since you can shoot the first shot, but killing the “Jumbo”s engine guarantees that it will not be able to shoot back and damage your tank, forcing you to repair. Both the green and red sections are penetrable in the Tiger, but hitting the red section by aiming between the tracks is optimal since it does hull damage as well as engine damage (Figure 23).
-
Of course, 2 shots to the back plate at any angle will kill it, with 1 shot killing the engine. When shooting the rear, care must be taken to avoid the bags of equipment on the rear of these tanks, outlined in section 4.5.2, as these areas will not penetrate. Aim below them.
Now, onto what we can learn from engagements with the Soviet tanks:
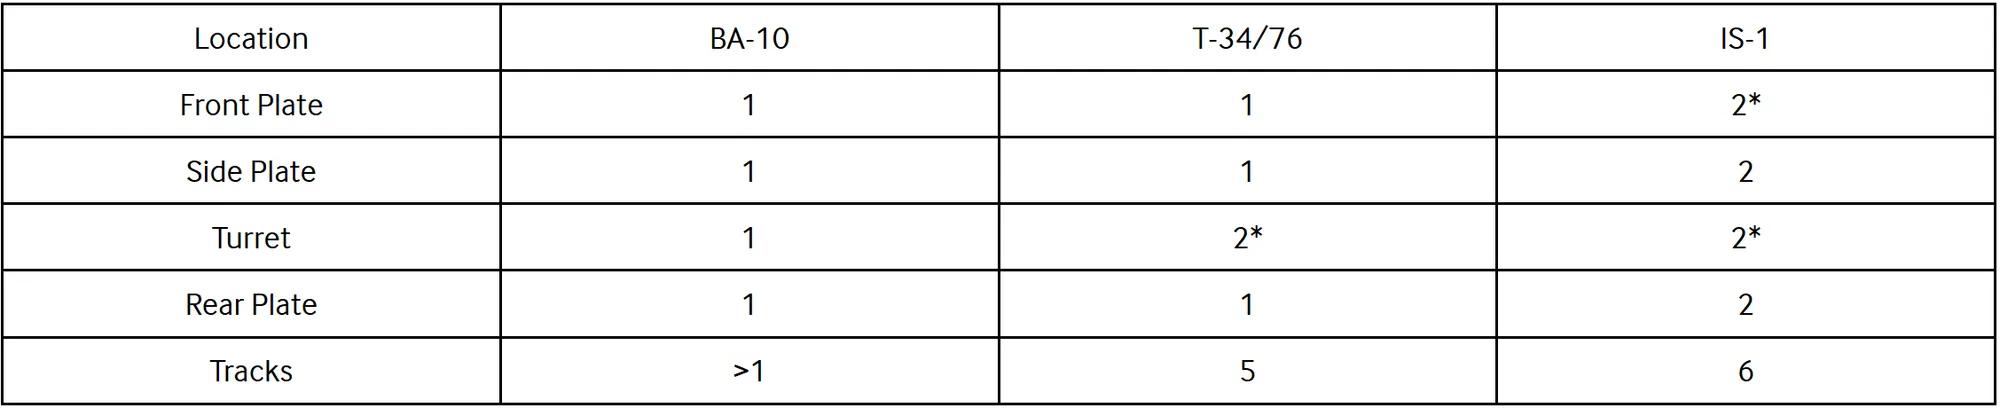
#* - # shots can only be achieved under specific circumstances or in special areas
When engaging a BA-10:
- Aim anywhere except the tires—they will take more than 1 shot to kill. You can use an HE shell if you wish to conserve AP shells.
When engaging a T-34/76:
-
The T-34/76 can be 1 shot anywhere in the front, side, and rear plates. It cannot save itself even if it angles the body, so shoot away.
-
The mantle of the T-34/76’s turret will ricochet even Tiger shots. Shooting any other part of the turret of a T-34/76, including the “cheeks” and “forehead” outlined in Figure 50, will kill it in 2 shots.
-
Do not hit the tracks.
-
The Achilles Heel shot is possible, but practically useless since you can kill it in 1 shot to the side armor.
When engaging an IS-1:
-
The Tiger can 2 shot kill an IS-1 in the large flat front plate between the tracks as well as the smaller flat front plate right below the turret under the barrel (Figure 59). If you connect with the long part of the front armor that faces upwards, perpendicular to the other plates, you will ricochet. This may result in the shell ricocheting into the flat part of the front plate anyway and penetrate that, but if you want to reliably destroy IS-1’s, make sure to avoid aiming for that area.
-
With regards to the IS-1’s “shoulders”, the Tiger’s ability to penetrate them is the same as the Panzer IV’s ability to penetrate them. The “shoulder” that is closer to the Tiger will penetrate, and the farther one will ricochet. If the IS-1 is directly facing the Tiger, both “shoulders” will ricochet. For more on this, see Figures 52-56 in the Panzer IV section. That being said, is not recommended to even aim for this shot, since the other body shots are much more reliable.
-
The trick to engaging an enemy IS-1 from the front is landing the first shot. Since the Tiger and the IS-1 both have the same reload speed, the crew that lands the first shot will be the crew that wins the engagement, assuming all subsequent shots land.
-
Hitting the side will kill an IS-1 in 2 shots. This can be done even if you only see a sliver of the side from the front, but is not recommended since the aforementioned shots are superior.
-
The turret can be killed in 2 shots as well, but is a little finicky. This is because the entire turret, including the mantle, is rounded off, meaning the vast majority of shots aimed here will ricochet. Only a very small square on either side of the barrel, where the mantle’s curvature makes it flat enough with respect to the Tiger’s shell to pierce, can be penetrated (Figure 59). Everywhere else will ricochet.
-
The turret’s cupola and the inside of the barrel will penetrate, but will never do hull damage. Instead, they simply disable the turret.
-
The Achilles Heel shot is applies. Since the Tiger can penetrate the side plate of the IS-1, both the red and green outlines are penetrable and both will disable the engine in 1 shot (Figure 23). Hitting the red outline is relatively simple, provided you are at the right angle—aim at the large gap between the last and 2nd to last cog in the tracks and penetrate the side. If you are at the right angle you should always take this shot so that the IS-1 does not have the opportunity to turn around and damage your tank, forcing you to repair.
-
Hitting the tracks is inadvisable given the aforementioned shots.
-
Shooting the back plate is a 2 shot from any angle if you get the opportunity to do so. The first shot kills the engine. If aiming from the rear, do not hit the cylindrical canisters hanging off either side of the rear, as these will not penetrate (see section 4.5.9 for an illustration of this).
**
Opinion:** The Tiger has been a staple of Axis tanking for years, but Update 12 has cast the Tiger into Panther’s shadow. The Panther has better mobility, a faster reload, a smaller chassis, and a higher top speed without any additional significant weaknesses to balance it out when compared to the Tiger. For the same 600 fuel cost, there is simply no reason to ever spawn or use a Tiger instead of a Panther. While it’s true that the Tiger has not been changed at all in Update 12 (except the enlarging of its driver window, which is actually a small buff) and it can still mop the floor with enemy “Jumbo” 76mm tanks as well as win games for the German side, as a tank crew you could be doing all of that and way more if you were in a Panther instead. The immense potential for lost opportunities caused by spawning a Tiger instead of a Panther means that any commander that does is throwing the game—period. Even if the German team happens to have 1200 fuel lying around and wishes to spawn 2 heavies at the same time, it is still way better to wait 4 minutes and spawn 2 Panthers than it is to spawn a Panther and a Tiger given that tanks tend to stay on the field for a lot longer than 4 minutes. TL;DR: don’t spawn this thing, use the Panther instead.
4.4 The Soviet Tanks
Section titled “4.4 The Soviet Tanks”The T-34/76 is the Soviet medium tank, and like other medium tanks in Hell Let Loose, it combines relatively fast maximum speed with a decent main gun and decent armor. Its main strengths are its very high 4th gear turn speed, the ability to angle its armor, and its cost (there are 2 naturally spawning T-34/76’s in Update 12, and all naturally spawning tanks are free).
Let’s take a look at what the T-34/76 looks like (Figure 62):
-
A short barrel and a small turret relative to the body.
-
Angled plates on the front, sides, and rear.
-
Boxes, wooden crates, and other garbage on the side of the tank.
-
A “pyramid” shape to the body, complete with corners where the front plate meets the side plate.
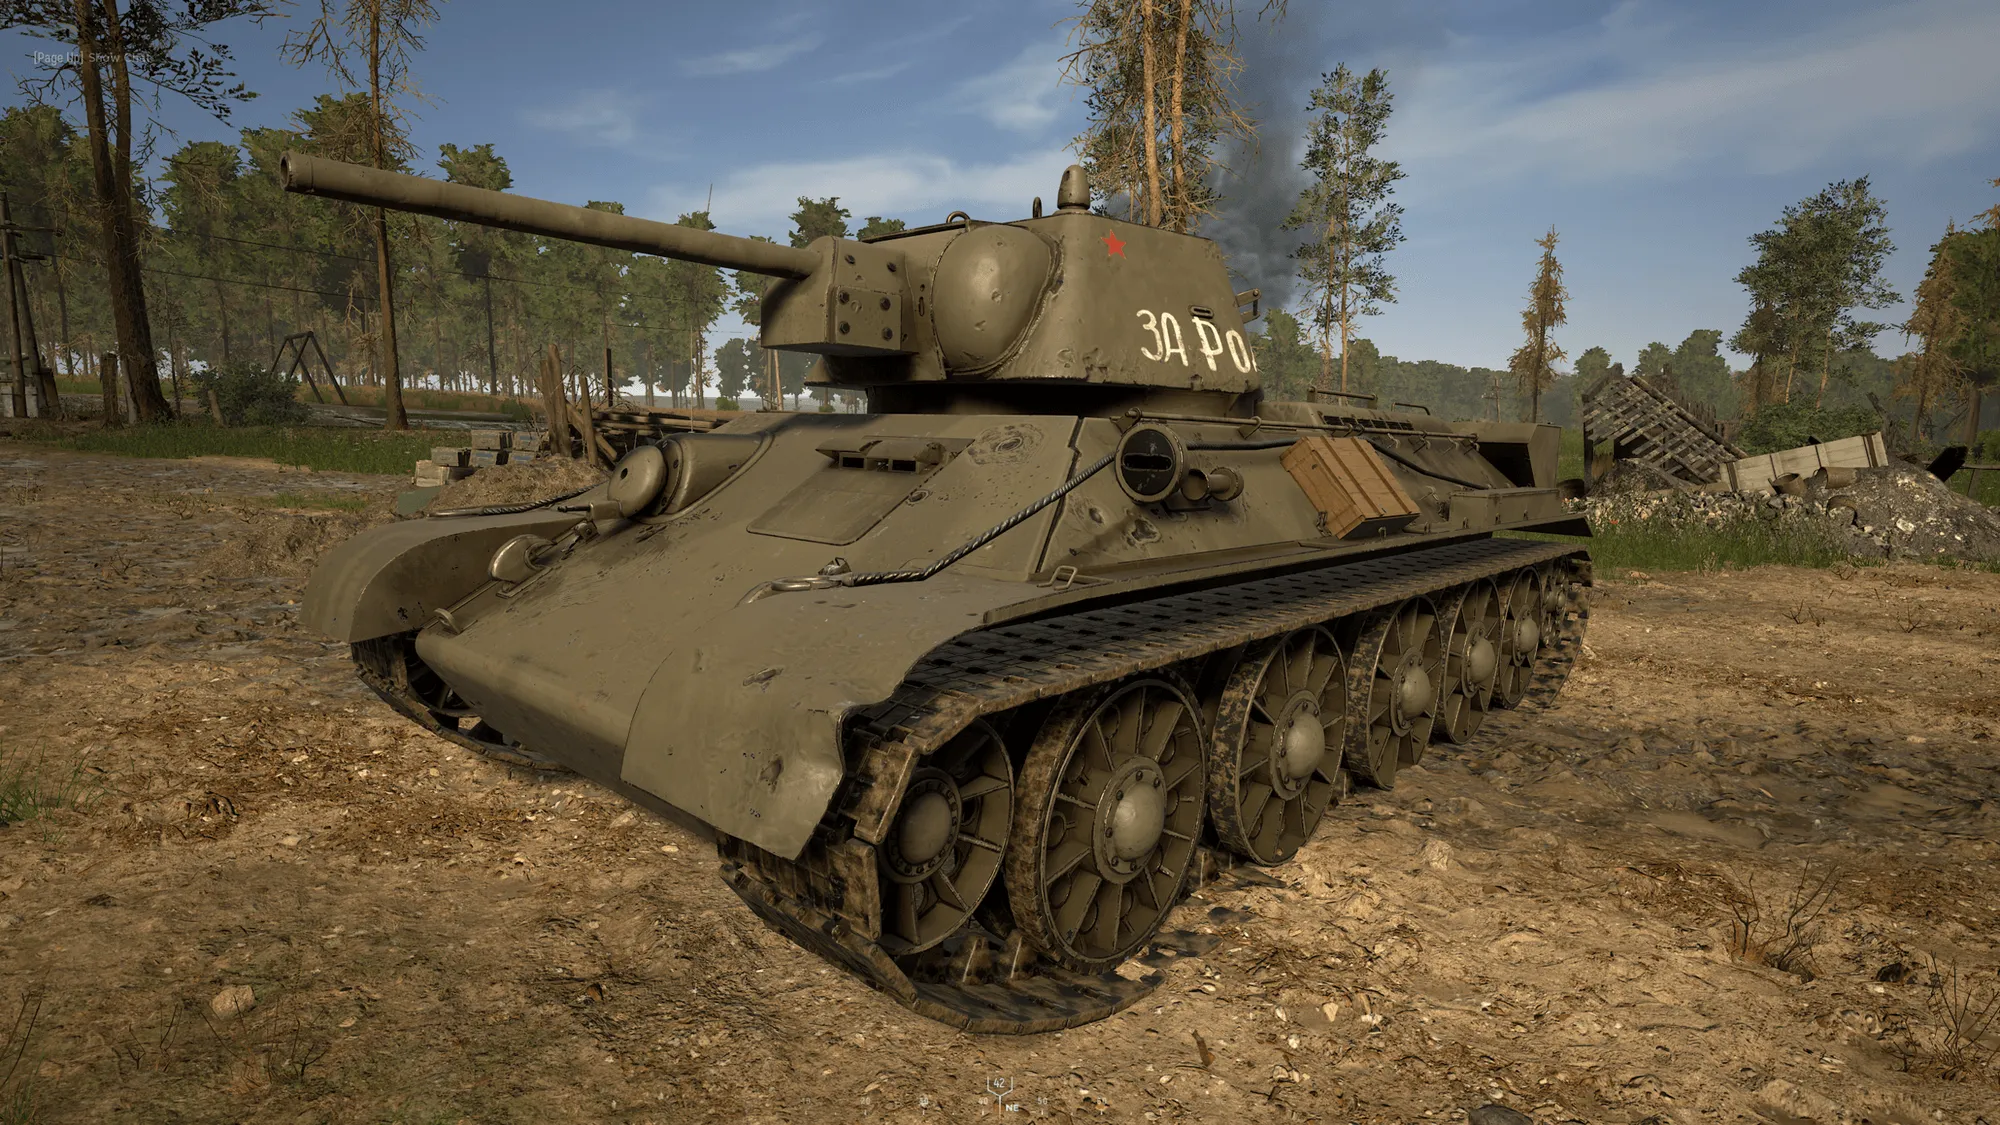
Figure 62: “The T-34/76”

The T-34/76’s stats are not very noteworthy among the other mediums. The only thing worth mentioning is that it holds a little bit more ammunition than other tanks.
So how does it drive? Well, the T-34/76 has the best 4st gear turn speed of any mediums, as well as a comparable top speed:

The T-34/76 shares a similar 1st gear/reverse turn speed when stationary to the Panzer IV, but is faster than the Panzer IV when it comes to turning in 4th gear. It’s 4th gear turn speed is slightly faster even than the Panther, which is known for its fast 4th gear turn speed. If flanking was not so difficult on the eastern front maps, the T-34/76 could be very effective at this kind of “hold W” tactic due to this maneuverability.
Here’s the amount of shots it takes the T-34/76 to kill German tanks:
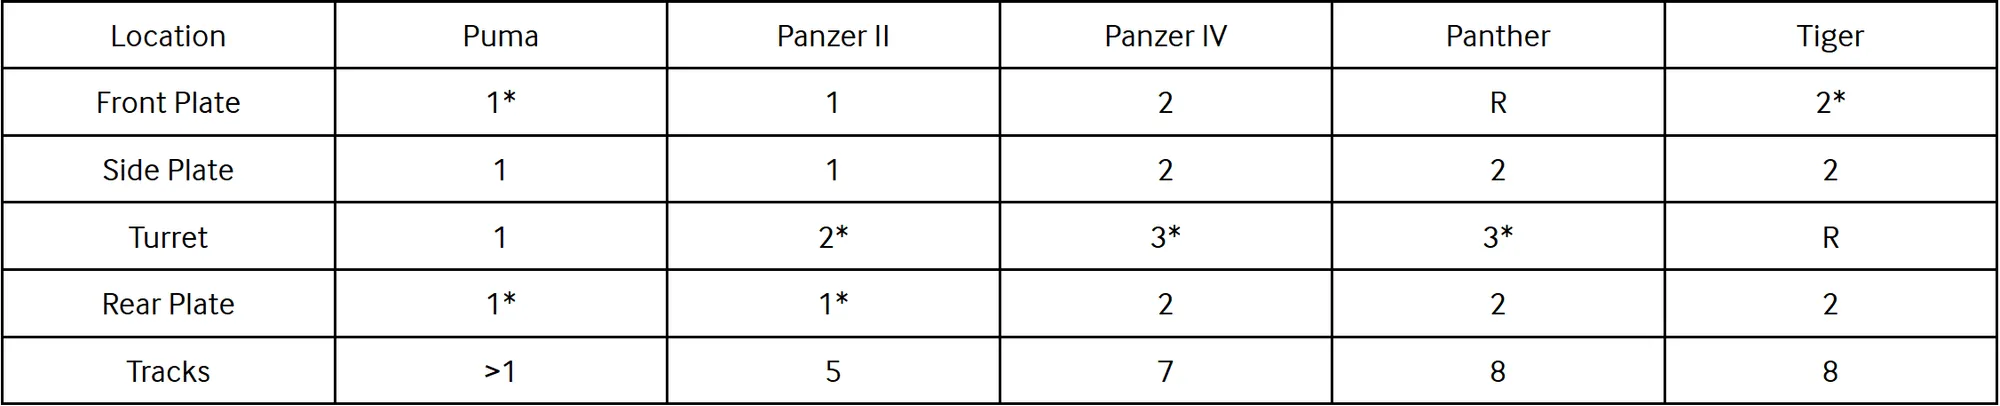
R - Ricochet or non-penetrating hit
#* - # shots can only be achieved under specific circumstances or in special areas
When engaging a Puma:
-
Aim for the center of the body or the turret for a 1 shot kill. Care must be taken not to hit the stoplights on either side of the rear or the gas canisters on top of the side skirt on either side of the front plate because these areas are bugged and will not penetrate (see section 4.5.3 for more on this). You may use an HE shell if you wish to conserve AP shells, since they will also 1 shot everywhere.
-
Avoid hitting the barrel or the base of the barrel, this will only do barrel damage (and it will not kill the tank).
-
Hitting the wheels will take longer than 1 shot. Avoid them.
When engaging a Panzer II:
-
Make certain to hit anywhere in front, side or rear plates, as it is always a 1 shot kill.
-
Make certain not to hit the tracks or the turret, as this can increase the shots it takes. The turret mantle is also impenetrable. You can ricochet into the top of the Panzer II chassis by aiming for the bottom half of the turret mantle for a one shot.
-
Do not shoot the top half of the fuel canisters on either side of the turret as well as the back of the side skirt on the rear of the tank as these areas are bugged and do not penetrate. For more on this, see section 4.5.4.
-
Since the Panzer II cannot do any real damage to the T-34/76, it is not a foe you should be worried about.
When engaging a Panzer IV:
-
Just like the medium Sherman, the T-34/76 will penetrate a Panzer IV anywhere in the front, side, or rear plates for a 2 shot kill.
-
Trying to kill the Panzer IV by hitting the tracks is impossible from the front and inadvisable from the side, as it takes many shots to do so and the turret or side takes less shots to kill.
-
Hitting the turret is a viable approach to killing a Panzer IV whose body is obscured from view, but care must be taken not to hit the barrel or the small mantle either side of it as this will not penetrate. Left or right of the mantle, or side/rear of the turret will kill the tank in 3 hits.
-
If you want to engage a Panzer IV, the optimal strategy is to try to position yourself so that you can hide your front plate and only show your turret. Your turret can be penetrated from the front, but it is a much harder shot than where the Panzer IV can penetrate you in the body. Hard cover or elevation differences such as those that exist on Kursk will allow you to do this.
-
Another option to extend your life against a Panzer IV in the absence of hard cover is to angle the T-34/76 relative to the Panzer IV. If you are turned between 35° and 40° left or right of where the Panzer IV is, both your side plate and the top ⅔ of your front plate will ricochet. At this point, all the Panzer IV can do to penetrate your hull is hit the part of the front plate between the tracks that is angled the opposite way to the rest of the front plate for a 2 shot kill, or the turret in very specific spots for a 3 shot kill. In a public match, it is unlikely that any tanker will know these spots, so you will be able to survive most engagements provided you pull off the correct angle. Against skilled players, however, you may need to find some kind of low bearing object or hill to cover the lower front plate with, and angle the tank to protect the rest. In this niche example, you would force the enemy Panzer IV to have to shoot you in hard-to-hit turret spots while you can hit anywhere in its turret or body. To illustrate this dynamic, see Figures 63 and 64. To see the Panzer IV’s perspective of this angle, see Figure 49 in the Panzer IV section.
-
The Achilles Heel shot is available. Since the T-34/76 can penetrate the side plate of the Panzer IV, both the red and green outlines are penetrable and both will disable the engine in 1 shot (Figure 23). Hitting the red outline is relatively simple, provided you are at the right angle—aim for the space between the side plate and the tracks towards the rear of the tank.f
-
As with any other medium, 2 shots to the back plate at most angles will kill it. The first shot disables the engine.
-
There are some locations where the T-34/76 cannot penetrate the Panzer IV. For more on where these are located, see section 4.5.5.
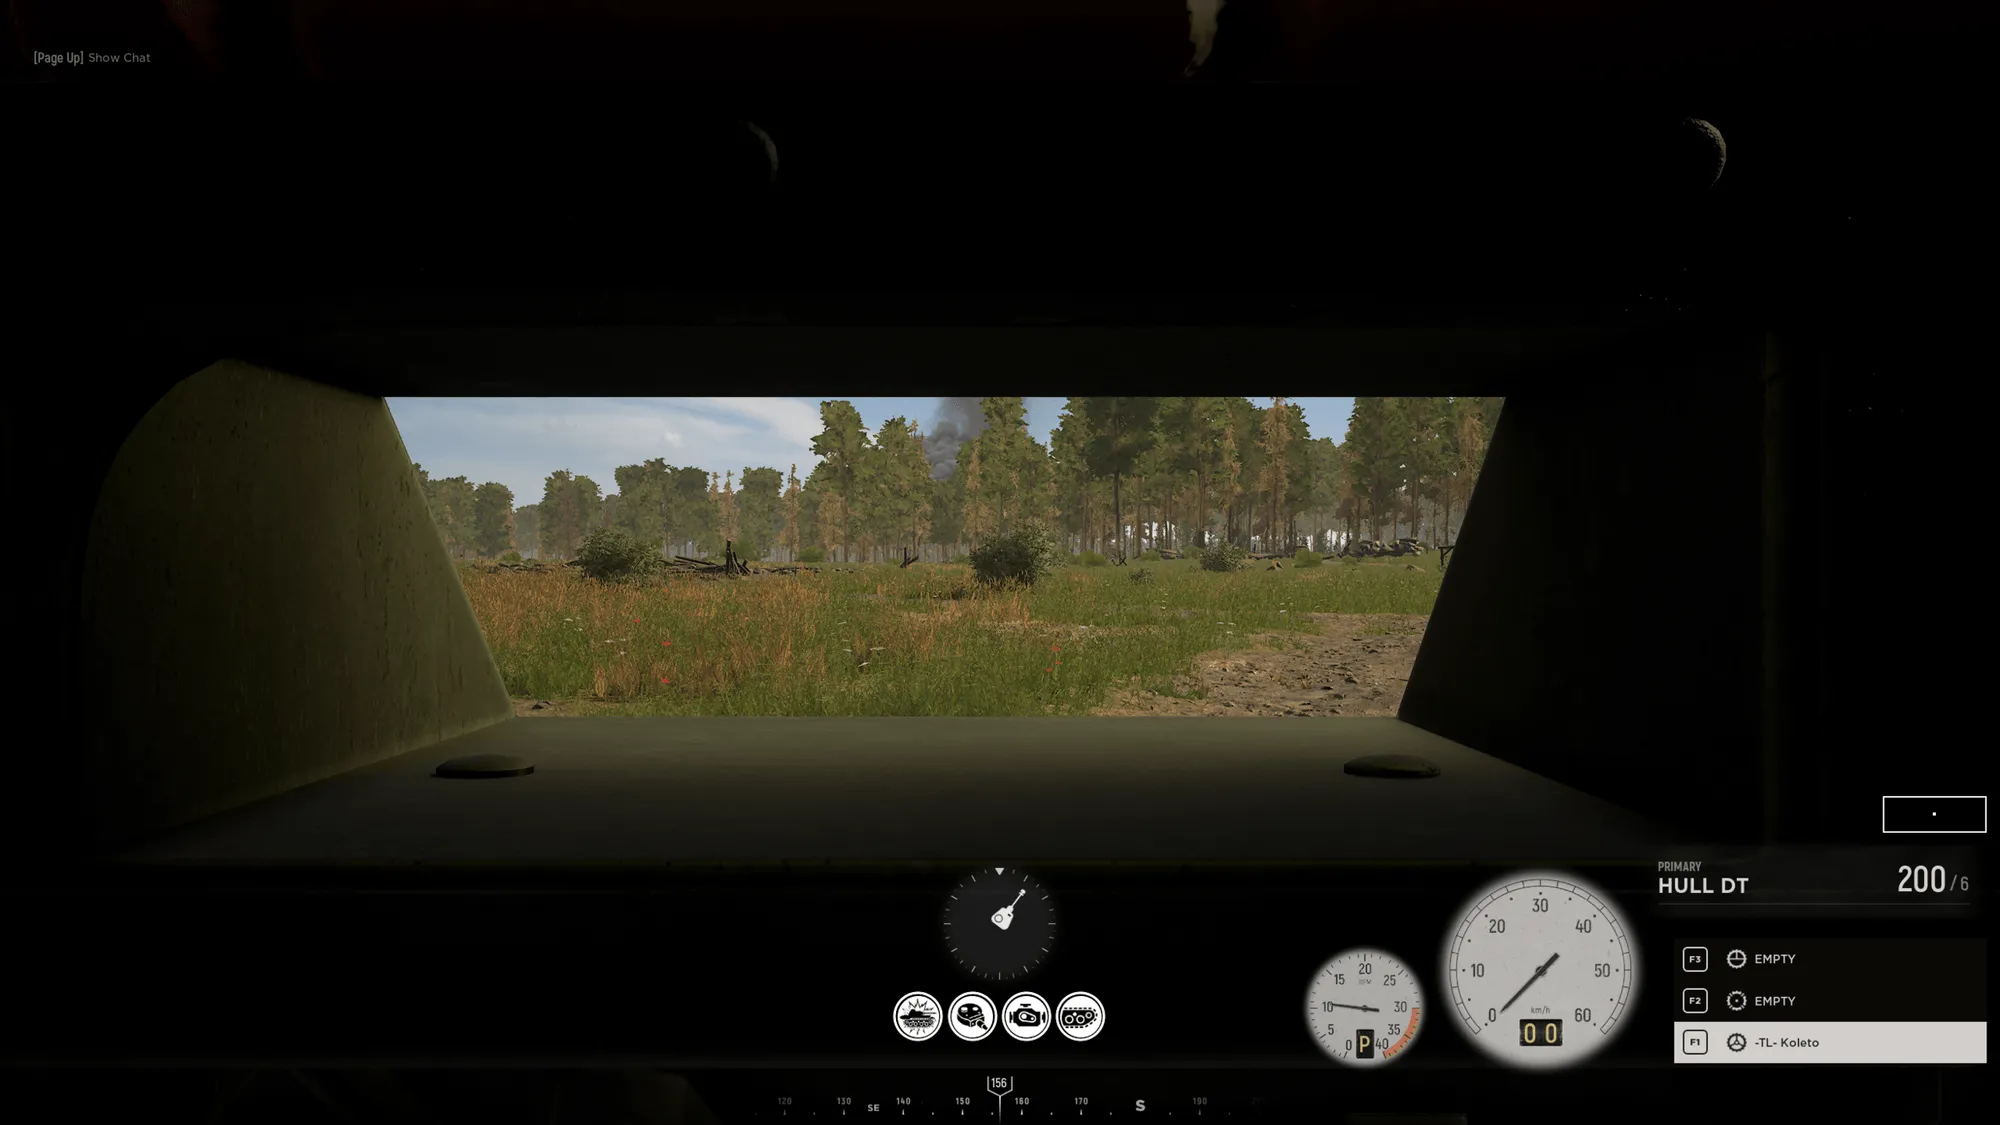
Figure 63: “Angling the T-34/76 from the Driver’s Perspective”
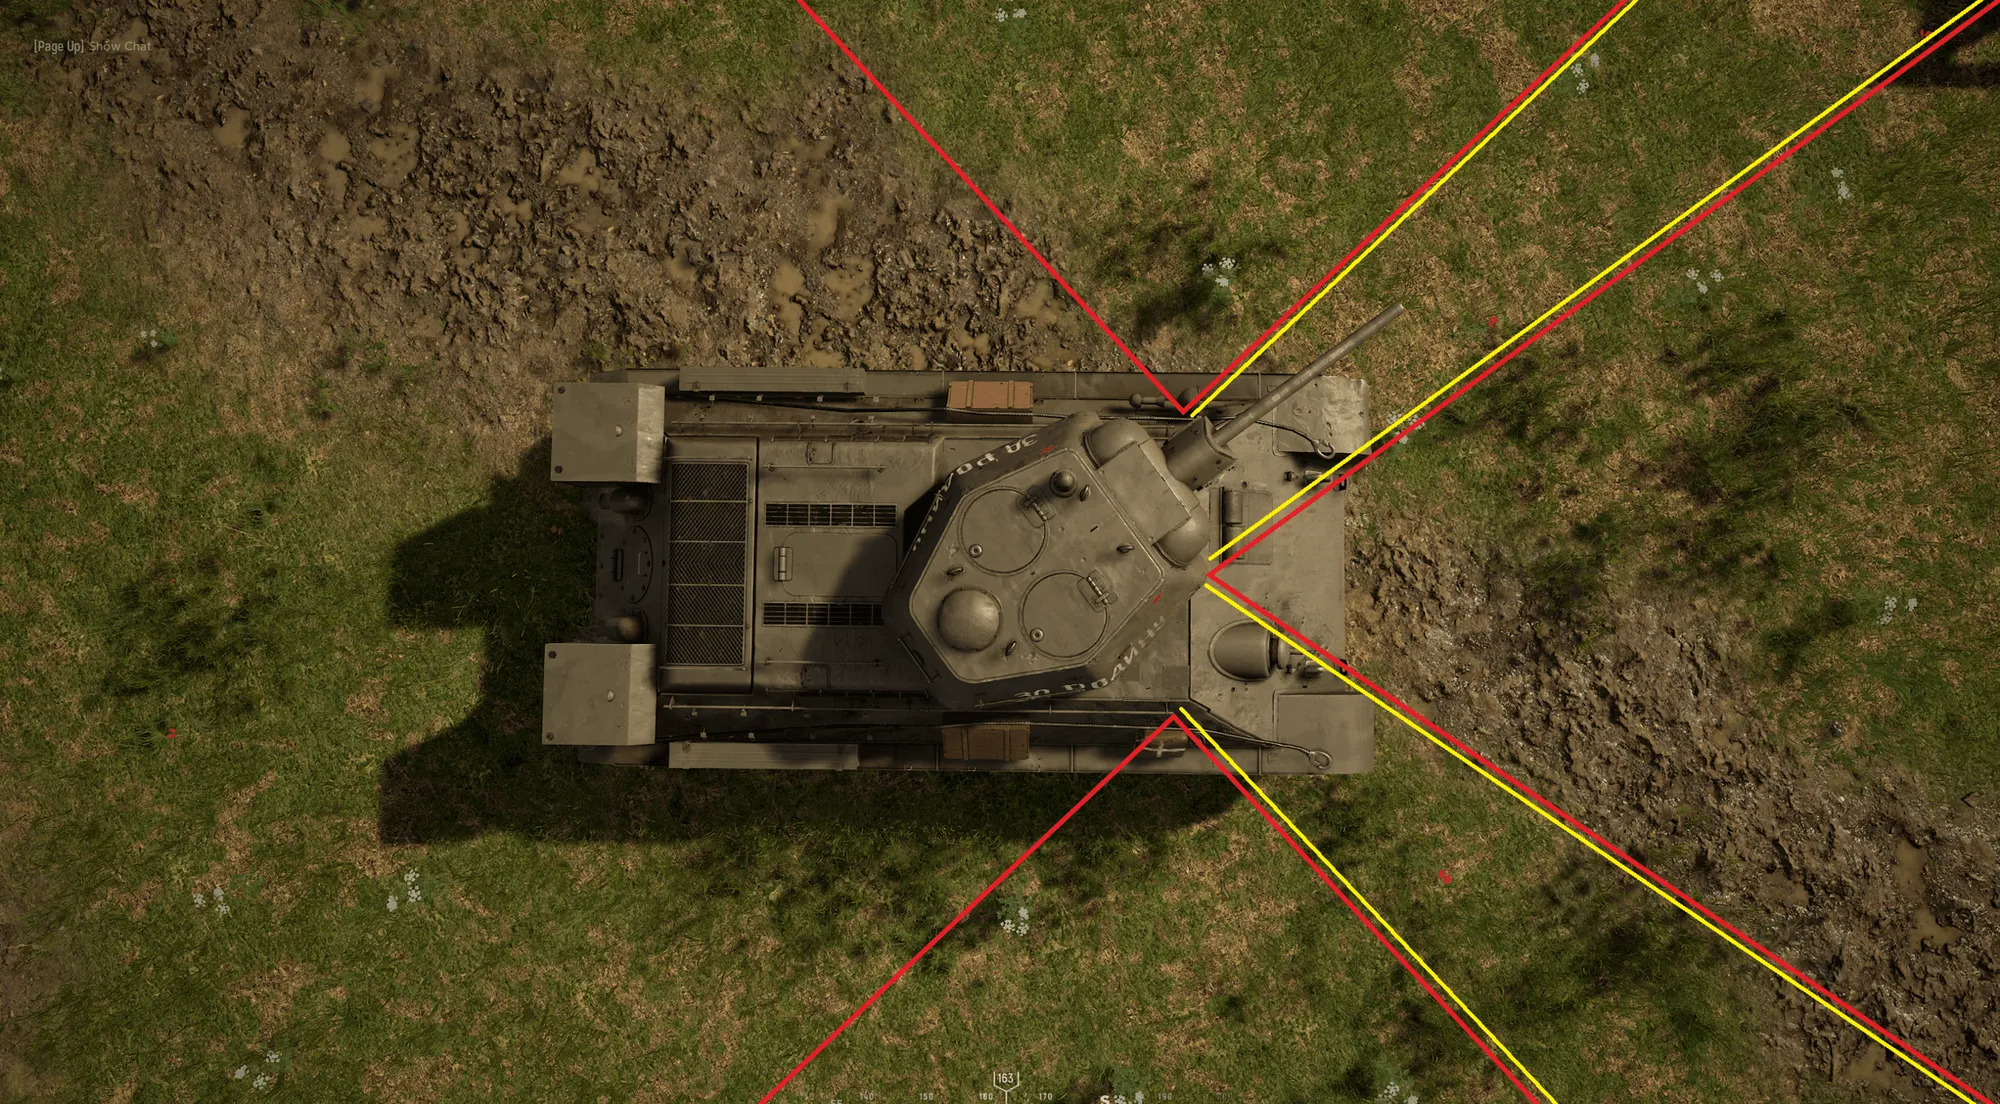
Figure 64: “Angling the T-34/76 from the Top Down Perspective”
4.4.2 The IS-1
Section titled “4.4.2 The IS-1”The IS-1 heavy tank is definitely the poorest performing heavy tank in several different metrics. It has the weakest armor of any heavy tank and the slowest 1st gear turn speed of any heavy. That being said, it is still a heavy tank, and outclasses most other tanks in the field.
How can you differentiate the IS-1 from the T-34/76? Here’s a list (Figure 65):
-
A very long, smooth, cylindrical cannon.
-
A round turret with a rounded mantle.
-
Big white numbers spanning the side of the turret.
-
Slanted front armor pieces that smoothly connect with the side plate.
-
A series of big cylinders hanging off the side of the tank towards the rear.
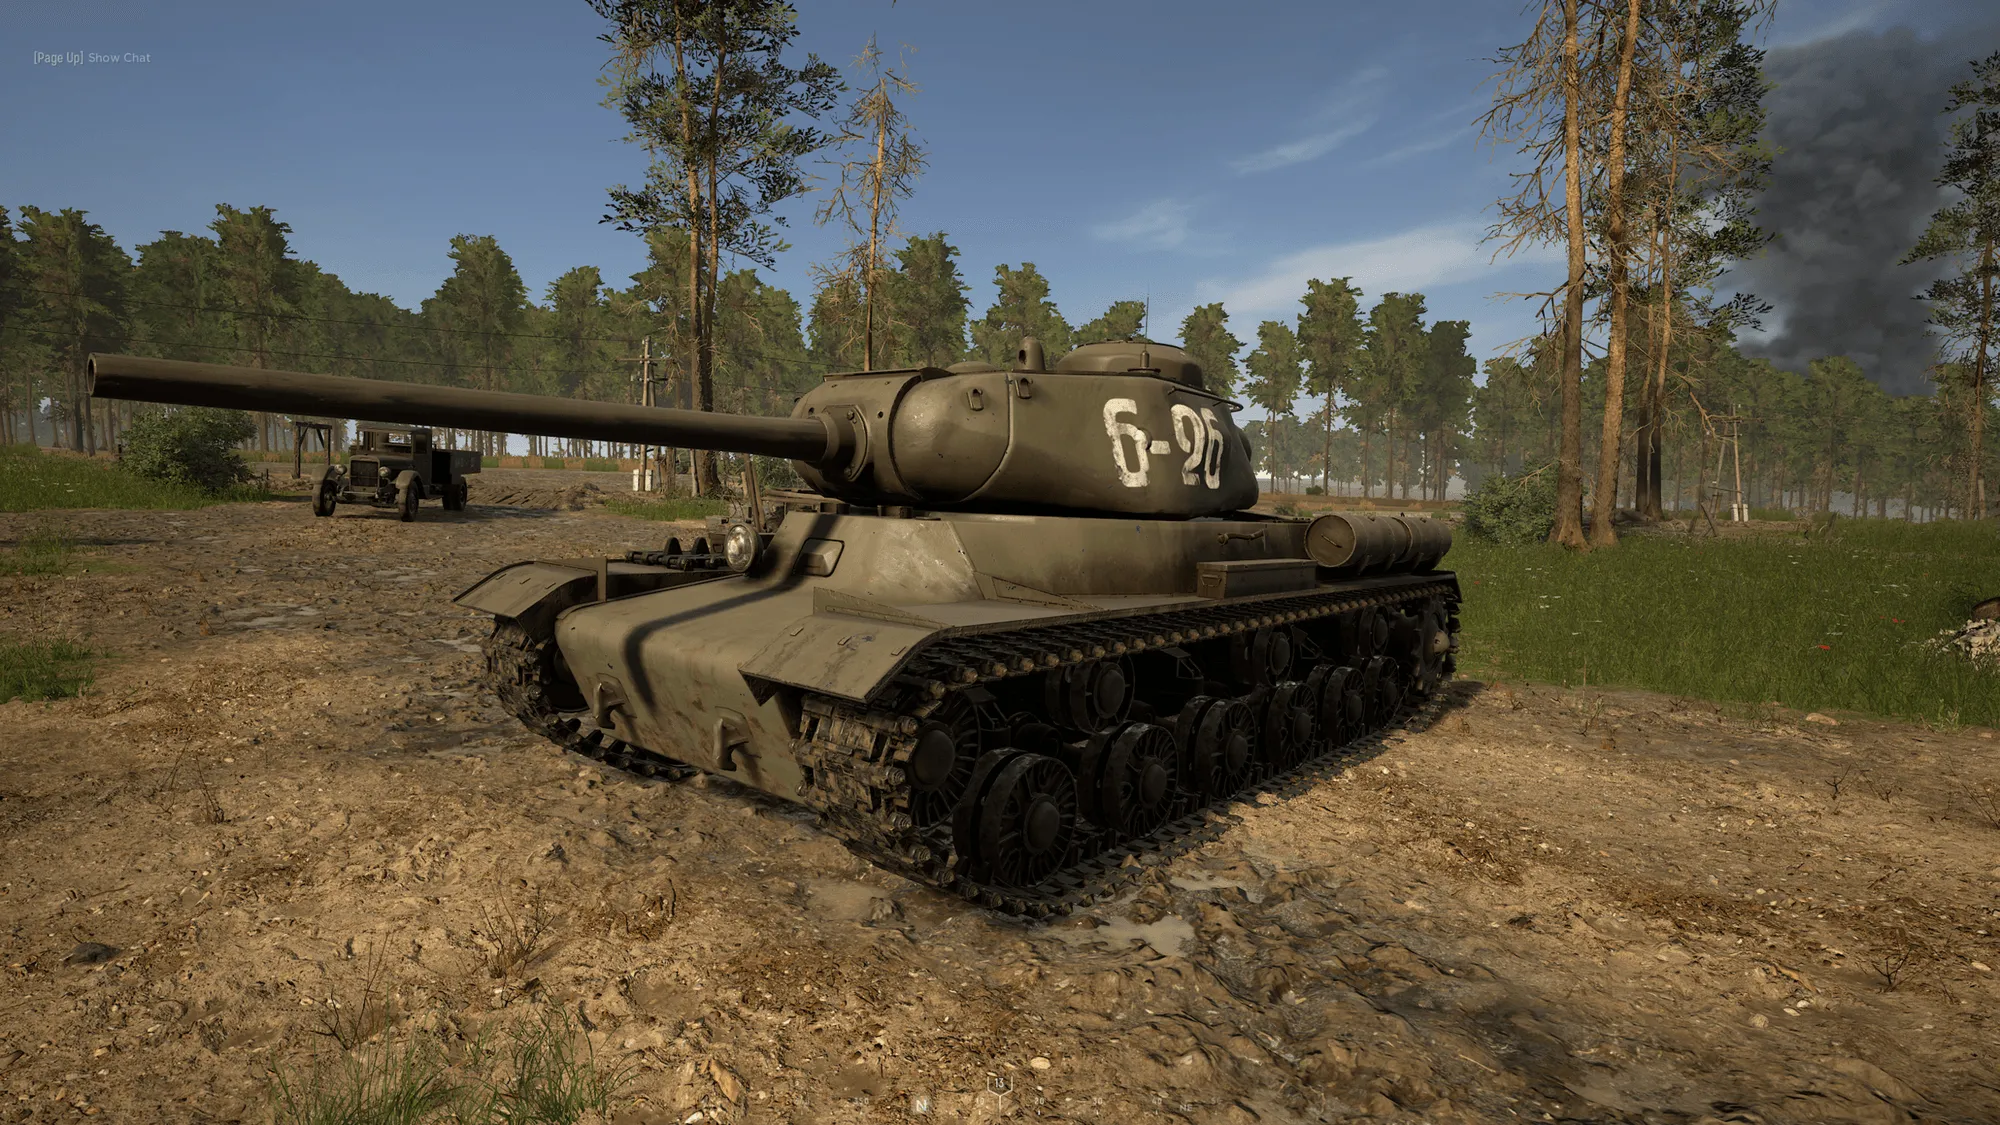
Figure 65: “The IS-1”

Note that the IS-1 has similar stats to the other heavies on the field except for, notably, the Panther.
Here is the driving info:

The IS-1 never fails to disappoint—it has by far the worst 3rd and 4th gear turn speeds, taking a whole 44 seconds to make a complete turn. This is in stark contrast to its main competitor, the Panther, who turns 3.4 times faster in 4th gear. Its first gear/reverse turn speeds are nothing to write home about either.
Here’s the table on hit-to-kill values:
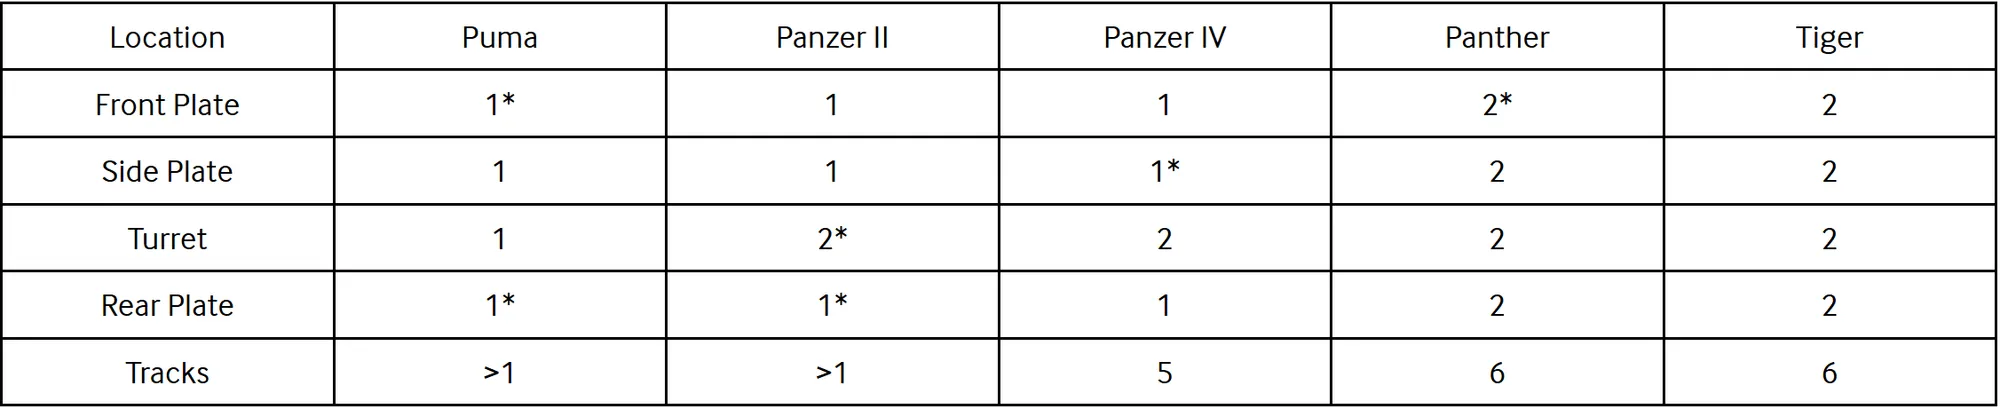
When engaging a Puma:
-
Aim for the center of the body or the turret for a 1 shot kill. Even in the IS-1, care must be taken not to hit the stoplights on either side of the rear or the gas canisters on top of the side skirt on either side of the front plate because these areas are bugged and will not penetrate (see section 4.5.3 for more on this). You may use an HE shell if you wish to conserve AP shells.
-
Hitting the wheels will take longer than 1 shot. Avoid them.
When engaging a Panzer II:
-
Make certain to hit anywhere in front, side or rear plates, as it is always a 1 shot kill.
-
The turret mantle is impenetrable.
-
Even in the IS-1, the top half of the fuel canisters on either side of the turret as well as the back of the side skirt on the rear of the tank are areas that are bugged and do not penetrate. For more on this, see section 4.5.4.
-
Since the Panzer II cannot do any damage to you in an IS-1, it is not a foe you should be worried about.
When engaging a Panzer IV:
-
Shooting the front plate, side plate, or rear plates obliterates this thing in 1 shot.
-
The turret will take 2 shots before the Panzer IV explodes, and this can be done from any angle. This method should only be used to kill Panzer IVs that are only visible by their turret. If you can see the body, shoot it in the body and do not waste your time.
-
The turret’s cupola and the inside of the barrel are penetrable but deal no hull damage—shots to those areas will just kill the turret module.
-
It is important to note that a good Panzer IV crew can shoot you from the front if you are not careful. Always keep an eye out for where enemy tanks are and could be soon, and when a Panzer IV shows up, make sure to work with your spotter to face the IS-1 in the Panzer IV’s direction (down to the exact bearing) or kill it before it gets a chance to land a shot. This will make it so the Panzer IV is not able to penetrate your front armor or turret anywhere (You can also do this for AT, though it’s harder since they are moving around).
-
Going for the tracks is inadvisable because of the sheer number of shots required to kill the tank.
-
While the Achilles Heel shot is technically possible, it is not recommended to go for this shot since hitting the side plate will kill it in 1 shot anyway.
-
Even in the IS-1, there are places of the Panzer IV front, side, and rear plates which are impenetrable. To see where, check out section 4.5.5.
When engaging a Panther:
-
The IS-1 can blow the Panther up in 2 shots anywhere in the front plate. Care must be taken not to hit the side skirt protruding above the tracks left and right of the front plate, as this will not penetrate at all (see Section 4.5.6 for more). This is the go-to method for destroying a Panther tank.
-
The IS-1 has a much slower reload speed than the Panther (8 seconds vs 6 seconds respectively). This means that even if you land the first shot in an engagement with a Panther, you may still end up losing if you get hit up to 2 seconds after shooting your first shot. Assuming all shots land, the Panther will be able to fire its 2nd shot and blow you up before you have a chance to finish it off. This single fact makes the Panther a very scary tank on the battlefield, and one that needs to be attacked intelligently. If you try to engage a Panther head to head, assuming both crews are of equal skill, you will lose the engagement in a 1v1a majority of the time. The reload speed dynamic between these two tanks forces the IS-1 to go for the element of surprise when engaging Panthers or double up with other IS-1’s or AT guns to land two blows at once and end the engagement early.
-
The second spot that is very effective against a Panther is the sides, which can be hit twice for a kill even from a very shallow angle. In fact, if you can see the side at all then you can penetrate it. This is a strictly inferior method to hitting the front though because there is less surface area, so only do this if you can’t hit the front for some reason.
-
If for some reason the front and sides of the body are obscured or otherwise inaccessible, the turret is the next best place to hit. It takes 2 shots to kill the Panther if you shoot it anywhere in the front, sides and rear of the turret. Do not hit the barrel or the cupola instead of the plates on the turret, as these will only destroy the turret and not damage the hull.
-
Under almost no circumstances should you be hitting the tracks of a Panther given the aforementioned methods of dispatching the tank, as it takes three times as long in the best case scenario (by that time you’d be dead).
-
The IS-1 can hit the Achilles Heel in both the red and green sections. This can be useful to mitigate the potential for the Panther to turn around and land a shot in your plate, since the engine dies in 1 shot, but in general if the IS-1 has the angle to hit the Achilles Heel it will kill the Panther before the Panther can kill it.
-
The rear plate of the Panther is still a 2 shot kill, just like the front and sides, except the engine gets disabled after the first shot.
When engaging a Tiger:
-
Penetrating the Tiger’s front armor is possible anywhere as an IS-1, and will kill it in 2 shots. If you see the front, shoot it.
-
The trick to engaging enemy Tigers from the front is landing the first shot. Since the Tiger and the IS-1 both have the same reload speed, the crew that lands the first shot will be the crew that wins the engagement, assuming all subsequent shots land.
-
You can also penetrate a Tiger in the sides, which can be hit twice for a kill even from a very shallow angle. In fact, if you can see the side at all then you can penetrate it. This is a strictly inferior method to hitting the front though because there is less surface area, so only do this if you can’t hit the front for some reason.
-
If for some reason the front and sides of the body are obscured or otherwise inaccessible, the turret is the next best place to hit. It takes 2 shots to kill the Tiger if you shoot it in the front mantle, or the sides and rear of the turret. This means that if the Tiger is looking directly at you, the flat plates on either side of the barrel are where you want to aim, and hitting the other surfaces will likely ricochet. Care also must be taken not to hit the barrel or the cupola instead of the plates on the turret, as these will only destroy the turret and not damage the hull.
-
Under almost no circumstances should you be hitting the tracks of a Tiger tank given the aforementioned methods of dispatching the tank, as it takes three times as long in the best case scenario (by that time you’d be dead).
-
The IS-1 can take advantage of the Achilles Heel as per section 2.10 in both the red and green sections. This can be useful to mitigate the potential for the Tiger to turn around and land a shot in your plate since the engine dies in 1 shot, but in general if the IS-1 has the angle to hit the Achilles Heel it will kill the Tiger before the Tiger can kill it.
-
The rear plate of the Tiger is still a 2 shot kill, just like the front and sides, except the engine gets disabled after the first shot. Note that the air filters and exhaust pipes on the back of the Tiger are impenetrable from the sides or the rear, even to the 76mm “Jumbo”. See section 4.5.7 to see an illustration of these areas.
Opinion: As mentioned in the introduction, the IS-1 leaves a lot to be desired when compared to the other heavy tanks. It can be damaged by the Panzer IV, the Panther, and the Tiger from the front, sides, and rear, and can even be shot by enemy AT players in the front if they know where to shoot. This creates a problem for the IS-1 on Stalingrad—the urban environment makes it very easy for AT to peek out of cover, shoot you, and run away, all while laughing at your puny attempts to defend yourself. That being said, the IS-1 is still a heavy tank, and as such has heavy tank firepower. It can use this firepower to destroy both Panzer IVs and Tigers relatively easily. In the battlefield, the Soviet heavy tank’s role is just that—to engage enemy tanks and remove them from the battlefield—but you should know the limitations of your armor. IS-1 crews simply have to work a little harder to make sure they are not being outplayed by enemy Panzer IVs or AT guns and that they are not being surrounded by enemy AT rocketeers, which can sometimes be a lot of things to juggle at the same time. Factor in the new Update 12 Panther, and you realize that the situation gets very dire for the Soviets. The IS-1 already was the worst heavy tank in the game and now it is monumentally outclassed by the Panther’s faster reload speed and greater mobility. Ultimately, you have to work with what you’ve got, but the IS-1 should stay in the backline in hard cover and shell from as far away as possible, or work with its friendly tanks to corner enemy Panthers and put pressure on them.
4.5 Achieving Maximum Penetration
Section titled “4.5 Achieving Maximum Penetration”Ever wondered why your good-for-nothing gunner manages to hit a puma in your 76mm “Jumbo” but not kill it? Well, your gunner is still garbage, but it’s not entirely their fault. Many tanks in the game have strange, inexplicable hitboxes that no shell can penetrate, even those from heavies. When a shell hits these locations, it neither ricochets nor penetrates, it simply vanishes and creates a non-penetrating animation (for more on what this looks like, see section 2.4.2). These hitboxes serve to explain a lot of the inconsistency and confusion that people get all the time when they are playing in a tank as to how they don’t penetrate even though they should—-so before you curse me out for incorrect information and toss this entire guide into the dumpster, read this section.
I have compiled a list below of all the areas that are not “supposed” to be non-penetrating (in other words, a medium tank hitting the front plate of a heavy will not be counted, since that is what’s “supposed” to happen). These spots are all of the ones that I personally am aware of, but if you find any and want me to add them to the list don’t hesitate to let me know. Also, if you find any errors in any of the following diagrams, please tell me so that I can fix them.
4.5.1 The Stuart
Section titled “4.5.1 The Stuart”The Stuart is impervious to damage from any source at the top of the skirt that sticks out of the front body covering the tracks (Figure 66).
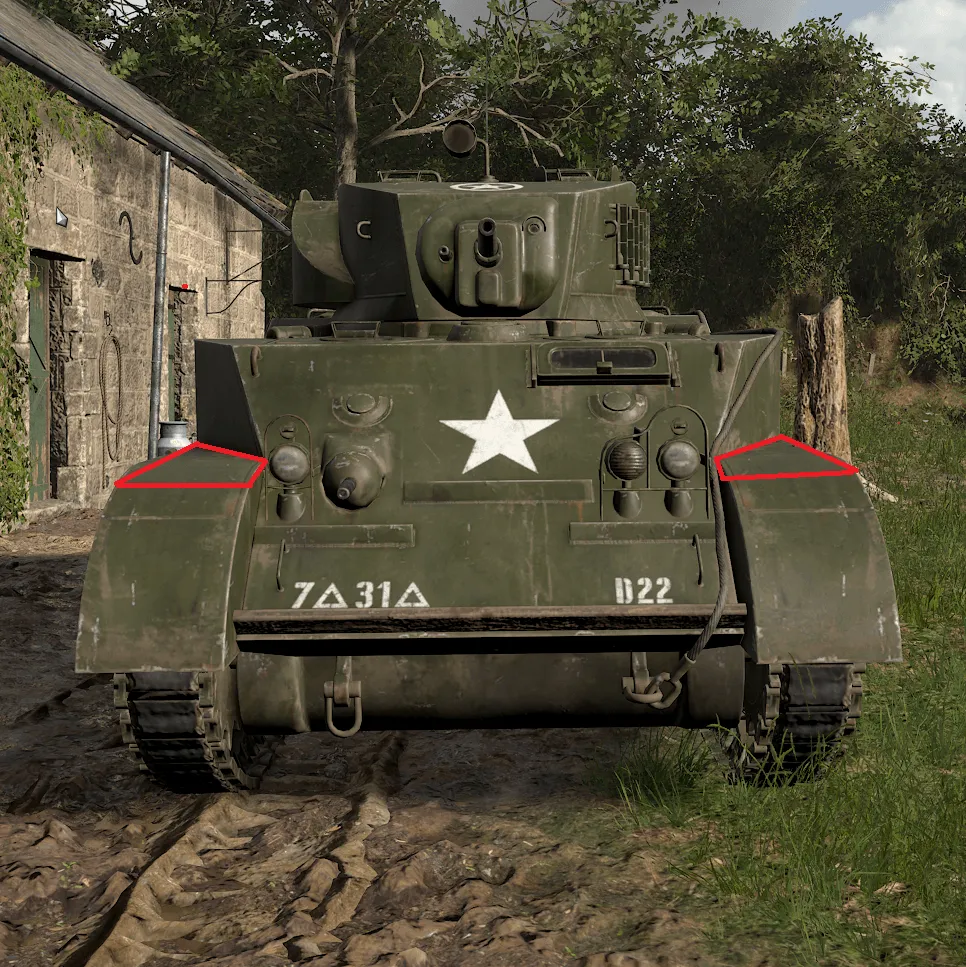
Figure 66: Stuart Non-Penetrating Areas
4.5.2 The “Jumbo”
Section titled “4.5.2 The “Jumbo””The “Jumbo”s’ butts can be penetrated almost anywhere except for the cloth-covered equipment right below the turret (the red section, Figure 67).
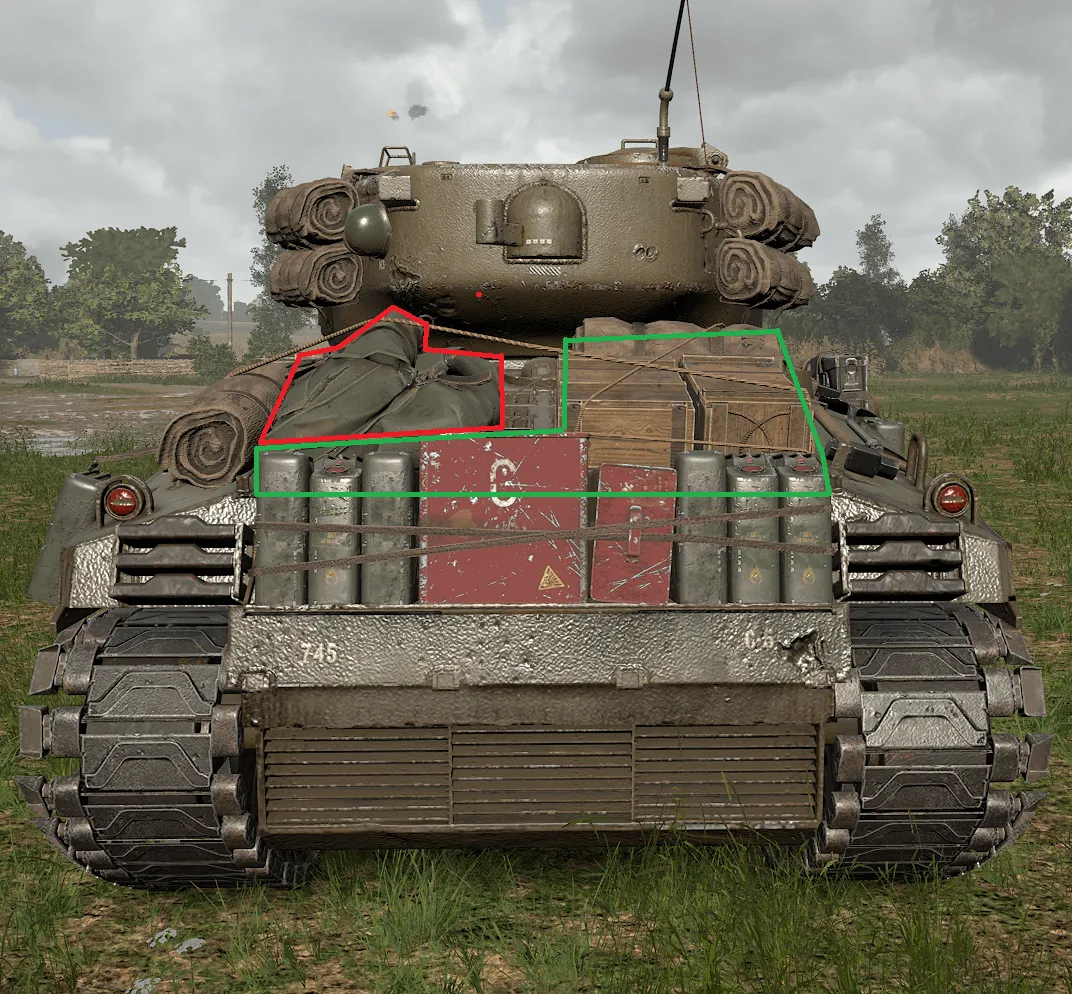
Figure 67: “Jumbo” Non-Penetrating Areas
4.5.3 The Puma
Section titled “4.5.3 The Puma”The Puma is perhaps the most egregious instance of non-penetrating surfaces since they take up large portions of the Puma’s front and rear surface areas (and heavies should just be able to penetrate anywhere on this thing, devs). On the front, the gas canisters left and right of the main body are impenetrable (Figure 68).

Figure 68: Puma Non-Penetrating Areas, Front
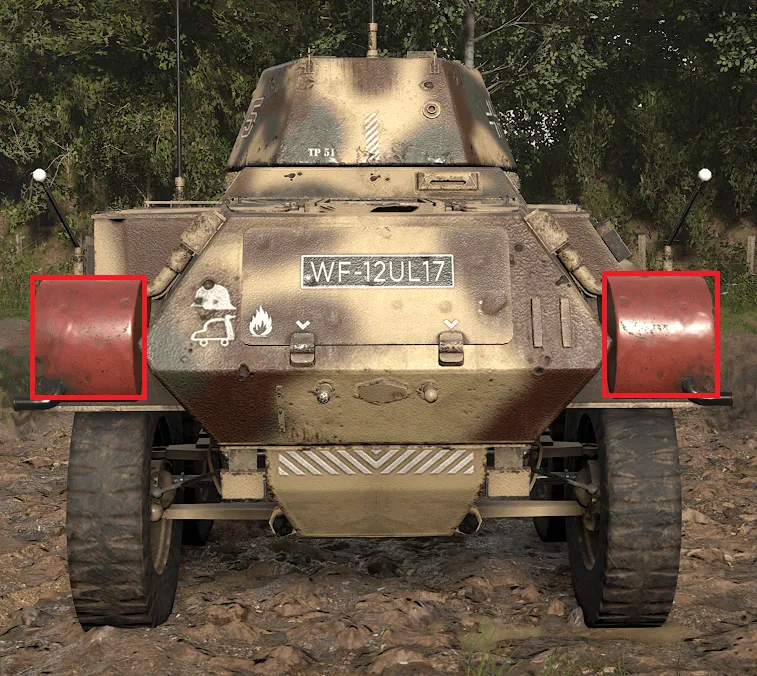
Figure 69: Puma Non-Penetrating Areas, Rear
4.5.4 The Panzer II
Section titled “4.5.4 The Panzer II”The Panzer II has two surfaces that cannot be penetrated by any source, the first being at the rear of the tank (Figure 70).
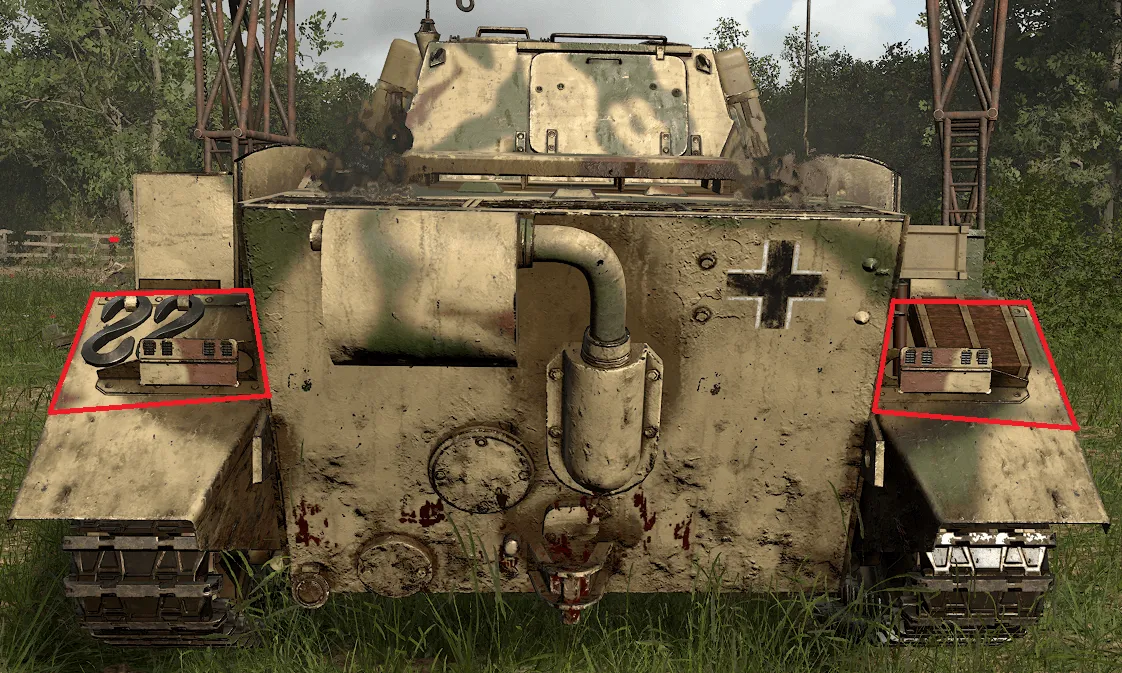
Figure 70: Panzer II Non-Penetrating Areas, Rear
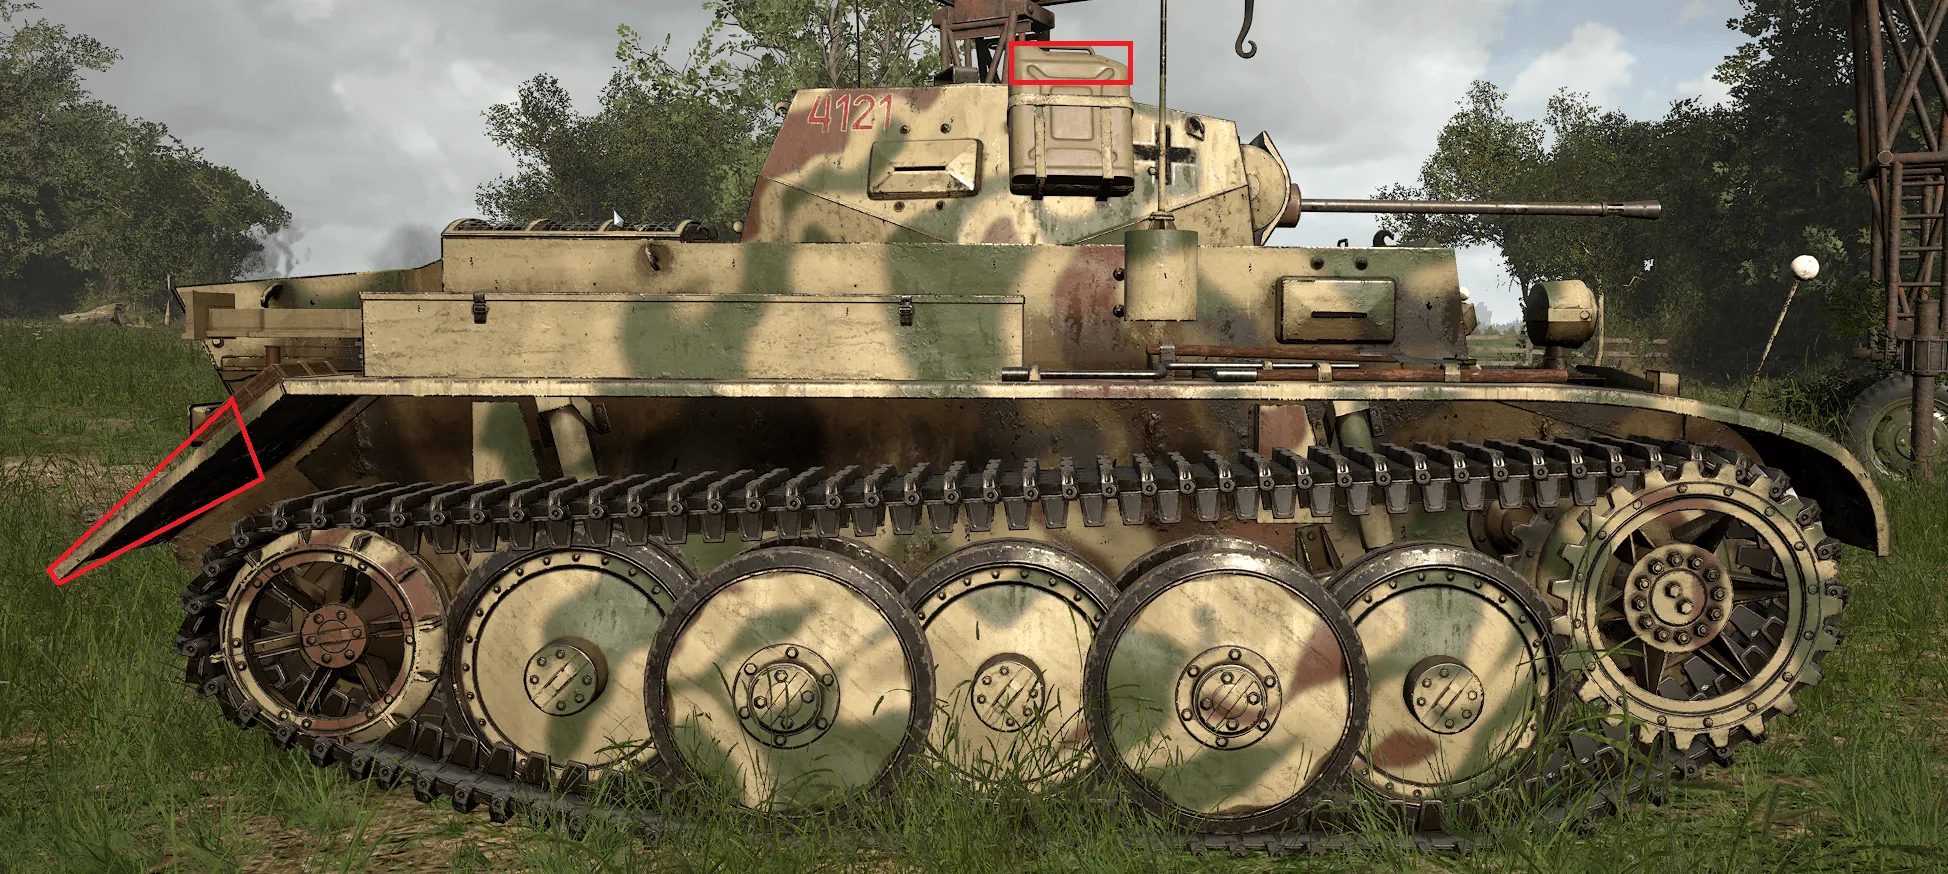
Figure 71: Panzer II Non-Penetrating Areas, Turret
4.5.5 The Panzer IV
Section titled “4.5.5 The Panzer IV”The Panzer IV, like the Panzer II, has non-penetrating surfaces that depend chiefly on the angle at which the incoming shell connects with the plate. The following 3 figures illustrate how the surfaces that are impervious to any shell shift as the angles change (Figure 72, Figure 73, Figure 74).
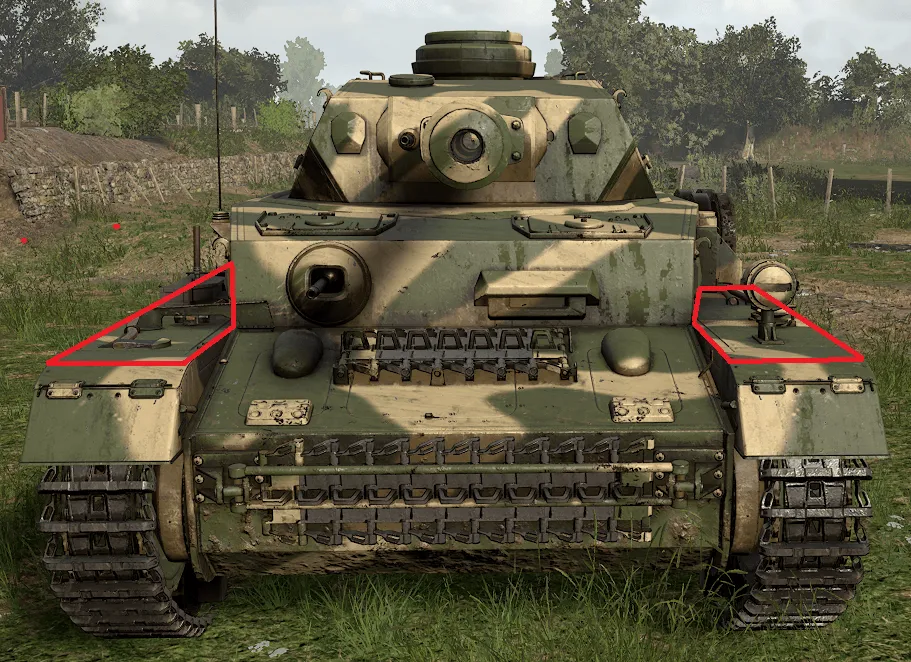
Figure 72: Panzer IV Non-Penetrating Areas, Front
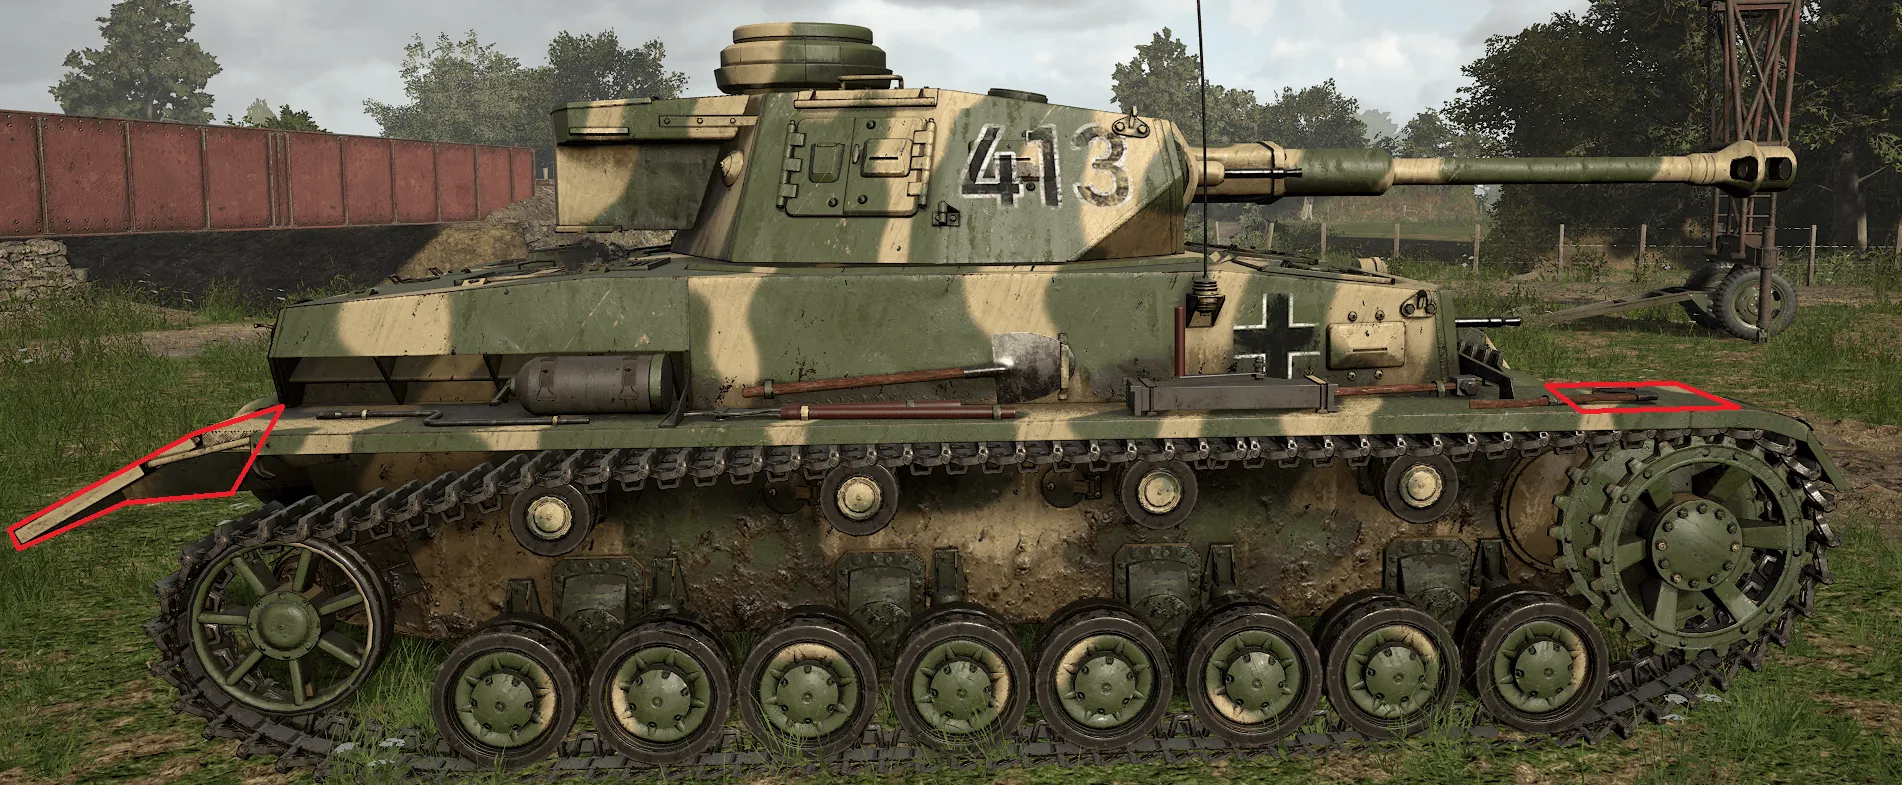
Figure 73: Panzer IV Non-Penetrating Areas, Side
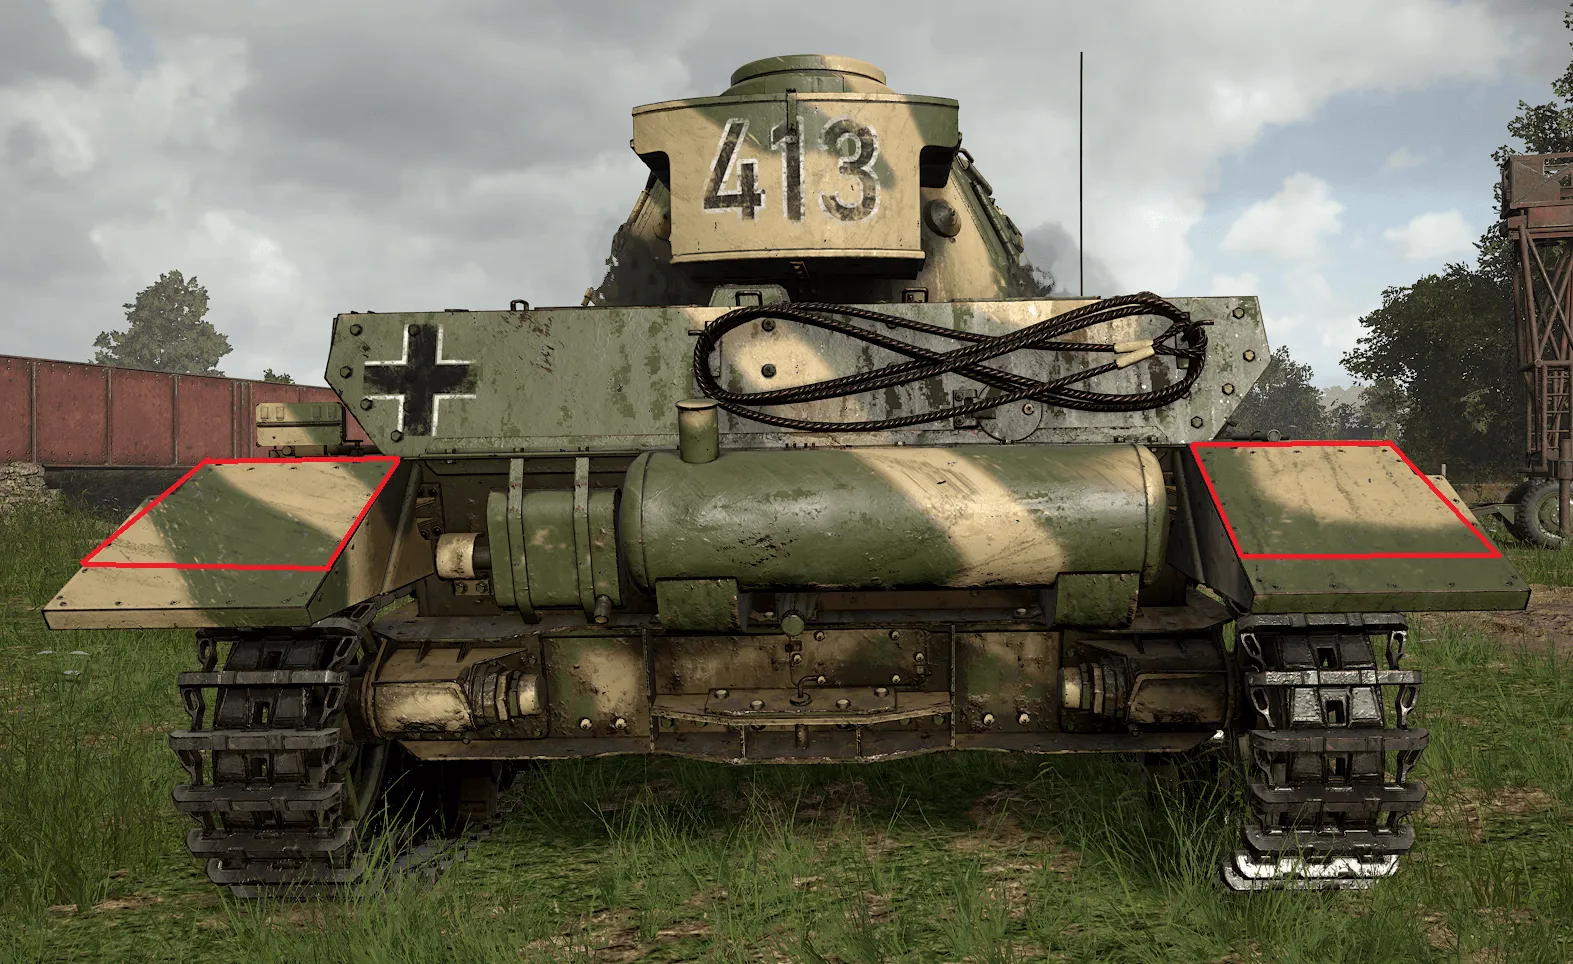
Figure 74: Panzer IV Non-Penetrating Areas, Rear
📹 Figure 75: Panzer IV Non-Penetrating Areas, At an Angle — watch clip on YouTube
4.5.6 The Panther
Section titled “4.5.6 The Panther”The Panther has a few annoying regions on its body that are not able to be penetrated by the 76mm “Jumbo” or IS-1. The first is the top of the skirt that goes over the tracks on the front of the tank (Figure 76).
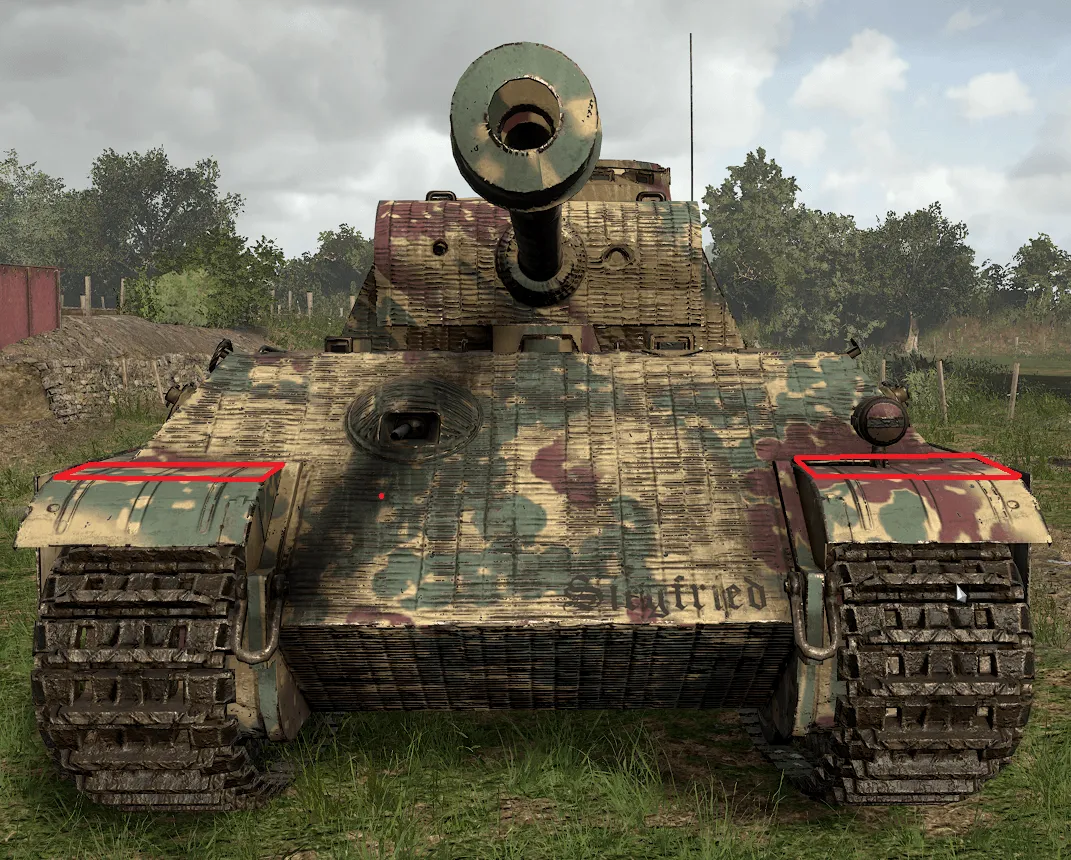
Figure 76: Panther Non-Penetrating Areas, Front
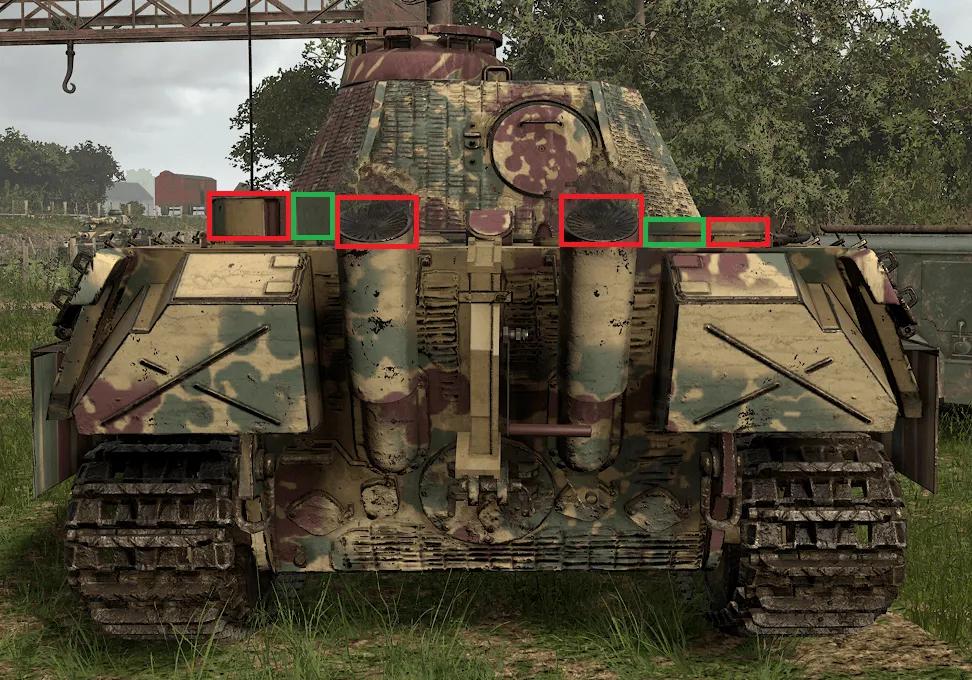
Figure 77: Panther Non-Penetrating Areas, Rear
4.5.7 The Tiger
Section titled “4.5.7 The Tiger”The Tiger’s non-penetrating areas are exclusively attached to its gigantic rear end. These are the air filters and exhaust pipes, which stick up over the tank’s chassis, and the equipment that is immediately below them when viewed from the side (Figures 78 and 79).

Figure 78: Tiger Non-Penetrating Areas, Side
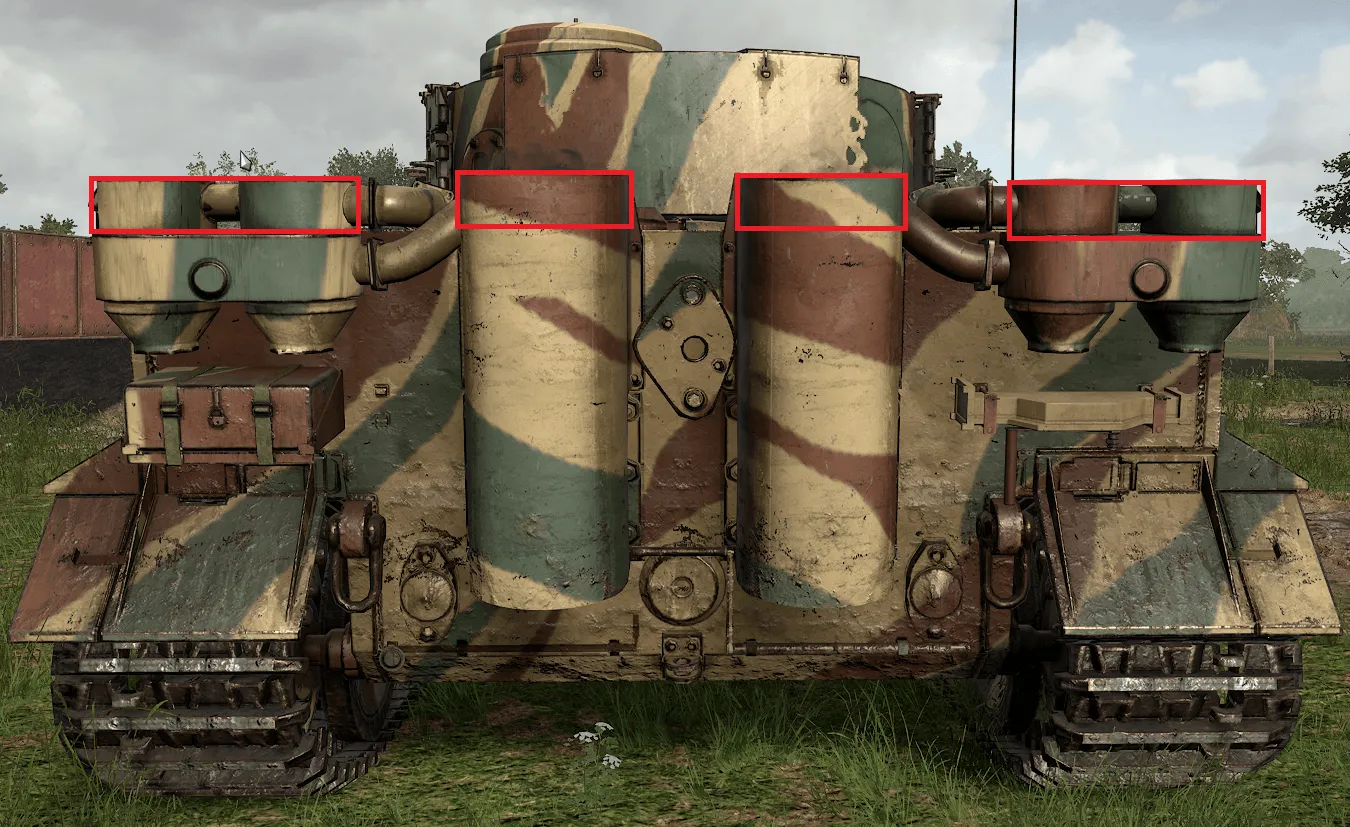
Figure 79: Tiger Non-Penetrating Areas, Rear
4.5.8 The T-34/76
Section titled “4.5.8 The T-34/76”The T-34/76 can also prevent penetration if it gets shot in the corners of the large cube boxes that stick out of its rear, marked in red (Figure 80).
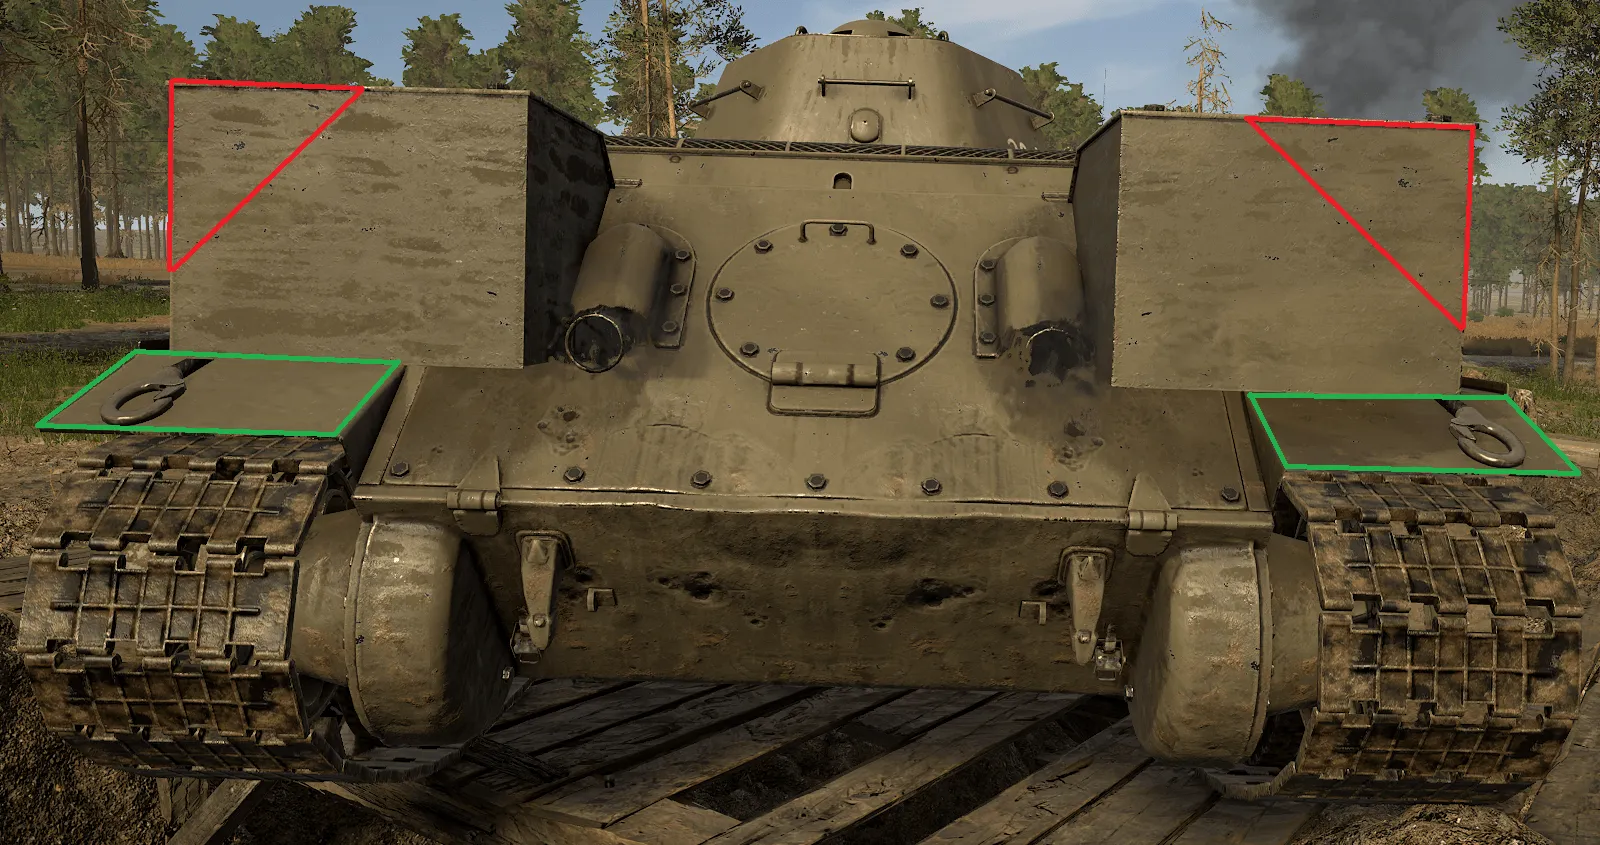
Figure 80: T-34/76 Non-Penetrating Areas, Rear
4.5.9 The IS-1
Section titled “4.5.9 The IS-1”The portion of the IS-1’s plate that is not penetrable is very simple—it is the metal cylinders on either side of the chassis (Figure 81).

Figure 81: IS-1 Non-Penetrating Areas, Rear