Anti-tank Shenanigans
Ever stopped to wonder why you spent a full minute making sure there was absolutely no one behind you and as soon as you looked away you got shot? Or why as soon as the map switches to Hill 400 your team goes from 5 full tank squads to 1 solo? Why are enemy infantry more OP than enemy tanks for crying out loud? This phenomenon is what experienced tankers like to call “getting AT’d in the ass” and is how most novice tankers meet their ends on the battlefield. To fix that, I have compiled a complete section on everything you need to know about all forms of AT—rockets, guns, bombs, precision strikes, mines, satchels, shells, and rifles—to help you understand what can happen in the field and how to react to it.
Let’s start with the AT rockets and rifle first. Below are the individual damage values of each team’s AT rockets and rifle against enemy tanks. Knowing the damage values of each of these off the top of your head will allow you to get a better idea of when you are safe as a tank and when you are in imminent danger.
3.1 The American “Bazooka”
Section titled “3.1 The American “Bazooka””The “Bazooka” is a decent anti-tank weapon that can do the job if the AT player wielding it knows what they are doing. In the current iteration of the game a lot of tank engagements are standardized based on class as we will see below in the tank section and the “Bazooka” is no exception. The “Bazooka” has exactly the same firepower as an M5 Stuart light tank. Below are the hits to kill all German tanks in each location:
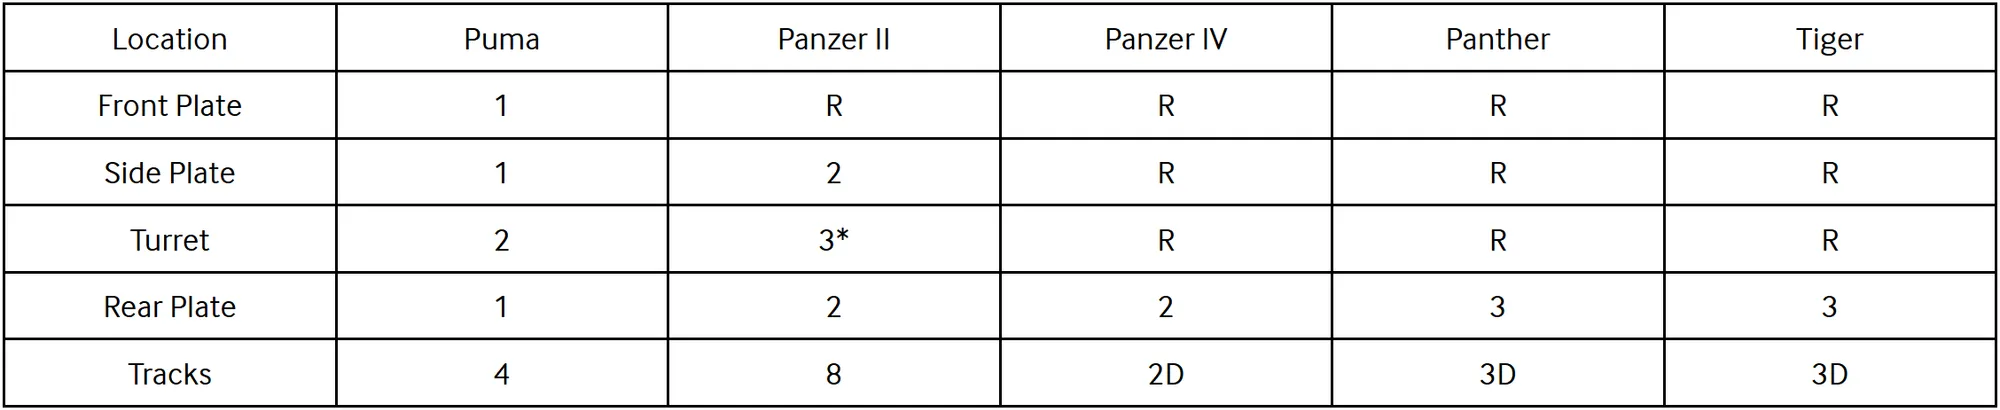
R - Ricochet or non-penetrating hit
#D - # shots to disable module (no hull damage), after which becomes non-penetrating hit
#* - # shots can only be achieved under specific circumstances or in special areas
Notes:
-
For the Puma, aim at the dead center of the body. The Puma contains many small surfaces that are not able to be penetrated by anything and you need to avoid those. For more information on where they are, see section 4.5.3.
-
For the Panzer II, the front plate and turret mantle (which obscures the entire turret when looking at it from the front) are impenetrable. The turret mantle can be used to ricochet shots into the top of the chassis for a 2 shot kill from the front, but it is a difficult shot to land especially from distance (see the section on the M5 Stuart for more). In normal everyday situations, however, you will have to aim for the side or rear of the tank. If aiming for the rear, there are some non-penetrating areas that you have to keep in mind that are outlined in section 4.5.4.
-
The Panzer IV, Panther, and Tiger can only be killed from the rear. There are some areas of each of these tanks which the “Bazooka” cannot penetrate (see section 4.5).
-
To damage the engine of a Panzer IV, care must be taken to aim at the section of the rear with the cylindrical canister. Anywhere else will only deal hull damage (Figure 26).
As the data above clearly shows, the “Bazooka” is effective at dealing with German recon vehicles and light tanks, but medium and heavy tank hulls can only be penetrated from the rear. Shooting the tracks of the Panzer IV or the Panther/Tiger will only result in disabling those tracks without doing any actual hull damage. That being said, here are some things good AT players can do to give you a bad day:
- American AT can disable your tank faster than you might think. If hit in the rear, the engine of the Panzer II is disabled in 1 shot and the engines of the Tiger and Panther are disabled in 2 shots, while the Panzer IV is killed outright in 2 but the engine is not disabled with the first shot. This means that although the Panzer II, Panther, and Tiger actually take 2, 3, and 3 “Bazooka” rockets to the rear to kill respectively, effectively once their engines are destroyed they are dead. Perhaps there is a small chance you can get out and kill the AT hounding you, but you would then have to repair the tank to 100% engine to be operational again.
Currently, the only AT loadout that includes the “Bazooka” gives that player 2 rockets. This means that like the “Panzerschreck”, you can choose to ignore American AT players if they miss their first shot in a medium or heavy, because they cannot kill you or destroy your engine. In fact, if an AT player has shot all of their rockets, it’s better not to kill that AT player so that they do not have a chance to respawn with more ammunition. As a whole, only the back plate is a viable option for dealing substantial damage to German medium and heavy tanks with a “Bazooka”. This fact allows German tanks to be a bit more lenient with their positioning as well as their infantry support. For more on dealing with AT rocketeers, see section 3.8.
3.2 The German “Panzerschreck”
Section titled “3.2 The German “Panzerschreck””
Figure 24: “German Anti-tank Soldier (circa 1944, colorized)”
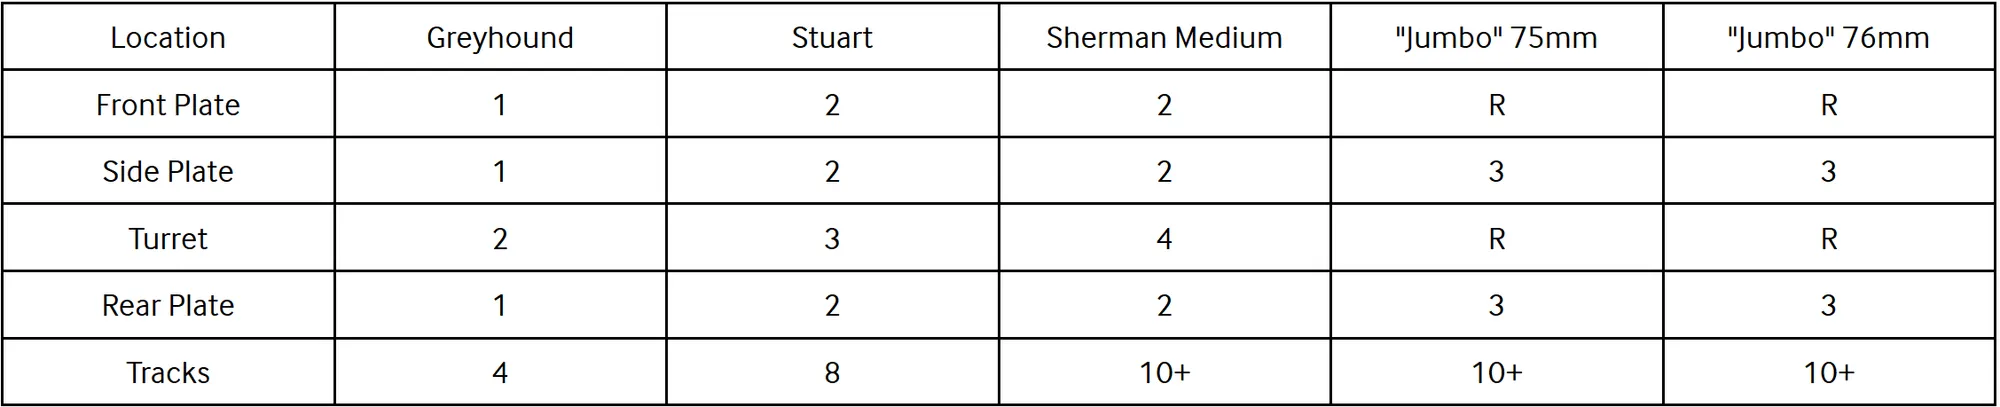
R - Ricochet or non-penetrating hit
Notes:
-
For the Greyhound, anywhere in the body will do. Try not to hit the turret or wheels as it will take longer.
-
For the Stuart, the front, side, or rear plates are the place to go for. The turret will absorb more rockets than you have ammunition for in one life, so therefore is sub-optimal. The tops of the skirts that stick out over the tracks on the front of the tank are impenetrable. To see an illustration of this, go to section 4.5.1.
-
The Sherman medium can be penetrated and blown up anywhere in the front, side, or rear plates in 2 hits if you hit perpendicular to the plate. These shots each do 50% hull, so 2 add up to exactly 100%. The turret mantle on the front of the turret will not penetrate, but you can penetrate the turret anywhere else besides the mantle for a 4 shot kill.
-
“Jumbo” 75mm and 76mm can be penetrated in the side and rear of the tank for a 3 shot kill. These do 45% hull damage, so 2 of them do 90% hull and 3 kill. Take care to avoid all of the fuel canisters, boxes, and other junk strapped to the back of the tank if aiming for rear because these will not penetrate. Aim below them.
-
Testing on tanks that took more than 10 rockets to the tracks was not pursued.
That’s all fine and dandy, but what about the Soviet forces? How does the “Panzerschreck” fare against their tanks? Here are the stats:
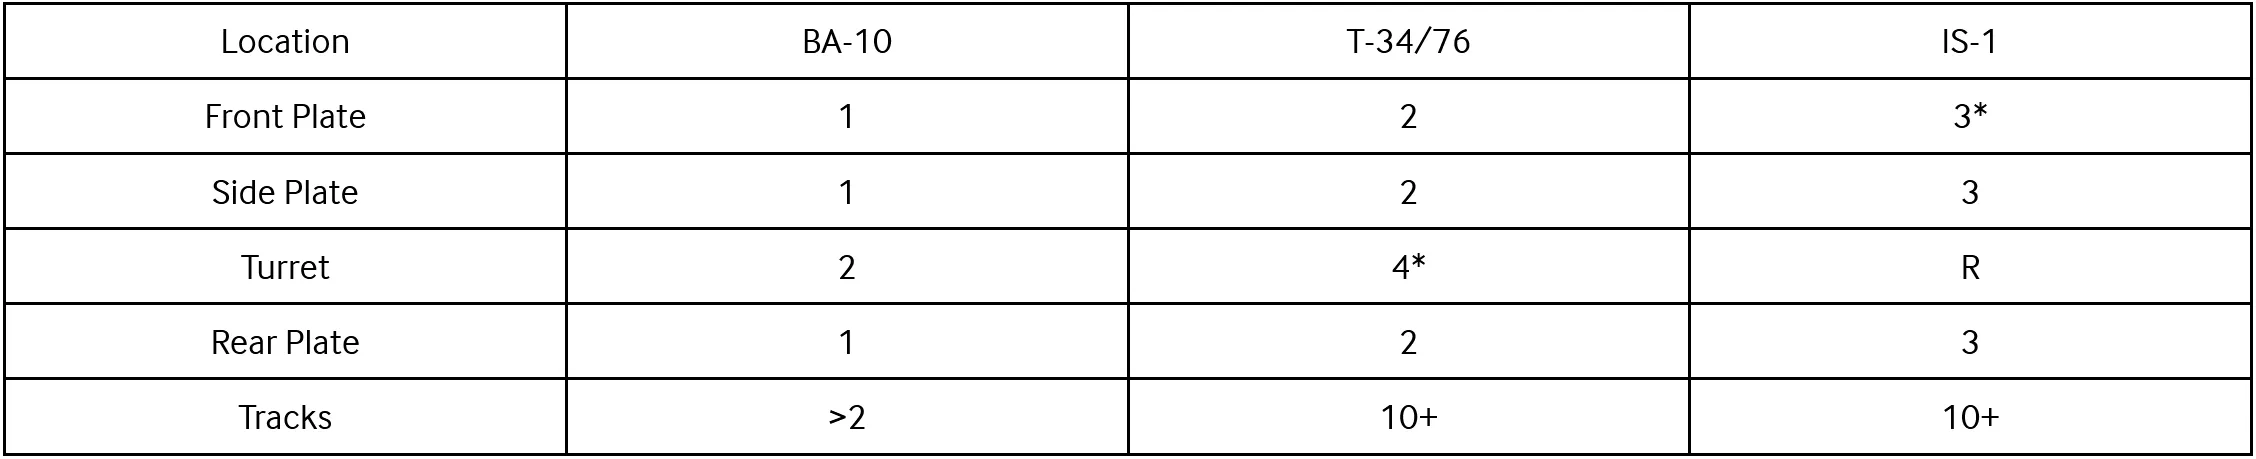
R - Ricochet or non-penetrating hit
#* - # shots can only be achieved under specific circumstances or in special areas
Notes:
-
Hopefully you have started to notice the pattern here in Update 12—the different classes of tanks have largely the same armor with only minor differences, and the American tanks perform very similarly to Soviet tanks against German AT.
-
For the BA-10, aim at the dead center of the body.
-
The T-34/76 can be penetrated anywhere in the front plate for a 2 shot kill if you hit perpendicular to the plate. These shots each do 50% hull, so 2 add up to exactly 100%. Hitting the turret mantle will ricochet, and aiming for the turret is a bad idea anyways since even when you can penetrate in the side or the rear of it, the best case scenario is a 4 shot kill. Shooting the side and rear plate are also 2 shot kills, but the first shot to the rear will not disable the engine. If shooting the front, make sure you do not shoot the circular mg port as this will ricochet.
-
The IS-1 can actually be penetrated in the front the same way the Panzer IV can penetrate the IS-1 in the front (Figure 25), in the two slanted portions of the front armor that connect to the side armor (to see the detailed breakdown of this exact shot, see the section on the Panzer IV). In addition, the IS-1 can be penetrated in the side and rear of the tank in 3 shots. These do 45% hull damage, so 2 of them do 90% hull and 3 kill. If aiming for the rear, make sure that you are not shooting the cylinders left and right of the back plate—these will not penetrate.
-
For more information on the impenetrable areas of Soviet tanks, see section 4.5.8 and section 4.5.9.
-
Testing on tanks that took more than 10 rockets to the tracks was not pursued.
📹 Figure 25: “The ‘Panzerschreck’ Penetrating IS-1 Front Armor” — watch clip on YouTube
3.3 The Soviet PTRS-41
Section titled “3.3 The Soviet PTRS-41”The PTRS-41 is a unique anti-tank weapon in Hell Let Loose because it is the only anti-tank rifle in the game. In fact, the Soviet forces do not currently get any type of rocket launcher—instead, they get this rifle. The PTRS itself is a semi-automatic anti-materiel rifle that shoots armor piercing rounds and can penetrate tanks in certain locations. It makes a very distinct and very audible sound on the battlefield which, after a bit of practice, will easily be noticeable from almost any location on the map. It has no damage drop off at range either, and despite having no optic can be fired accurately by a skilled shooter at over 400m.
But how does it do against German armor? The following table shows its effectiveness in the field:
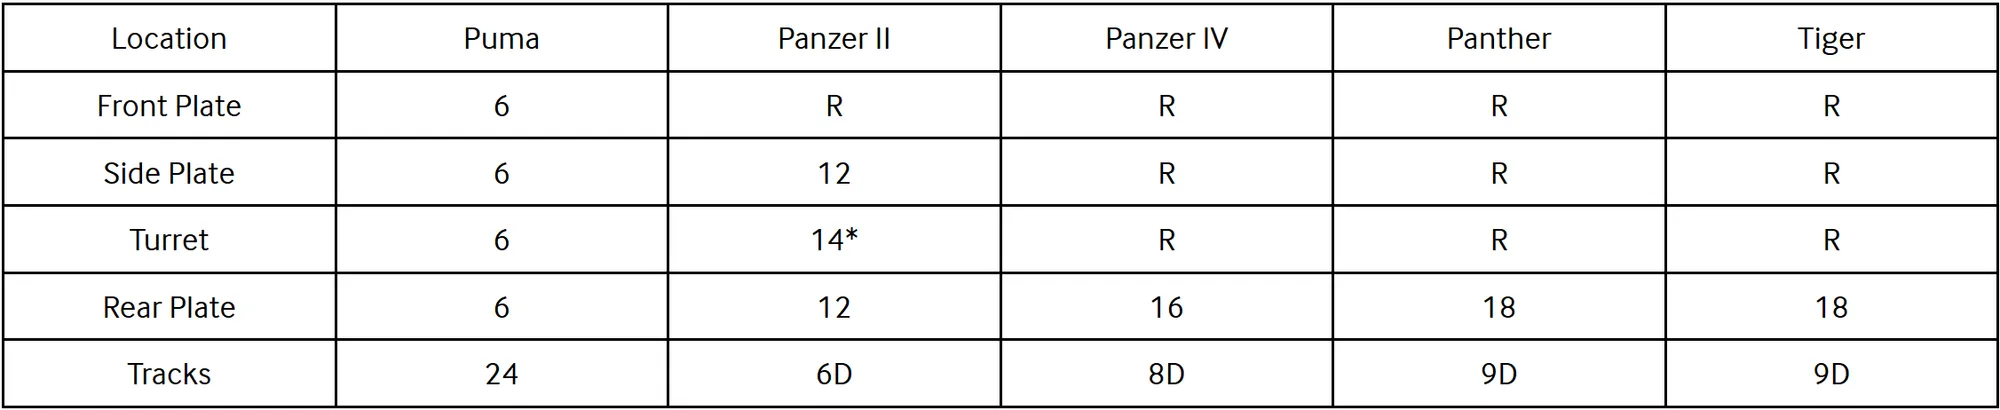
Figure 29: “School Lunchbox”
R - Ricochet or non-penetrating hit
#D - # shots to disable module (no hull damage), after which becomes non-penetrating hit
#* - # shots can only be achieved under specific circumstances or in special areas
Notes:
-
For the Puma, aim in the center of the the body. The Puma contains many small surfaces that are not able to be penetrated by anything and you need to avoid those. For more information on where those are, see see section 4.5.3.
-
For the Panzer II, hitting the front plate or turret mantle (which obscures almost the entire turret from the front) will not penetrate. You can penetrate the side and rear for hull damage, and this is usually the best course of action. If hitting the rear, the PTRS kills its engine in 4 shots, allowing you to finish the job from there. You can also kill the Panzer II in only 6 shots by utilizing the fact that the turret mantle ricochets—simply aim for the lower half of the turret mantle and the round will bounce into the top of the chassis and penetrate the tank. If you shoot the turret from its side or rear instead, it will take 14 shots to kill. If aiming for the rear, there are some non-penetrating areas that you have to keep in mind that are outlined in section 4.5.4.
-
The Panzer IV, Panther, and Tiger can only be hit from the rear and the tracks. The tanks cannot be killed through the tracks either, only disabled, so if you want to kill these tanks you need to find a good place to hunker down and unload magazine after magazine into their rears. The Panzer IV takes 5 shots to kill the engine, and the Tiger takes 6. If they turn around before then, you are out of luck, but if you manage to kill the engine, you can basically keep unloading until you blow it up. There are also some areas of each of these tanks which the PTRS cannot penetrate (see section 4.5).
-
To damage the engine of a Panzer IV, care must be taken to aim at the section of the rear with the cylindrical canister. Anywhere else will only deal hull damage (Figure 26).
-
The PTRS can kill a truck in 5 shots to the engine, 6 shots to the rest of the body, and curiously, only 3 shots to the wheels.
-
Halftracks take 6 shots anywhere in the body to kill, just don’t hit the tracks or wheels as it will take longer.
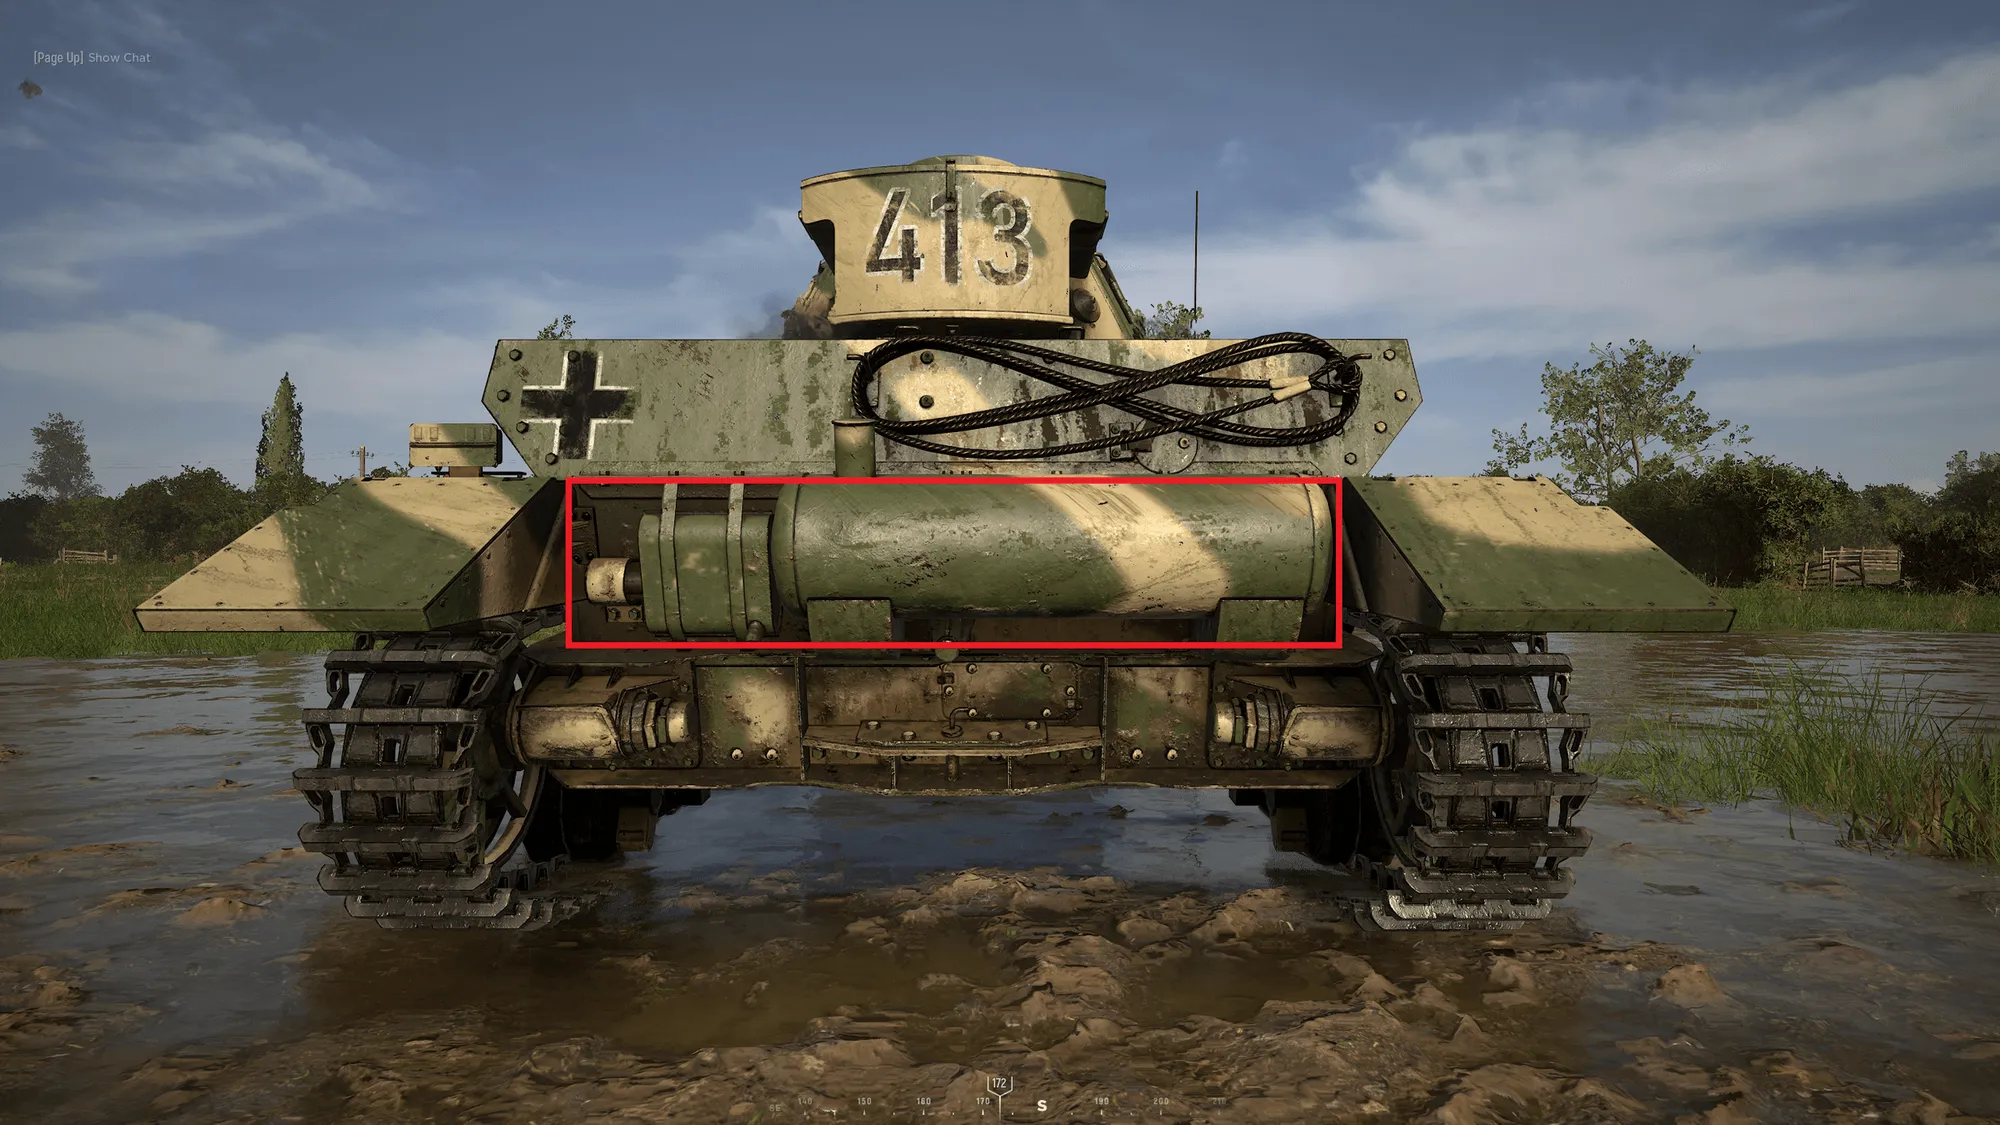
Figure 26: “Where to Penetrate Engine on a Panzer IV”
3.4 Anti-tank Guns
Section titled “3.4 Anti-tank Guns”For the second update in a row, the developers have seen fit to change AT guns and now nobody in public matches knows how they work (again). Luckily for you, dear reader, I am here to clear up any confusion. AT guns can still penetrate any vehicle in the game, including heavies, pretty much anywhere, but they deal a lot less damage than in Update 12 than they previously did. All AT guns of all factions deal the same damage to the same tiers of tanks, so the following table contains all the statistics you need to know as a tanker about their damage values:

Figure 28: “Pancake”
Note: All AT guns kill all trucks and halftracks in 1 shot to the body or engine.
Note 2: Even areas that would normally ricochet a heavy tank’s round, such as the bottom of the “Jumbo”s’ front plate, can still be penetrated without a problem by AT guns. It is not a joke to say that you really can aim almost anywhere with these things.
Though AT guns lack the raw firepower of a heavy tank’s main cannon, they have some perks when compared to their heavy tank counterparts. First off, they are cheap, costing only 50 supplies. This means that an AT player with the loadout to build an AT gun and a support player is all you need to build one of these things, even in enemy territory. Update 12 has significantly increased the time it takes to build AT guns, but because enemy tanks cannot see their blueprints while they are being built, it can be hard to spot an AT gun going up until it has completed construction. On top of that, a loader allows the guns to fire faster than medium and even light tanks (an approximate reload speed of 4 seconds). Additionally, since they are located on the ground and have legs that extend into the dirt for recoil support, AT guns do not move horizontally or vertically between shots. If you have set up the gun and have aimed it at a particular spot of an enemy tank and you hit that spot, you don’t have to readjust the gun even after you fire it, switch seats to load a shell, and come back (this is not true for tanks). On top of all that, AT guns seem to shoot straighter than their medium tank counterparts with less shell drop, making aiming at targets easier.
With so many pros, what are the cons? Well, AT guns can be killed in 1 shot by any tank’s cannon with both AP and HE rounds. They also rotate slower than tanks do, even when both the gunner and loader are turning. They are immobile, so once they are found by an enemy tank they are pretty much dead, and the players themselves are not invulnerable while manning the gun from small arms fire. With Update 12, they deal significantly less damage to all tanks which means that against decent tankers AT guns really don’t stand a very good chance of killing medium or heavy tanks on their own. They can still be very annoying if they are coordinating with one of their friendly heavy tanks to double team tanks, since it only takes 1 AT gun shot and 1 heavy AP shell to kill an enemy heavy, and they can fire at the same time. By and large, however, in public matches this level of coordination is rare and you should have little trouble dispatching enemy AT guns on their own.
Though Update 12 has markedly reduced the damage that AT guns deal, they are still able to penetrate basically any surface of any tank in the game, including the front plate of heavy tanks. This means that you still have to pay attention to random AT guns popping up in addition to the regular threats such as enemy tanks, enemy AT rocketeers, satchel players, mines, artillery, and bombing runs. That being said, in the vast majority of games that are not competitive matches, teams will not even bother putting up AT guns anymore because it takes too long to kill a medium or heavy, and they usually end up getting blown up before they can land the killing blow even if they have the element of surprise. If you are still having trouble dealing with AT guns, you should play conservatively—always play near cover, kite, and play further back from the action where you can spend time finding and neutralizing AT guns should they pop up in the field. This strategy’s strengths lie in the fact that you can stay alive for longer—surprise AT guns are less likely to result in your death because of the cover near you, and you can control the angles you see (and therefore what angles the AT guns can see) in order to sweep the map safely. The added bonus to this strategy is the fact that you can also use it to deal with enemy tanks while being in the relatively more safe position of near your team and behind cover.
As for the mechanics of dealing with AT guns, they are small in size and can be hidden rather cleverly, so you are chiefly going to be relying on your spotter to spot enemy AT guns as they are built or as they try to shoot at you. Your friendly infantry on the ground can also be utilized to spot and mark enemy AT gun emplacements for you. A good way to identify an AT gun when you’re being shot by it is to notice the firing speed. With a loader and a gunner, the AT gun can fire much faster than any other tanks you might be facing in the field. If you are consistently taking shots quickly then there’s a good chance it’s an AT gun. If you’re having problems with an AT gun and you can’t hit it because it’s cleverly hidden, you can mark it and ask your artillery to send a few shells its way and that will make quick work of it.
3.5 Mine, All Mine!
Section titled “3.5 Mine, All Mine!”Ah, mines. The erstwhile bane of every tanker’s existence, turned into a useless toy that nobody uses. All mines in the game from all factions act exactly the same way and deal the exact same damage to all tanks based on their class. Here is the breakdown:

Figure 27: “Tuna Can with a Steering Wheel on Top”
There are two ways mines can interact with tanks. If a tank runs over a mine with its track only, it will blow up and deal damage to just the track. If the tank runs over the mine with its body (or chassis), the mine will still explode, and deal much more damage. Mines in Update 12 do not deal proximity damage, so tankers can breathe easy knowing that they cannot get hurt by a mine even if it is placed right under or next to them and blown up with a grenade. Only if the tank itself moves can it get damaged by mines.
Additionally, medium and heavy tanks do not die with 1 mine anymore, instead requiring 2 or more. This makes dealing with mines relatively simpler, because you can stop the tank and repair it before continuing. Despite this, tankers should be aware that enemy infantry can still place two mines one right next to the other to kill you instantly, but that should also make them more visible. Mines cannot be shot with any small arms fire either, including tank MG’s, so if you want to blow up a mine in your way you must shoot the main cannon at it.
Below are pictures of each team’s AT mines for reference:
The American mine looks like a can of tuna with a steering wheel on top of it (Figure 27), the German mine is known as the “pancake” mine (Figure 28), and the Soviet mine looks like my old lunchbox from grade school (Figure 29). As you can tell from the pictures, the American mine sticks out of the ground more and is a dark color, meaning that it is easier to spot for the most part than the German or Soviet ones, especially in muddy environments. Sometimes mines can be exceedingly hard to spot especially while thinking about other things, so tank crews have to be extra vigilant (Figure 30).
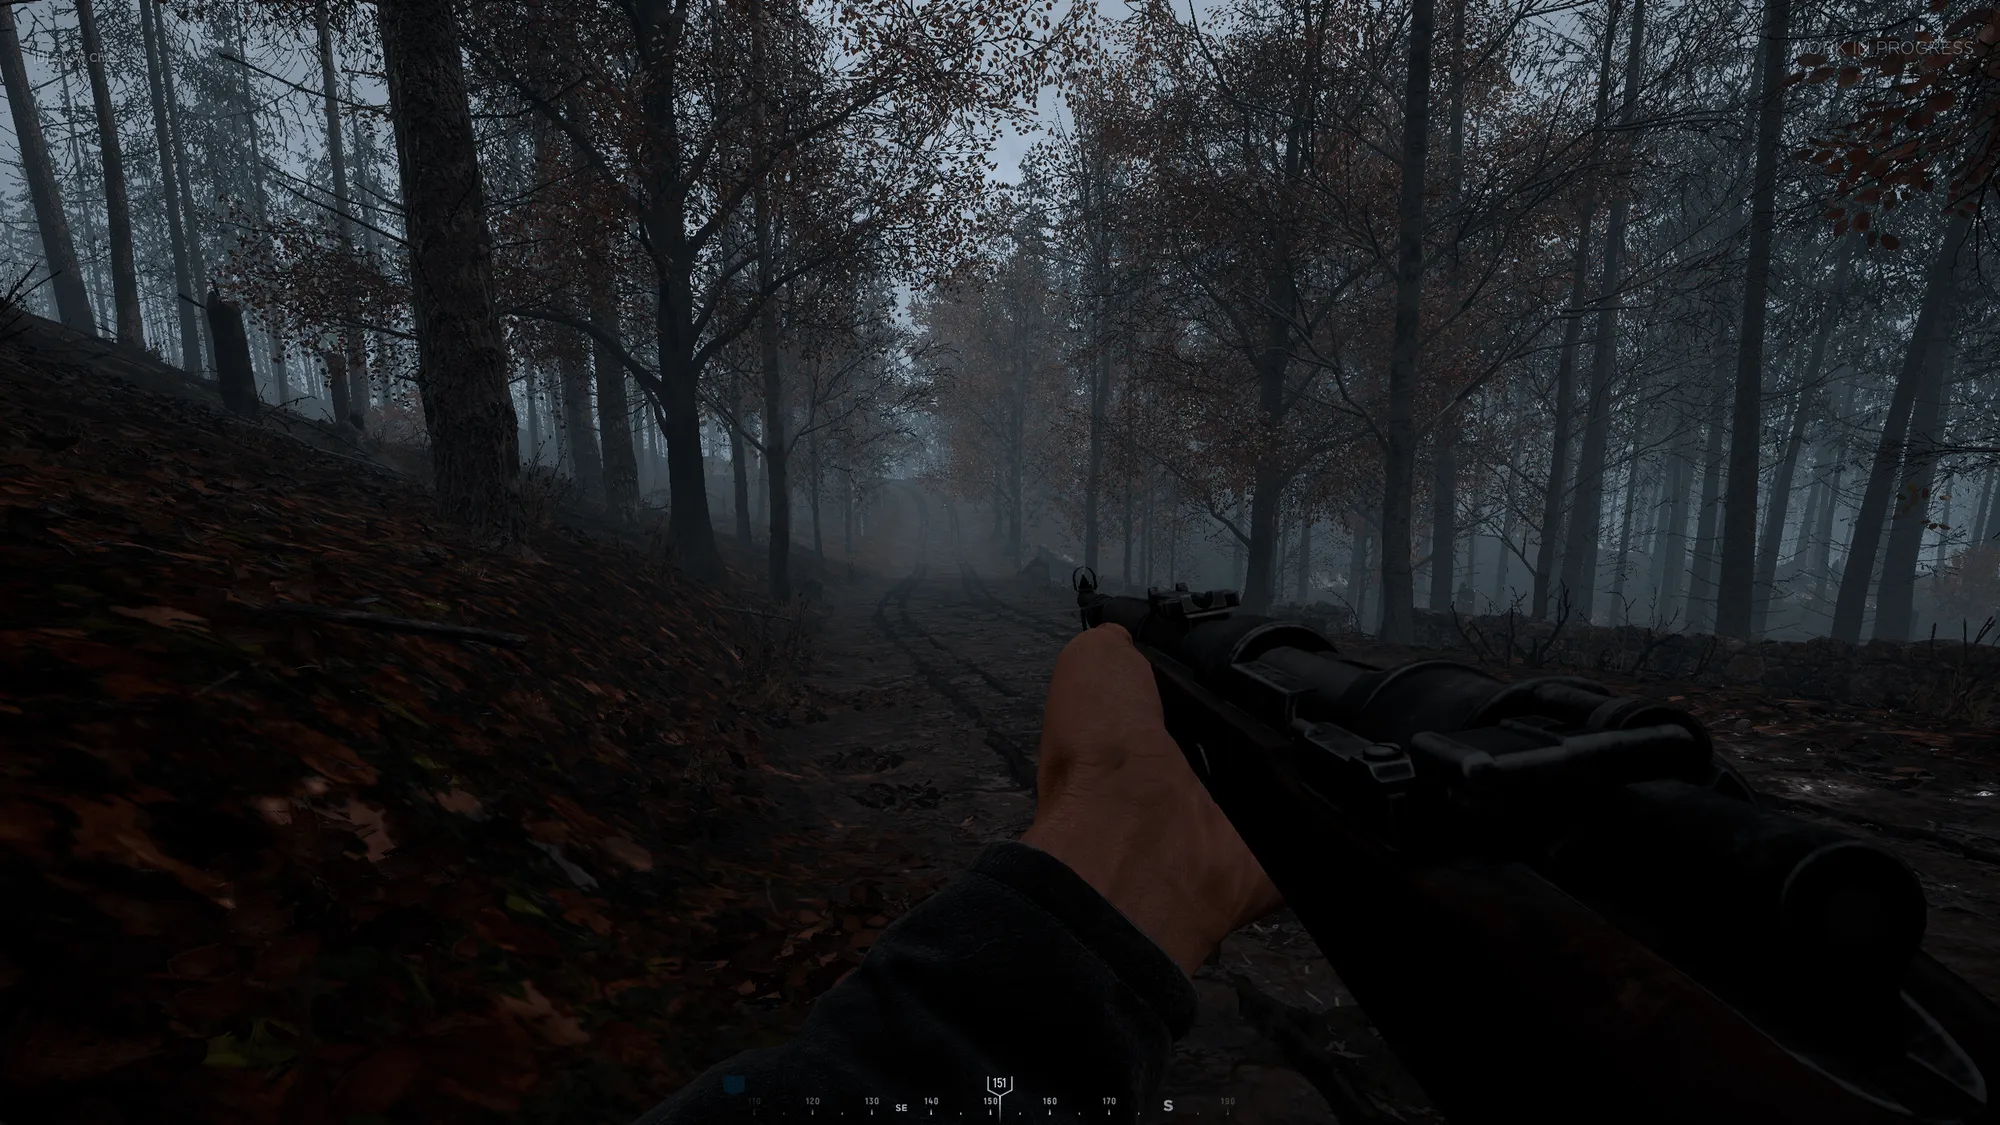
Figure 30: “Try to Find the Mine”
3.6 Satchels
Section titled “3.6 Satchels”Satchels are arguably one of the strongest anti-tank weapons at the disposal of regular infantry in Hell Let Loose. Satchels can be placed anywhere on the tracks, body or turret of any tank in the game and, if they explode, kill that tank with 1 blast. Satchels are powerful enough to kill medium and heavy tanks without even needing to be placed on the tank itself through proximity damage.
Proximity damage to tanks from satchels starts from as far as about 25m and increases linearly as the satchel gets closer to the tank. For every tank, proximity damage is calculated the same way—the turret is damaged the most, then the hull, and then the tracks. This makes even proximity satchels that are too far away to outright kill you dangerous, because tankers will have to repair 3 separate modules in a tank, making the process take significantly longer.
Unlike Update 10, the satchels in Update 12 have been standardized such that all satchels deal the same amount of damage to all factions’ tanks, now depending only on the tier of the tank. As a result, the following table is a generalization of the maximum distance (in meters) at which satchels placed on the ground will destroy full-health tanks in 1 blow:

As the above data shows, it is possible to kill medium and heavy tanks with a satchel placed on the floor 12m in front of the tank or 4m from the side, and this effect goes through walls and corners of buildings. In other words, urban maps such as Carentan, Stalingrad, and Sainte-Mere-Eglise are much more dangerous to tanks than they already were because enterprising AT players can satchel you from places you cannot see (such as the inside wall of a building you are next to) with no counterplay available to the tankers. Additionally, AT players that are having a hard time placing a satchel on your tank as you are spinning to try to kill them may opt to put the satchel on the floor instead, which is much harder to see (you could kill the AT player, get out, see no satchel on the tank, get back in, and still blow up).
3.7 Precision Strikes, Bombing Runs, Katyusha Strikes, Artillery and You
Section titled “3.7 Precision Strikes, Bombing Runs, Katyusha Strikes, Artillery and You”Bombing runs and artillery shells in Hell Let Loose have gone through many iterations during the development of the game, at times being utterly devastating to tanks and at others being laughably ineffective. In Update 12, they lean more towards the latter. Both German and American bombing runs have been changed in Update 12 (yet again) to now only damage a tank, even on direct hits. Each individual bomb of the run deals proximity track damage to tanks, and no one bomb can deal enough damage to kill the tank. Instead, each bomb that lands around or on top of a tank deals a certain amount track of damage that, when added up, may end up dealing hull damage. Even in the worst case scenario where the tank is positioned just right to catch damage from 4 different bombs in the zipper, the bombs still do not deal enough damage to kill a full health medium or heavy based on our testing. This means that only already damaged mediums or heavies can get killed by a bombing run.
Here is my artist interpretation of what a bombing run actually looks like, for reference (Figure 31).
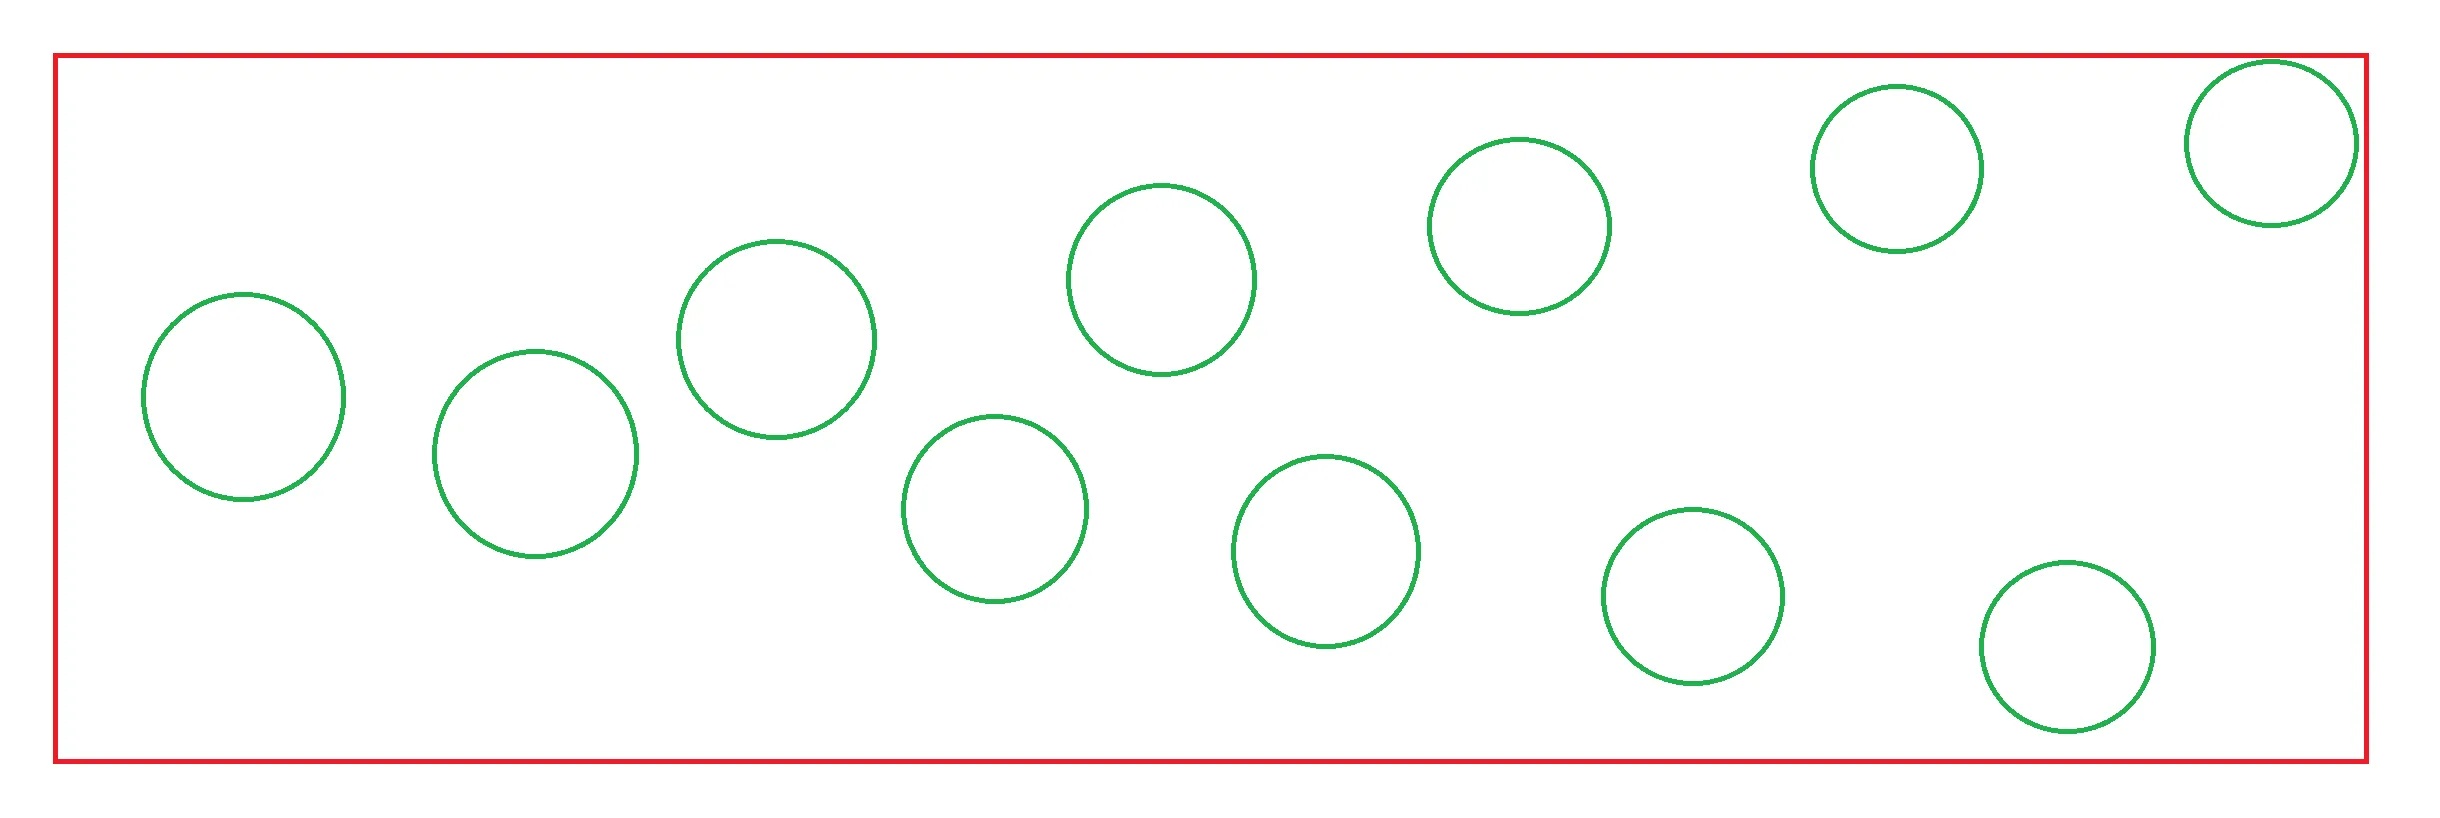
Figure 31: “Crude MS Paint Drawing of a Bombing Run”
📹 Figure 32: “Panther Surviving Precision Strike Direct Hit” — watch clip on YouTube
So what is the lesson here regarding non-tank related explosives? Barring the precision strike, which is only a nuisance at maximum a few times per full length game, you can ignore them. If you are scared that a bombing run is coming towards you and you want to make sure you will not die, then you can move a few meters out of the direct blast zone and you are completely safe. If artillery comes down near your position you can feel free to let out a chuckle knowing that those idiots are wasting time and munitions on your tank.
3.8 How to Die Less to Anti-tank Infantry
Section titled “3.8 How to Die Less to Anti-tank Infantry”With all of the above information having been learned, what tactics can tankers employ to stay clear of enemy anti-tank infantry? The first step is to learn the above statistics by heart. Yes, I mean it. Knowing the exact damage something does to your tank can help you identify what just shot you before you can visually see it. For example, say you’re in a non-German heavy tank (such as the IS-1 or a “Jumbo” Sherman) minding your own business and suddenly you take a little less than 50% hull damage but no engine damage from something. The only thing that deals exactly 45% hull damage but no engine damage to an IS-1 or “Jumbo” in 1 shot is a “Panzerschreck” to the side armor. (a Tiger shot does more than 45%, for example, and a “Panzerschreck” to the rear will also do engine damage). Knowing this as a spotter, you can much more easily find the target by looking at one or both of the sides allowing you to turn the tank accordingly and save your life. Another example of this is if you are in a Panzer IV and you take exactly 50% hull damage and some engine damage, you can be sure that either a “Bazooka” or Stuart is on your rear right at that moment, since those are the things that can do that type of damage to you, and they can’t do that type of damage to you anywhere except the rear plate. Note: the exact specifics of the damage components take for each individual tank is outside of the scope of the Tank Bible, and is something you will have to memorize by playing the game and taking hits.
The general rule of thumb for mediums and heavies is that if you take engine damage, you should turn around 180° because you are being shot either in the Achilles Heel or the rear plate, and turning around will prevent the AT player from hitting either of those shots. If you took hull damage but did not take engine damage, then you were either penetrated in the front or side plates (see the sections above on AT rockets to see what AT weapons can penetrate where for which tanks). If you lose more than ⅔ of your hull in 1 shot, and you were not moving, then most likely you were just shot by an enemy tank.
Another tip is not staying in one location for too long. You may be having a great run killing tanks and infantry in a certain spot, but once you piss off enough people you will eventually start drawing a large amount of unwanted attention. This can mean getting pinged by enemy infantry and therefore increasing the chances enemy tanks can see you before you see them, enemy infantry building AT guns with the express purpose of killing you and you only, die-hard AT hunters whose only purpose in life is to shoot you in the ass, or new in Update 12, precision strikes. If you move around every so often you can reduce the likelihood of death related to these threats by a surprising amount.
Probably the most important piece of advice regarding AT is the driver’s observational skills. Obviously it’s the spotter’s job to look around and take note of all the threats in the surrounding area, including the rear, and good spotters make it easy to respond to threats no matter where they are—but sometimes the spotter is looking at something else when AT is coming behind the tank and it becomes the driver’s responsibility to save the lives of the crew. As soon as the driver sees that their tank has taken damage from an AT player, he or she need not wait for a command or spotter confirmation to turn the tank 180°. Since turning the tank (not running away, for example) is the best way to deal with flanking AT rocketeers, the driver should be ready to take quick and aggressive action. Incidentally, this is also why it’s best for drivers to keep their tanks in 1st gear or reverse while stationary, so that they can turn as fast as possible in an emergency—if the driver does not take this action right away, your tank is dead. So how can you know what you are taking damage from as a driver? Here are some tips:
-
AT rockets travel much slower than shells of a tank or AT gun, so with enough practice you can learn to hear the time between when the shot was fired and when the shot hits your tank. In addition, AT guns and tanks make a particular sound, more of a loud “BOOM”, and AT rockets make more of a “fwooooosh” sound when fired.
-
If you are not engaging anything directly in front of you or to the sides, then you can assume the threat is at your rear until your spotter confirms otherwise.
-
As mentioned before, specific damage values can be a telltale sign that you are getting shot by an AT rocket as opposed to a tank or that you were shot from a rear angle. This is something you will learn through experience over time. Know your hit to kill values.
-
The PTRS specifically does a miniscule amount of damage per bullet but can shoot rather fast and has a distinct sound, so it should be obvious when you are getting pelted by this thing.
Lastly, positioning is a very important skill for everything with regards to tanking but especially surviving the onslaught of enemy AT players. Especially on urban maps and forest maps, you can get surrounded easily because your mobility is severely restricted when compared to that of the enemy infantry. For this reason it is advisable to be near friendly infantry at all times because they will naturally act as a screen for enemy AT rocketeers trying to attack you. Even if the friendly infantry are not a dedicated tank support squad, they will naturally kill any enemy they see (like bots), thus covering your flanks. Check your map frequently to see where your friendly infantry currently is and where they are going, as well as where their outposts are. If they start moving in a direction away from your tank, you need to either move up with them or retreat to a different position, both of which are viable options. This strategy has strong bonuses other than flank protection as well, such as the close proximity of engineers to repair your tank as well as the possibility of repair stations, not to mention the fact that you can clear enemy infantry out easily for a friendly infantry push thereby significantly increasing the chances that you can capture or defend a point. Positioning is half the battle in a tank—bad positioning is responsible for a majority of tank deaths, while good positioning is how games are won.