Findings That Apply to All Tanks
In Update 12, there are a lot of aspects of tank gameplay that are shared between every tank in the game. These are noted below.
2.1 Tank Health Bars
Section titled “2.1 Tank Health Bars”
Figure 1: “Poor Tank Having a Bad Day”
2.2 Barrels of Fun
Section titled “2.2 Barrels of Fun”Every tank in the game has a barrel through which the projectile is fired towards an enemy, and this barrel can be similarly fired upon by that enemy. When you hit an enemy tank’s barrel, it’s turret almost always becomes immediately disabled (meaning that the coaxial gun is offline and the traverse speed is reduced) and sparks start flying out of the barrel. Sounds good, right? Wrong. In every instance that has been tested and compiled here, while shooting the barrel does do damage to the turret quickly, it does not do damage to the hull, and therefore cannot kill the tank. As a result, you should never hit the barrel more than once, and even hitting it once is ill-advised. Typically, as you will see below, you will want to avoid the barrel when aiming for the turret.
The cupolas of different tanks act in much the same way. Depending on the tank, some cupolas are impenetrable and others are not, but all cupolas, if penetrated, will only do damage to the turret and never the hull, even if you shoot it multiple times. Because of this, you should avoid shooting the cupolas of tanks in general.
2.3 BBW: Big Bouncing Warheads
Section titled “2.3 BBW: Big Bouncing Warheads”So what is a ricochet anyways? A ricochet is when the projectile you fire from your tank bounces off the hull of an enemy tank instead of penetrating. In terms of the game, ricochets mean that your shots do no damage. Instead, the projectile is redirected somewhere else and may land nearby. Ricochet physics in Hell Let Loose are one of the biggest reasons why a lot of rookie tank crews are not as efficient as they could be at killing tanks. To understand how and why a tank round ricochets, it’s important to know the factors that are at play. The critical ricochet angle, meaning the angle at which a tank round will ricochet as opposed to penetrating, depends on the velocity of the projectile, the thickness and hardness of the plate on the tank, the shape of the projectile, the angle of the plate, as well as other factors. For the purposes of Hell Let Loose, however, all you need to know is that the bigger tanks tend to sling faster shells with greater penetrating power, but they also have thicker and harder plates to boot. So, in general, if you are facing a heavy tank with really hard armor such as a Tiger, most if not all of your shots to any angled or curved surface will ricochet. On the other hand, if you are a tank whose projectile is fast and hits hard, it may be okay to hit armor at an angle as it will penetrate anyway. All of that having been said, the most important thing to learn about ricochets is avoiding slanted and curved surfaces when you can. This may seem obvious, but typically you should aim for surfaces that are perpendicular to the projectile you are firing. For example, the American Sherman “Jumbo” 75mm and 76mm heavy tanks have a large flat rectangular front plate and a smaller flat plate, called the mantle, on the turret either side of the barrel. If you hit either of these areas with a Tiger or Panther heavy tank, you will penetrate and deal damage (Figure 2).
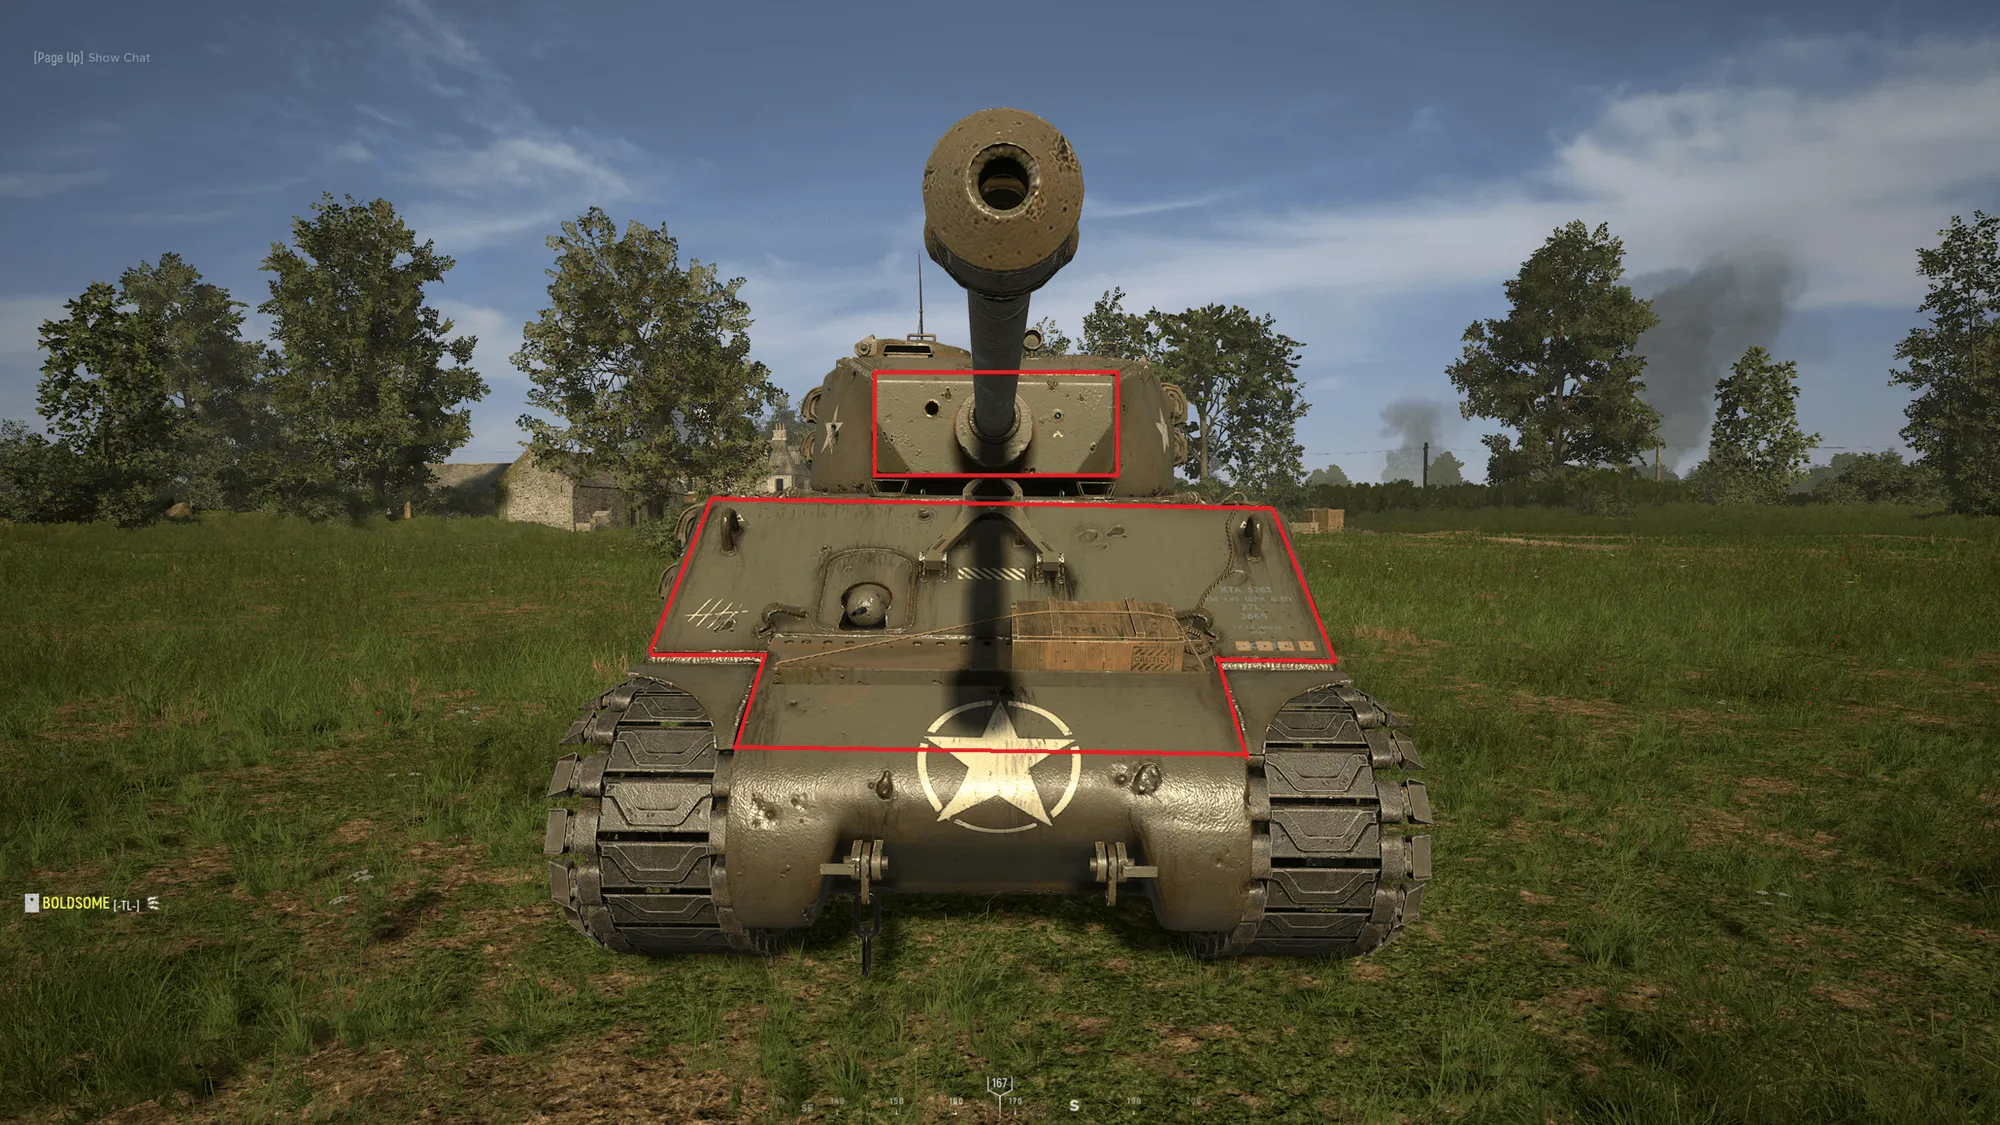
Figure 2: “Where to Shoot”
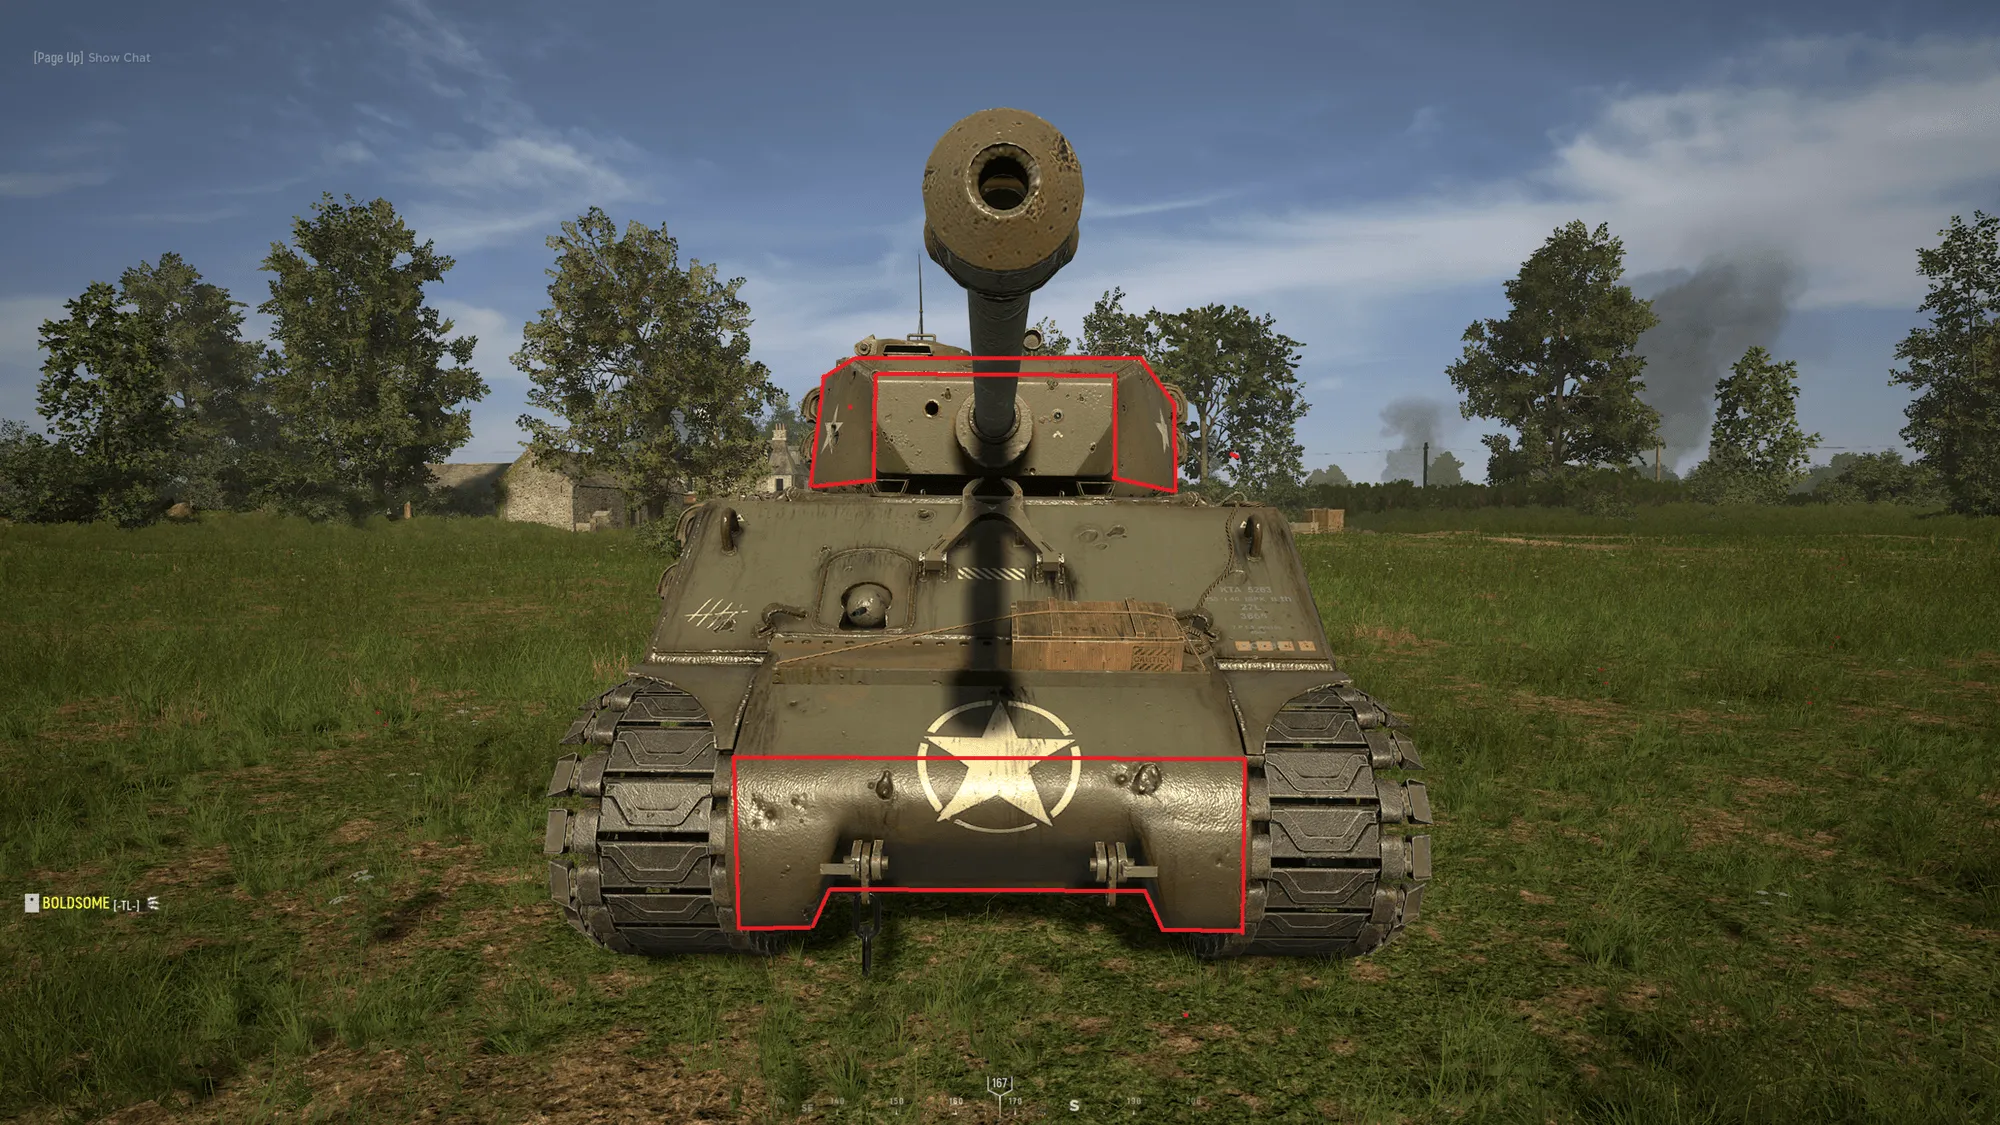
Figure 3: “Where Not to Shoot”
2.4 Knowing When You’ve Hit
Section titled “2.4 Knowing When You’ve Hit”With Update 11, the developers have made it easier to tell whether you are penetrating, ricocheting, or neither (A.K.A. a non-penetrating hit). There are new sounds and visual effects for each, and examples are listed below of each separate one from the gunner’s perspective. Note: feel free to right click on the video and set it to loop, make the video play in slow motion, or make it full screen so you can see these effects better.
2.4.1 Ricochets
Section titled “2.4.1 Ricochets”📹 Figure 4: “The Ricochet” — watch clip on YouTube
2.4.2 Non-penetrating Hits
Section titled “2.4.2 Non-penetrating Hits”📹 Figure 5: “The Non-penetrating Hit” — watch clip on YouTube
2.4.3 Penetrating Hits
Section titled “2.4.3 Penetrating Hits”📹 Figure 6: “The Penetrating Hit” — watch clip on YouTube
2.5 Muzzle What?
Section titled “2.5 Muzzle What?”A lot of real life tanks use a barrel that features a muzzle brake on the end of it as opposed to simply a straight cylindrical barrel. The purpose of the muzzle brake is to funnel the gasses that come out of the barrel to either side of it when a round is fired instead of directly in front of the barrel. This (in theory) makes for better visibility as well as less recoil and a variety of other things on top.
This is all well and good, but how does it pertain to the game? Well, in a general sense, tanks in Hell Let Loose that have a muzzle brake tend to have smoke trails that dissipate quicker than those that do not have muzzle brakes. If a shot is fired through a barrel that does not have a muzzle brake visibility can be lost for a few moments. For the Americans, the Sherman “Jumbo” 75mm and the Sherman medium do not have muzzle brakes, and they tend to leave a smoke cloud that obscures the spotter’s vision for about 2 seconds. The Sherman “Jumbo” 76mm however does have a muzzle brake, and does not have to deal with this issue. On the German side, both the Tiger tank and the Panzer IV tank have smoke screens that block the gunner’s vision for 2 seconds as well. This is something that crews of those tanks have to learn to get used to, and be ready to react to enemy engagements immediately after the smoke has dissipated.
Because all the gasses of a tank shell come out of the end of the barrel, it is important to note that friendly (and enemy) infantry can be suppressed by your shells in a radius around the end of your barrel. For the Americans and Soviets, all tanks suppress within 5 meters of the end of the barrel, and for the Germans, all tanks suppress within 7 meters of the end of the barrel. This means that, as infantry, if you are pushing behind or to the side of a friendly tank, you can use the body of the tank as cover from the suppression of the muzzle even if you are within the radius of suppression, as long as you keep the body of the tank between you and the muzzle.
2.6 A Driver’s Guide (For Dummies)
Section titled “2.6 A Driver’s Guide (For Dummies)”Let’s talk about driving, because some of you can’t seem to figure it out. All of the tanks in the game except the recon vehicles are stick shift operated, meaning that you have to control the switching of gears of the tank as your speed changes. Typically, the lower gears turn quickly and the higher gears move the tank faster, but this is not true for all tanks (for example, the Panther turns slowly in 1st gear but quickly in 4th). If you switch gears too fast you can stall the tank and get stuck at a slow speed even if you switch to higher gears. I can already imagine some of you rolling your eyes and saying things like “I already know the basics” and “get to the good stuff already”. Fine, let the “good stuff” commence.
2.6.1 Gears Just Want to Have Fun
Section titled “2.6.1 Gears Just Want to Have Fun”Update 10 has reworked the driving mechanics from the ground up to be more realistic. Now, when you accelerate in a straight line at 1st gear, the tachometer will steadily go up until it reaches a critical point at which it will “pop” and quickly spike to maximum RPM (Figure 7). In every tank, this happens when the tachometer reaches 20 RPM. When the 1st gear “pops”, this is when you can start turning with the maximum speed that the gear affords you. If you try to turn before that point, however, your turn speed will be significantly reduced, the time it takes to “pop” will be increased, and if the tank is particularly sensitive, such as the IS-1 heavy tank, the first gear will never “pop” so long as you are turning (Figure 7). Turning reduces your RPM, so if you are stationary the quickest way to turn is to first accelerate in a straight line until 1st gear “pops”, then press the “A” or “D” keys to turn (especially in tanks with high turn speed such as the Tiger and the “Jumbo”s).
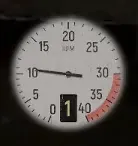
Figure 7: “1st Gear of the Panzer IV ‘Popping’ While Driving in a Straight Line”
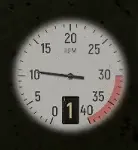
Figure 8: “1st Gear of the IS-1 While Turning”
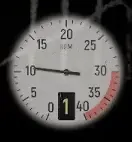
Figure 9: “Optimal Shifting from 1st to 4th Gear in a Tiger”
2.6.2 Advanced Agility Techniques (MLG Only)
Section titled “2.6.2 Advanced Agility Techniques (MLG Only)”In Update 10, the maximum turn speed of tanks in the game was reduced across the board, and the maximum movement speed of a lot of tanks was also been slashed. There is, however, a way to get around this. Movement on flat ground can be extremely vexing and slow, but you can utilize almost every piece of geometry on the map from low bearing obstacles such as tires and rubble to the sharp and angular corners of buildings to dramatically increase the speed at which you turn, saving your life in critical situations. To illustrate this, the following figures show how you can turn much quicker than you otherwise would be able to by using some of the map terrain.
📹 Figure 10: “Tiger 90° Turn on Carentan” — watch clip on YouTube
📹 Figure 11: “Sherman ‘Jumbo’ 76mm 90° Turn Using A Building” — watch clip on YouTube
📹 Figure 12: “Sherman Medium 180° Turn Using Berm” — watch clip on YouTube
📹 Figure 13: “Panther Going Up Sheer Walls” — watch clip on YouTube
📹 Figure 14: “Panzer IV 180° Turn Using A Rock” — watch clip on YouTube
2.6.3 The Tank Jesus QuickTurn™
Section titled “2.6.3 The Tank Jesus QuickTurn™”As per usual, I try to keep readers of the Tank Bible up to date on the latest mechanics and techniques used by the best tankers in Hell Let Loose, and this next trick is no exception. Have you ever been cruising along in 4th gear in your beautiful tank and suddenly been accosted by a band of pesky AT players right behind you? Have you ever needed to turn on a dime from 4th gear, in place, without losing RPM?* Are you annoyed that I’m wasting your time with stupid questions like these? If you answered yes to any or all of the above questions, you’re in luck! My patented QuickTurn™ is for you.
So what is it? Well, it’s a technique that allows drivers to react to threats while they are most vulnerable: driving from position to position in 4th gear. It allows drivers to turn certain tanks* in place faster than any other method can turn them, and it utilizes the peculiarities of old driving and tank physics on tanks that have not been updated yet. To illustrate this in action, let’s look at a side by side comparison (time it yourself!) of the “Jumbo” 76mm heavy tank using the previously known fastest method (namely dropping down to 1st gear from 4th gear since 1st gear has the fastest turn speed for the “Jumbo”) (Figure 15) and the new method (Figure 16).
* - This cannot be done with the Panther, Sherman medium, or IS-1
📹 Figure 15: “‘Jumbo’ 76mm Slow Turn” — watch clip on YouTube
📹 Figure 16: “‘Jumbo’ 76mm QuickTurn™” — watch clip on YouTube
📹 Figure 17: “Panzer IV QuickTurn™” — watch clip on YouTube
📹 Figure 18: “Botched Panzer IV QuickTurn™” — watch clip on YouTube
2.6.4 Spacial Awareness
Section titled “2.6.4 Spacial Awareness”Another very important aspect of driving is knowing the size of your tank and the location of the viewport as a driver. This is the single biggest reason why so many drivers get stuck in urban or forested maps or even when simply trying to make a sharp turn. Because the driver’s viewport is on the left hand side of the tank, not the middle, the tank actually extends farther to the right of the driver than it does to the left. For tanks like the Tiger that are wider than my aunt Bertha, this means you have to be careful how you make your turns. If the right side of your track gets caught on a tree or a wall, your entire tank will pivot into said tree or wall if you keep going forward and thus force you to reverse, wasting time. Note: you can move the mouse downwards to allow greater vision of the ground immediately in front of you, and can be useful in determining what you are stuck on.
Awareness of your tank also means awareness of which direction your turret is facing and what your gunner can see. A good driver knows if there are obstacles that will cause their gunner to have trouble getting a good sight picture and is able to position exactly so that there is the minimum amount of extra movement required during an engagement. If you have to move 1 foot to the left or right because there is a pole or a bush preventing your gunner from shooting the enemy tank you are engaging, you could end up paying for that oversight with your life. For this reason, you should always ask your gunner if their sight picture is satisfactory when stopping for a non-trivial amount of time. Additionally, you should know as a driver how visible your tank is from behind cover. If you are trying to disengage from a fight with a tank and retreat into cover you need to know whether your tank is visible from their perspective, including whether or not your turret can be seen over a hedge or wall or if your tracks can be seen sticking out of said cover, for example.
2.6.5 Kiting
Section titled “2.6.5 Kiting”Kiting is another technique utilized to great success by competitive level tankers at the highest levels of play. Kiting, as I like to define it in the context of Hell Let Loose tanking, is the act of peeking out of hard cover to shell infantry or tanks and backing up behind said cover and repairing the tank when taking damage. The purpose of kiting is to elongate your life in a tank and act as a safety net against surprise damage from an unknown source, all while not sacrificing your ability to lay the hurt down on enemy positions and tanks. Now, in theory, using cover is nothing new and certainly you, dear reader, understand its benefits. This section, therefore, is about how to determine which cover to use in the first place, the best ways to make use of said cover, and how to work with your gunner and spotter to kite effectively.
The first thing to understand is that not all hard cover is the same. Sometimes the hard cover itself can obscure your sight lines or is in an area of the map that does not have good sight lines to begin with. Other positions do not obscure your tank from damage in its entirety or have holes in them, such as stone walls. Others still are too close or too far away from the action to be effective spots. What you want in a good cover position is (1) the ability to protect your entire tank from damage, (2) good sight lines to enemy infantry and tank positions, (3) enough space behind the cover for the tank to smoothly maneuver back and forth to open and obscure the sightline, and (4) a position that is neither too close to enemy positions to risk getting overwhelmed nor too far from enemy positions to render you ineffective (in other words somewhere where you can sit for a while and get value without having to move immediately). When you apply these filters to all cover on a map, there usually ends up being only a handful of great positions that you can then memorize. Note: hedgerows can be good cover depending on the map and location. Sometimes bushes are penetrable and sometimes they are impenetrable, so be careful when kiting using bushes.
So you’ve found a good position. How best can you kite using this cover? The most efficient way to kite is to park sideways with respect to the cover and turn the barrel 90° left or right with respect to the front of the tank. The benefit of this is that the driver can peek straight out of the cover without turning at all, allowing the gunner to more quickly acquire any targets, but more importantly, it allows the driver to reverse the body of the tank straight back into cover upon taking damage, which is the quickest way to get to safety. As a driver, this takes some getting used to—you will have to depend on your crew mates to be your eyes because you will be looking away from any engagement you are in. Another important aspect of kiting is keeping in mind the distance between you and the cover you are using. Being too close to the cover can be detrimental because it hinders your ability to move around and turn if needed, but it is also harmful to the gunner because of perspective. As veterans of CS:GO will no doubt know, if you are close to a corner as you peek it and you are engaging an enemy farther away from the corner than you are, you are at a disadvantage because the enemy will see your body before you see theirs. In other words, the farther away from the corner you are, the more quickly your gunner will be able to see any enemies and the less time those enemies will have at their disposal to see your body before your barrel crosses the corner. You want to be as far away from the cover as you can be as long as it is comfortably hiding the entirety of your tank from enemy fire when you close the angle.
The following is a top down example of kiting in action (Figure 19). As you can see, it’s a pretty simple concept.
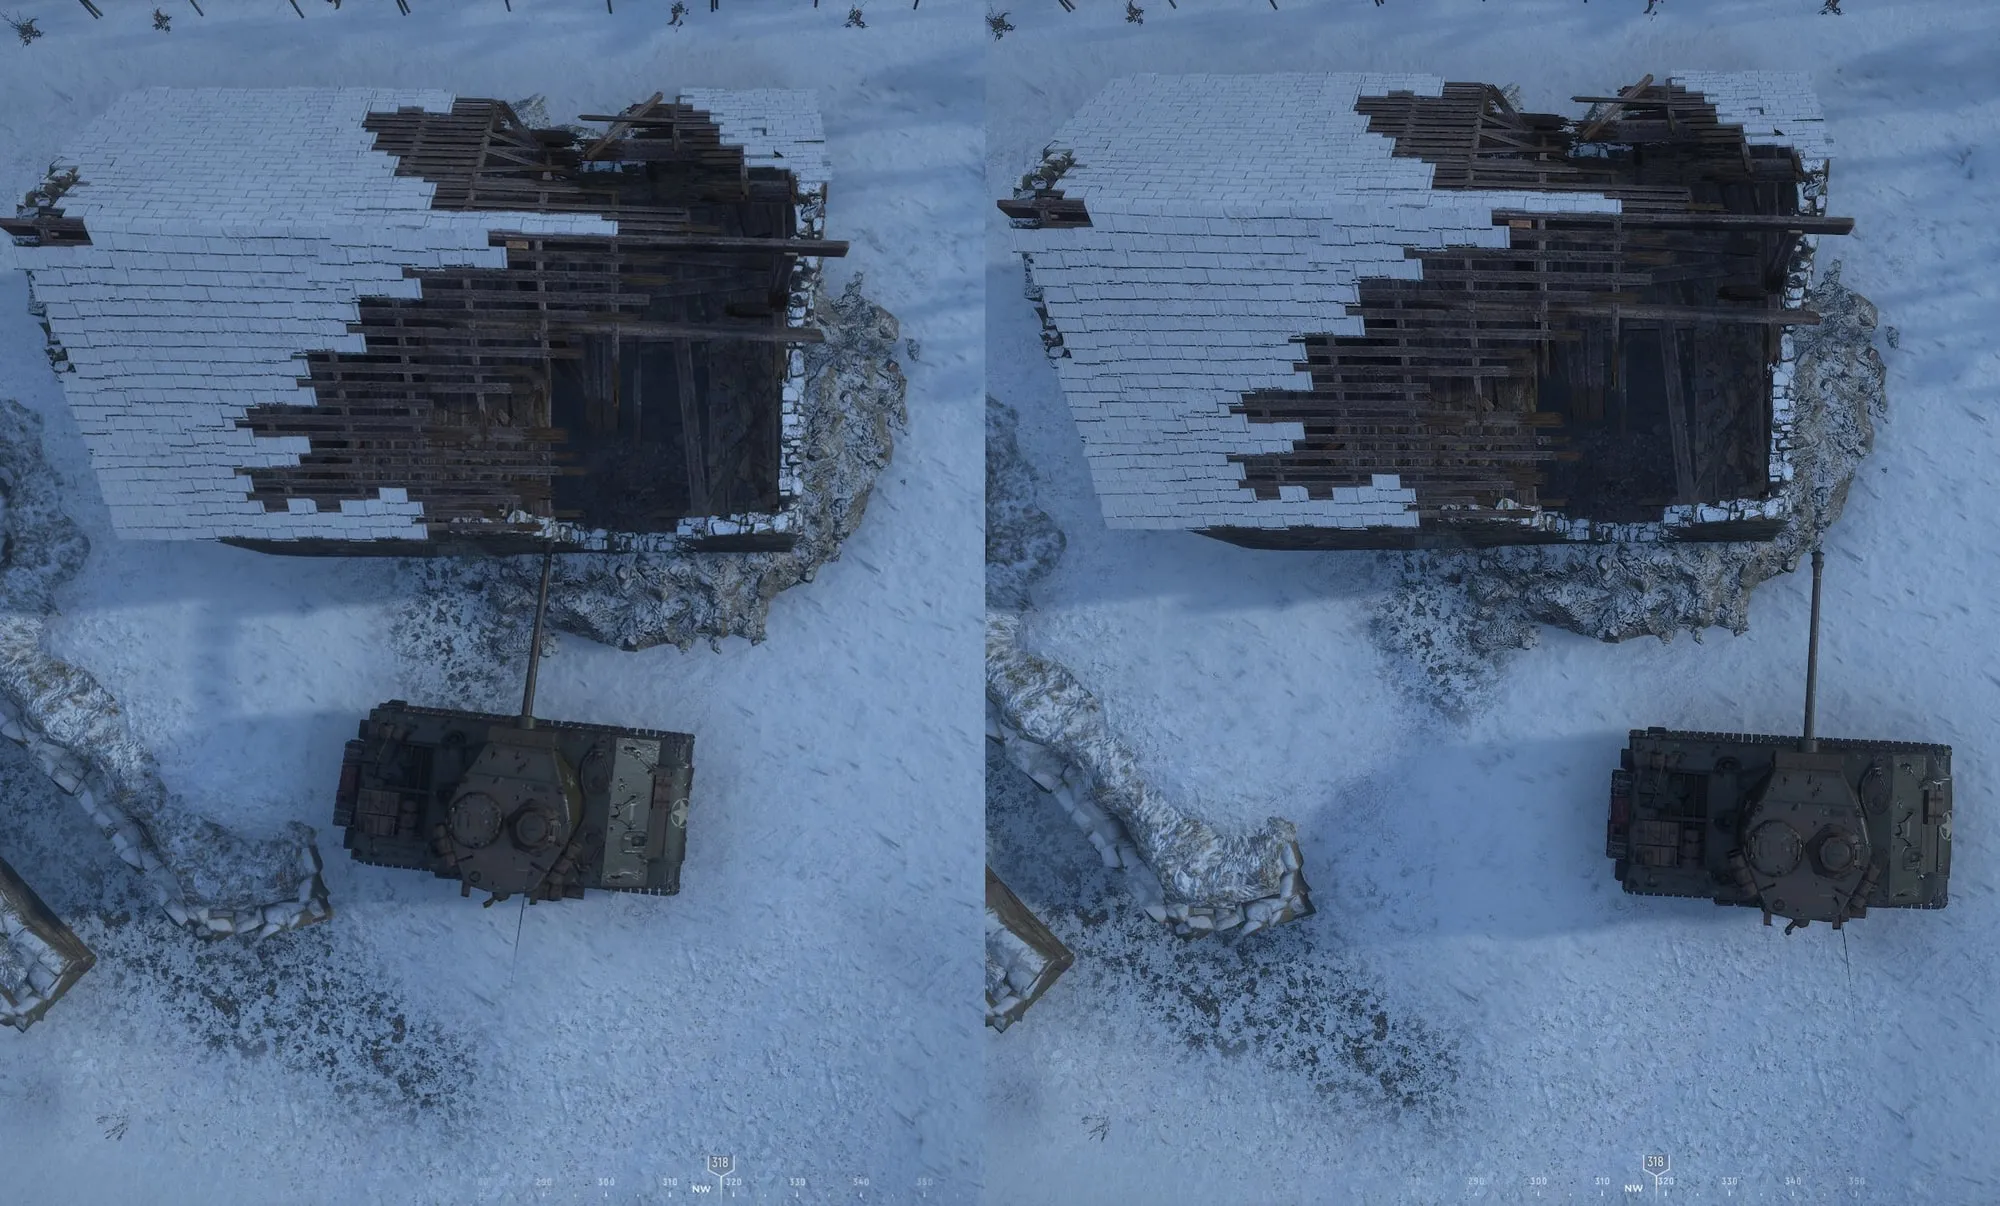
Figure 19: “‘Jumbo’ 76mm Kiting”
📹 Figure 20: “Kiting in a ‘Jumbo’ 76mm” — watch clip on YouTube
2.7 Stormtrooper Aim (MG’s)
Section titled “2.7 Stormtrooper Aim (MG’s)”If you’ve never seen a tank’s machine gun firing in Hell Let Loose before, you might think you’re seeing red and green lasers like in Star Wars, and you wouldn’t be far off the mark. Several updates over the years have gone a long way to fix the stability of MG fire (through the nearly complete removal of barrel shake) as well as its hit registration, creating consistently accurate coaxial MG fire that is offset by the same amount from the reticle every time. This means that you have no excuse for missing enemies like a complete Stormtrooper. You should always be trying to kill infantry players with MG if they are exposed as opposed to launching a round, because rounds can be conserved to shell targets who are behind cover.
Suppression is also a decent tactic to use against enemy infantry that isn’t outright exposed in Hell Let Loose as it limits their vision and makes it very hard for them to shoot anything. All tanks in the game have high enough fire rates on their MG’s that shooting at and around an enemy position at a constant rate of fire is a good way to lock down an area and force enemy infantry to deal with you or move around your zone, both of which hinder their potential push into your territory.
That being said, tank MG always shoots a tracer round every fifth bullet and you should be careful when spamming MG for suppressive purposes. Skilled enemy tankers will be able to tell the difference between the way your tank tracer looks and the way your team’s infantry MG tracer looks (the tank tracer is thicker and brighter) and will be able to locate you based on that tracer as well as the unique sound that your MG makes. Even though tanks use the same MG’s as infantry in Hell Let Loose, good tankers will assume the worst case scenario that any MG sound is a tank, so if you do not want to give your position away, not shooting MG (or main gun obviously) is important. Conversely, of course, if you are the one looking for enemy tanks but none have been marked out to you, listening for enemy tank MG is the best way to get an approximate bearing on potential locations of enemy tanks relative to your current position.
2.8 A Note on HE
Section titled “2.8 A Note on HE”HE can be utilized to penetrate certain vehicles in specific spots. This is determined, like most tank-related interactions are determined in Update 12, by each tank’s class (with the only exception being the Panzer II). Only light tanks and recon vehicles’ hulls are penetrable using HE shells, and below is a table detailing what is possible with HE:
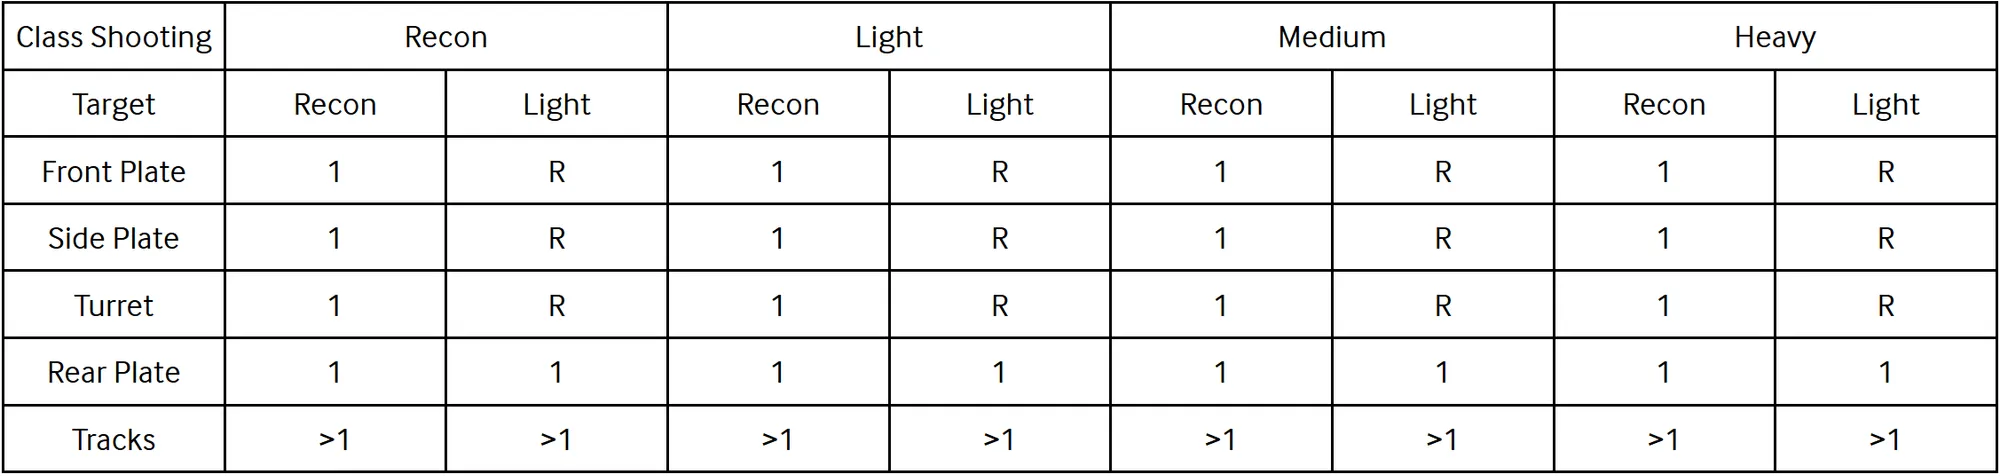
R - Ricochet or non-penetrating hit
So what can we learn from this data? Well, if you are in a tank out in the field and you see a recon vehicle, you can destroy it with HE rather than AP, allowing you to save that AP shell for enemy tanks. This is especially useful on heavy tanks like the “Jumbo” 76mm, because you get many more HE shells than you do AP shells, so your AP shells should be used to fight the enemy tanks that require them. If you happen to have HE in your barrel and you see a recon vehicle, you can shoot it without having to dump the HE shell to load AP. Additionally, HE can be used by any tank to disable the tracks of any other tank instead of AP, as mentioned previously. They both do the same amount of damage to the tracks, so if you want to kill the tracks of a tank but want to conserve AP, load HE instead.
As it relates to trucks and halftracks, HE deals damage to them as well. All tanks (including recon vehicles and light tanks) destroy all trucks and halftracks with 1 HE round anywhere in the body, engine, tracks, wheels, you name it.
2.9 Solo, Duo, or Trio?
Section titled “2.9 Solo, Duo, or Trio?”To duo or not to duo, that is the question. Update 10 has changed the mechanics of tanking by increasing the time it takes to switch seats as well as get into a tank. Now, it depends on the class of your tank (4 seconds for light tanks and recon vehicles, 5 seconds for mediums, 6 seconds for heavies, and half of those values to get in and out of the tanks). Because of this change, the previous meta of only needing 2 players per tank is not viable any longer except in niche cases. The switch seat time, especially in a heavy, is way too long to be able to react to threats or perform well in a tank. For this reason, solo tanks are completely dead (there is no scenario where you aren’t wasting fuel and manpower by taking a solo tank) while duo tanks are very situational. Even if you know that you will be sitting in a static spot for a very long time and you have friendly infantry support, you still can’t really get away with a duo. This is because in Update 12, taking a static position is how you get a precision strike to land right on top of you, and since you are a duo, you most likely aren’t going to be in a position to dodge it. In most situations, you need to be able to immediately turn or react to enemy AT or tank engagements, and you simply cannot do that while in a duo tank. When you’re clinching those cheeks, every second counts, so trios are the only way to go.
2.10 The Achilles Heel
Section titled “2.10 The Achilles Heel”With the addition of the engine compartment to the game in Update 10, a new opportunity to disable the engines of tanks has been discovered. Using the better track hitboxes introduced in the update, you can now shoot through gaps in the tracks and damage the engine on every tank without having to see its rear.
Here’s how the shot works: at any angle ranging from directly perpendicular to the side to directly perpendicular to the rear, medium and heavy tanks can shoot the tracks in specific spots—outlined further in this section—to damage both the module they are hitting (track module if hitting tracks or hull if hitting between the tracks) and engine at the same time (Figure 21). If you try this shot even 1 degree more towards the front of the tank than the rear of the tank (i.e. 1 degree outside of the angles outlined in Figure 21), you will not be able to penetrate the engine block, even if you shoot the exact same areas. Evidently the developers have implemented this as a way to prevent engine damage bugs from the front.
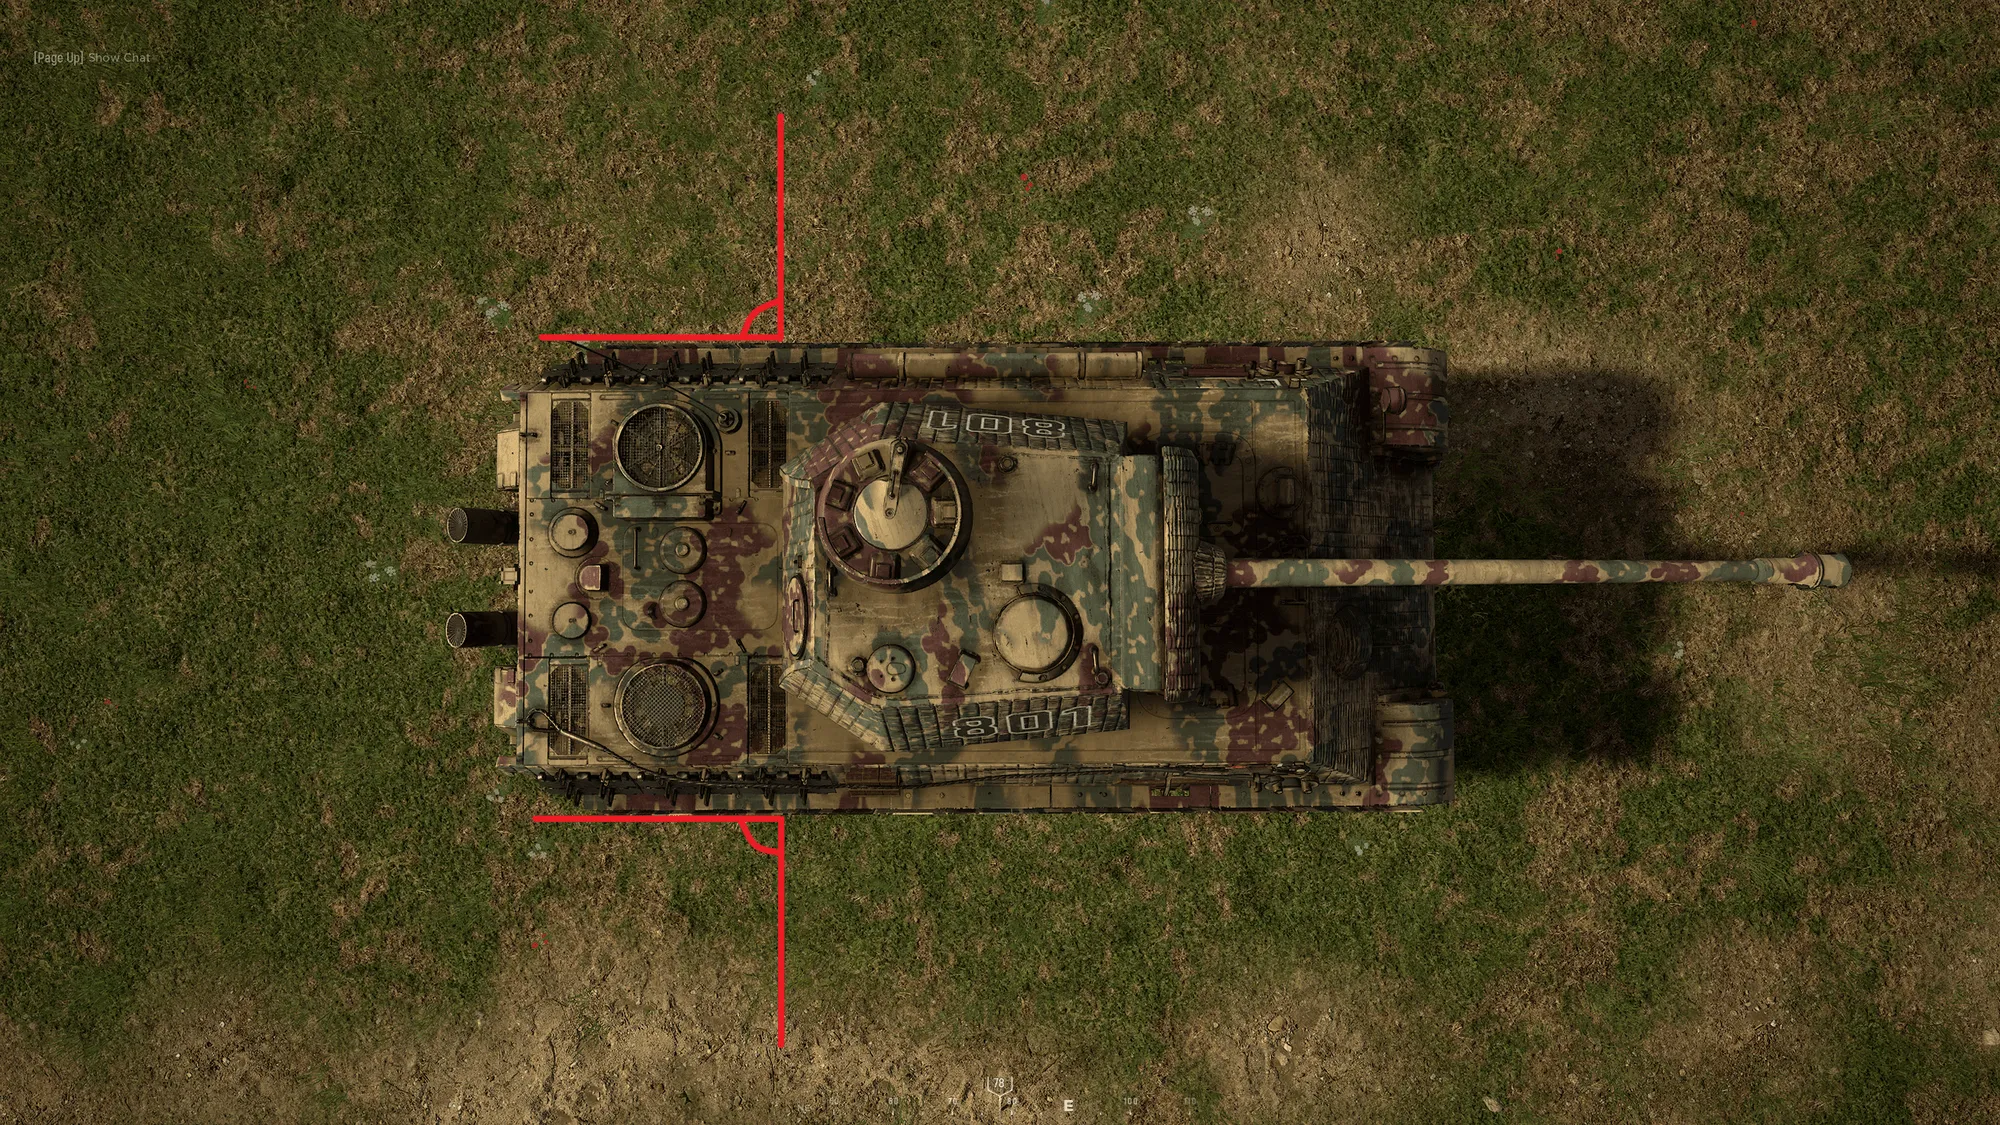
Figure 21: “Angles for the Achilles Heel”
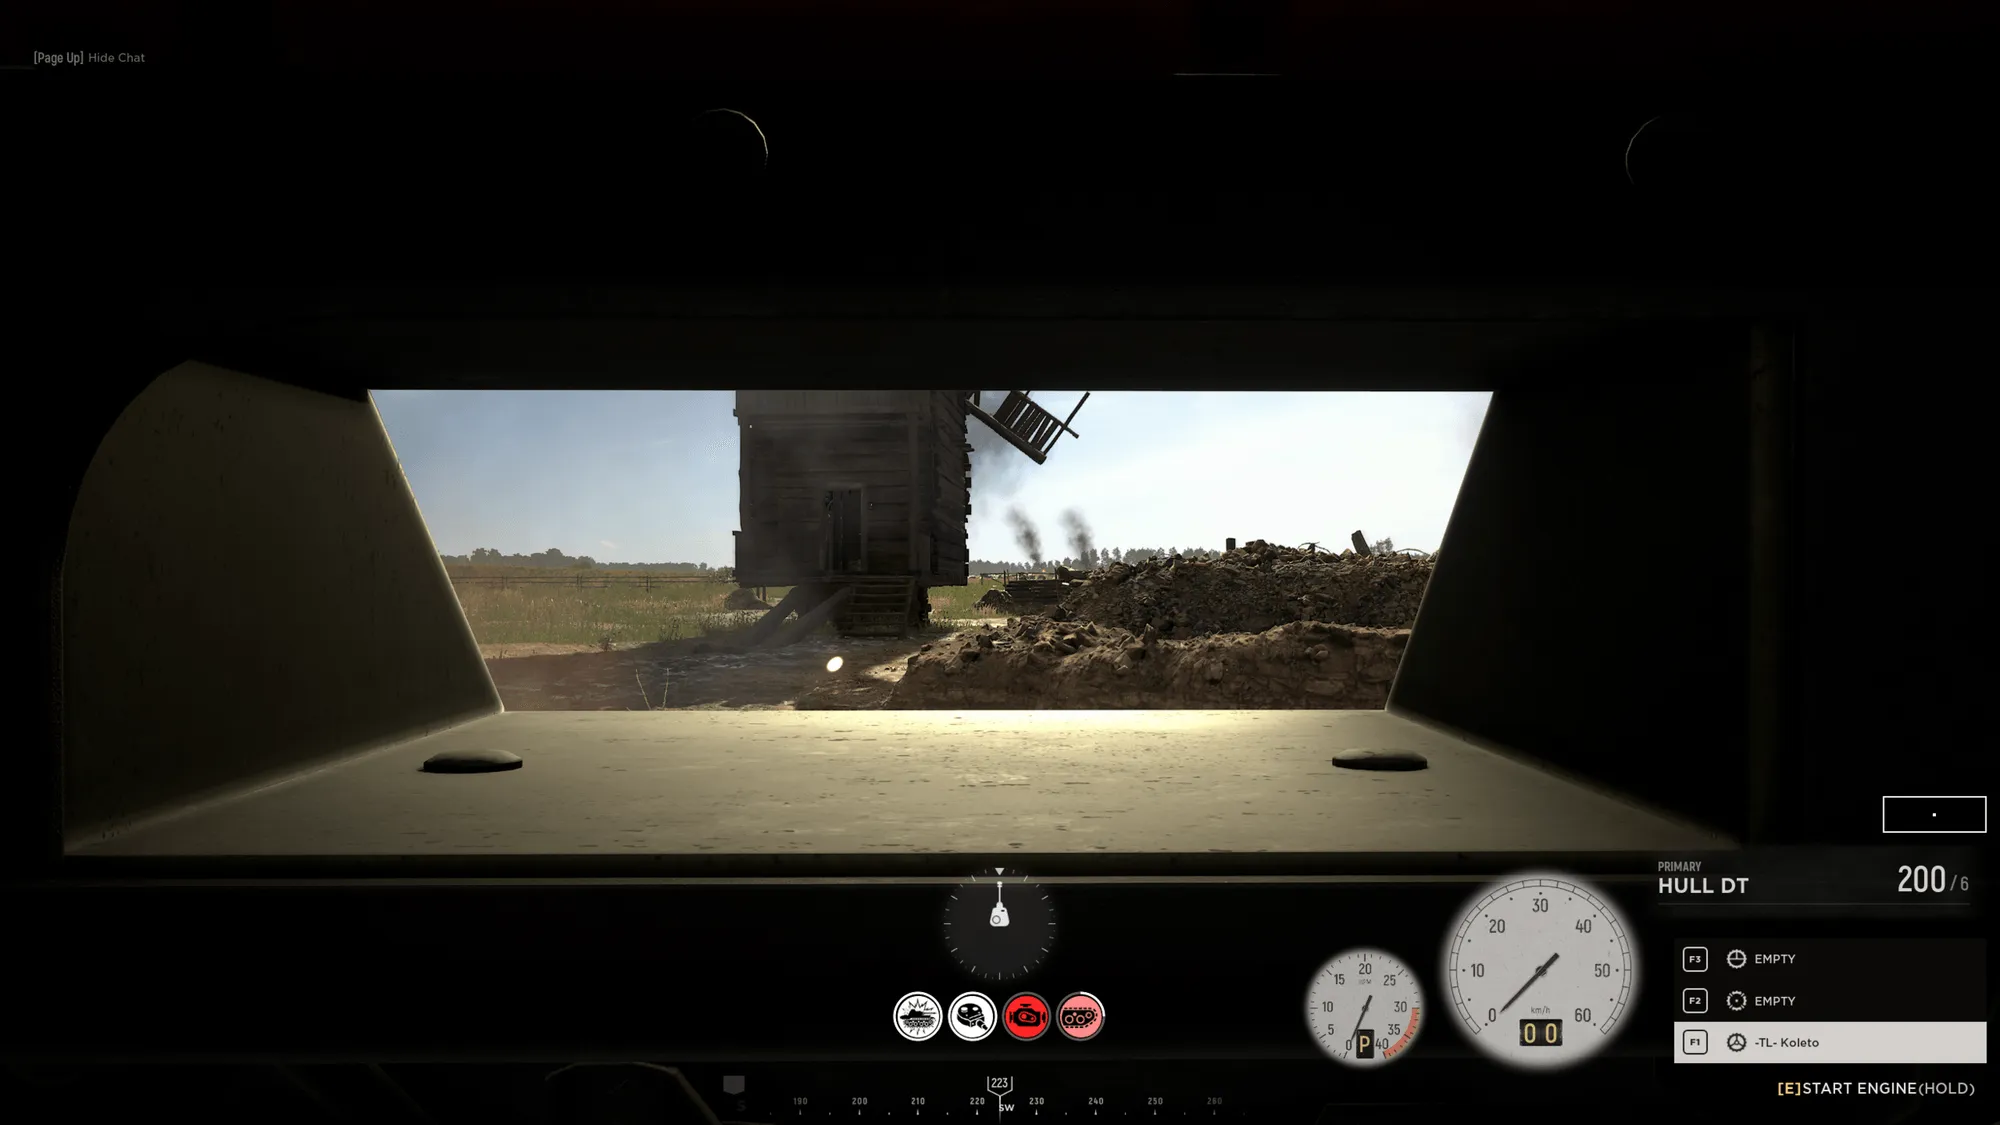
Figure 22: “Achilles Heel from Victim’s Perspective”

Figure 23: “Achilles Heel Breakdown”
Green - Deals track and engine damage
Red - Deals hull and engine damage
-
Panzer IV
-
Sherman medium
-
T-34/76
-
Tiger
-
Sherman “Jumbo” 75mm and 76mm
-
IS-1
-
Panther
*See Figure 22 for the correct angles.
**This shot can only be performed using AP ammunition.
***See individual AT and tank sections for what can pierce side armor.
As you can see, every tank is a little different, but there are a few general rules of thumb: (1) aim for the top corner of the last cog if you want to penetrate tracks and engine (except on the Panzer IV and Sherman medium), and (2) aim for between the first and second cog to hit the side plate and the engine (again, except for the Panzer IV and Sherman medium).
The Tiger and Panther are a little different from the rest, because they do not have gaps in their tracks but rather overlapping track wheels. The Panzer IV, the Panther and the Tiger also have a very large space above the tracks and below the side armor (which is covered up with a side skirt on the Tiger and Panther), making this shot a lot easier to land on German tanks. If you want to hit the “sweet spot” to damage the hull of a German tank, simply aim at the side skirt above the track but below the side.
The engine compartment is actually a hitbox located somewhere inside the rear of the tank chassis. As a result, this shot can be very finicky depending on the angle. If you are nearly perpendicular with respect to the side plate, the diagrams above provide a very accurate representation of what it looks like to hit the engine compartment. When you introduce a more significant angle, however, you can run into problems where the shell misses the engine compartment even though you technically hit the correct area on the track or between the track. If you are at a significant angle with respect to the Achilles Heel shot, you should consider adjusting a bit and hitting the rear instead.
In Update 10, every single tank, including recon vehicles and light tanks, as well as all forms of AT, from rifles to guns to rockets, were able to penetrate the green sections in Figure 23 and do engine damage. This is no longer the case in Update 12. Now, only tanks and AT guns/rockets that have enough penetrating power to deal damage to the side can take advantage of this shot. This means that AT guns, medium and heavy tanks, and the “Panzerschreck” are the only things that can utilize the Achilles Heel.
So what is the purpose of a shot like this? When would you actually use it in a real game? There are 3 scenarios where this might be useful:
-
German AT rocketeers can take advantage of the Achilles Heel to perform better flanks on larger tanks. The reasoning behind this is that AT players can now be dangerous in a much wider area of operation since they can completely immobilize a tank by killing its engine without ever needing to see the rear of that tank, and do so from a relatively safer position. After the enemy tank is immobilized it becomes a sitting duck, allowing your teammate tankers and AT personnel to finish it off.
-
Medium tanks who find themselves at the correct angle to hit this shot on an enemy tank can immobilize that tank in one shot, thereby securing the kill. This is especially useful against heavies such as the Sherman “Jumbo” 76mm, who can turn fast enough to deny a second shot (and ensure your swift death) if the crews manning them are skilled. It isn’t uncommon in an average game for conditions to be just right for the Achilles Heel, especially in a medium tank, so ensuring you capitalize on your advantage by taking out the engine instead of just hitting the side armor is crucial.
-
Heavy tanks, especially the “Jumbo” 76mm, who find themselves at the correct angle to hit this shot on an enemy heavy tank can immobilize that tank in one shot, thereby securing the kill without taking any damage in the process. Stopping to repair can have consequences for any tank, especially if you are flanking, so not taking damage and securing the kill is the best possible scenario.
There is no doubt this shot is situational, and players may opt to ignore it entirely in favor of less difficult shots, but the knowledge and execution of it is one thing that differentiates good tank crews from the best tank crews.